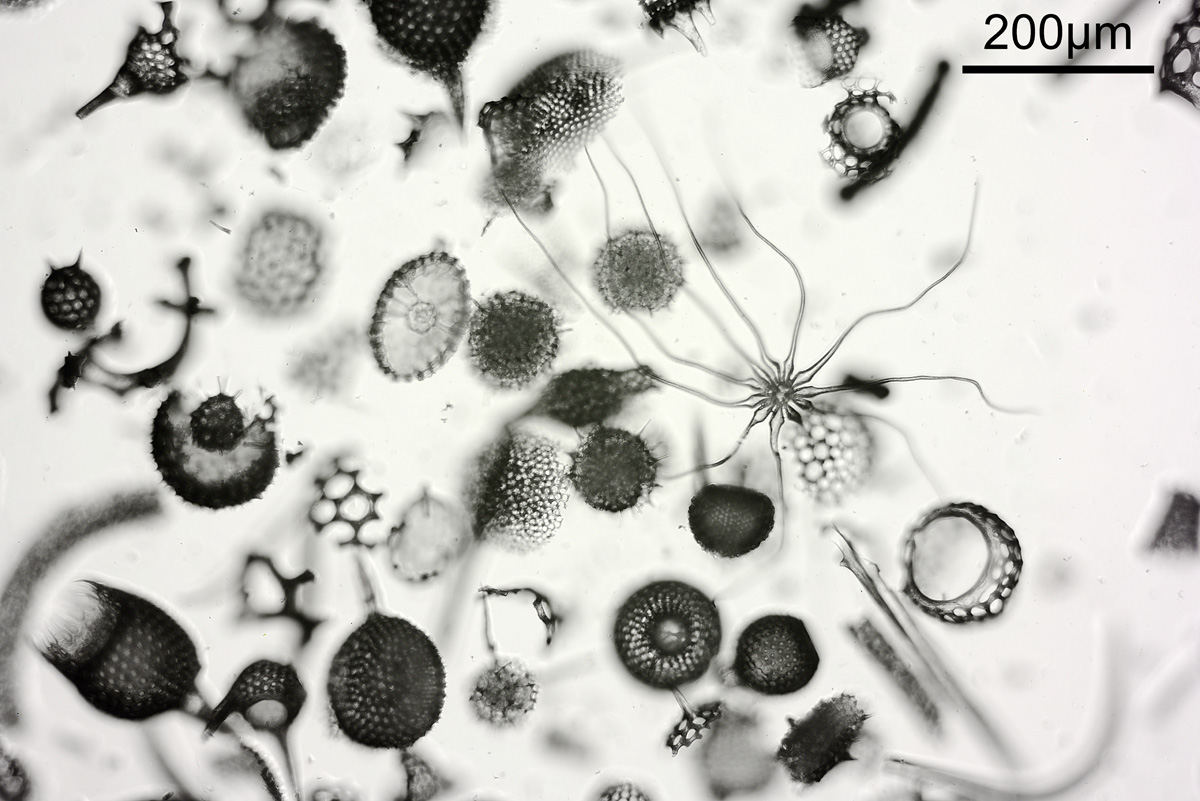
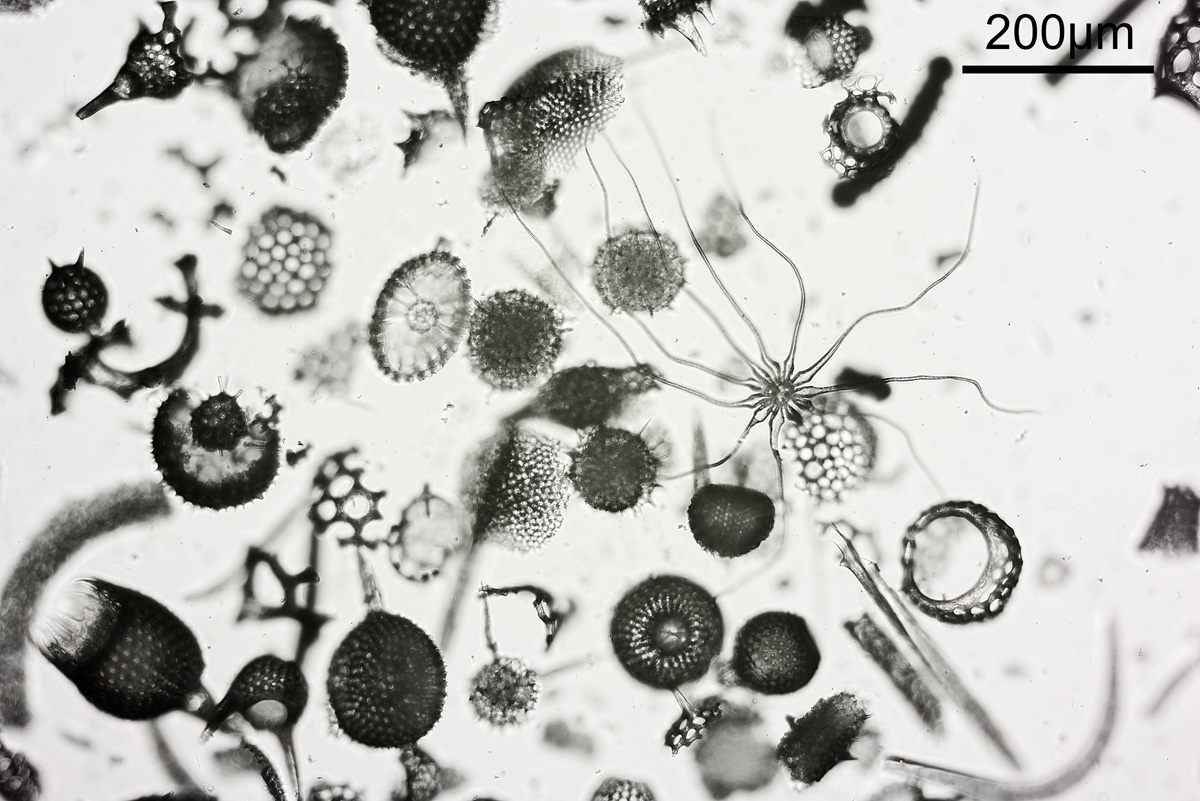
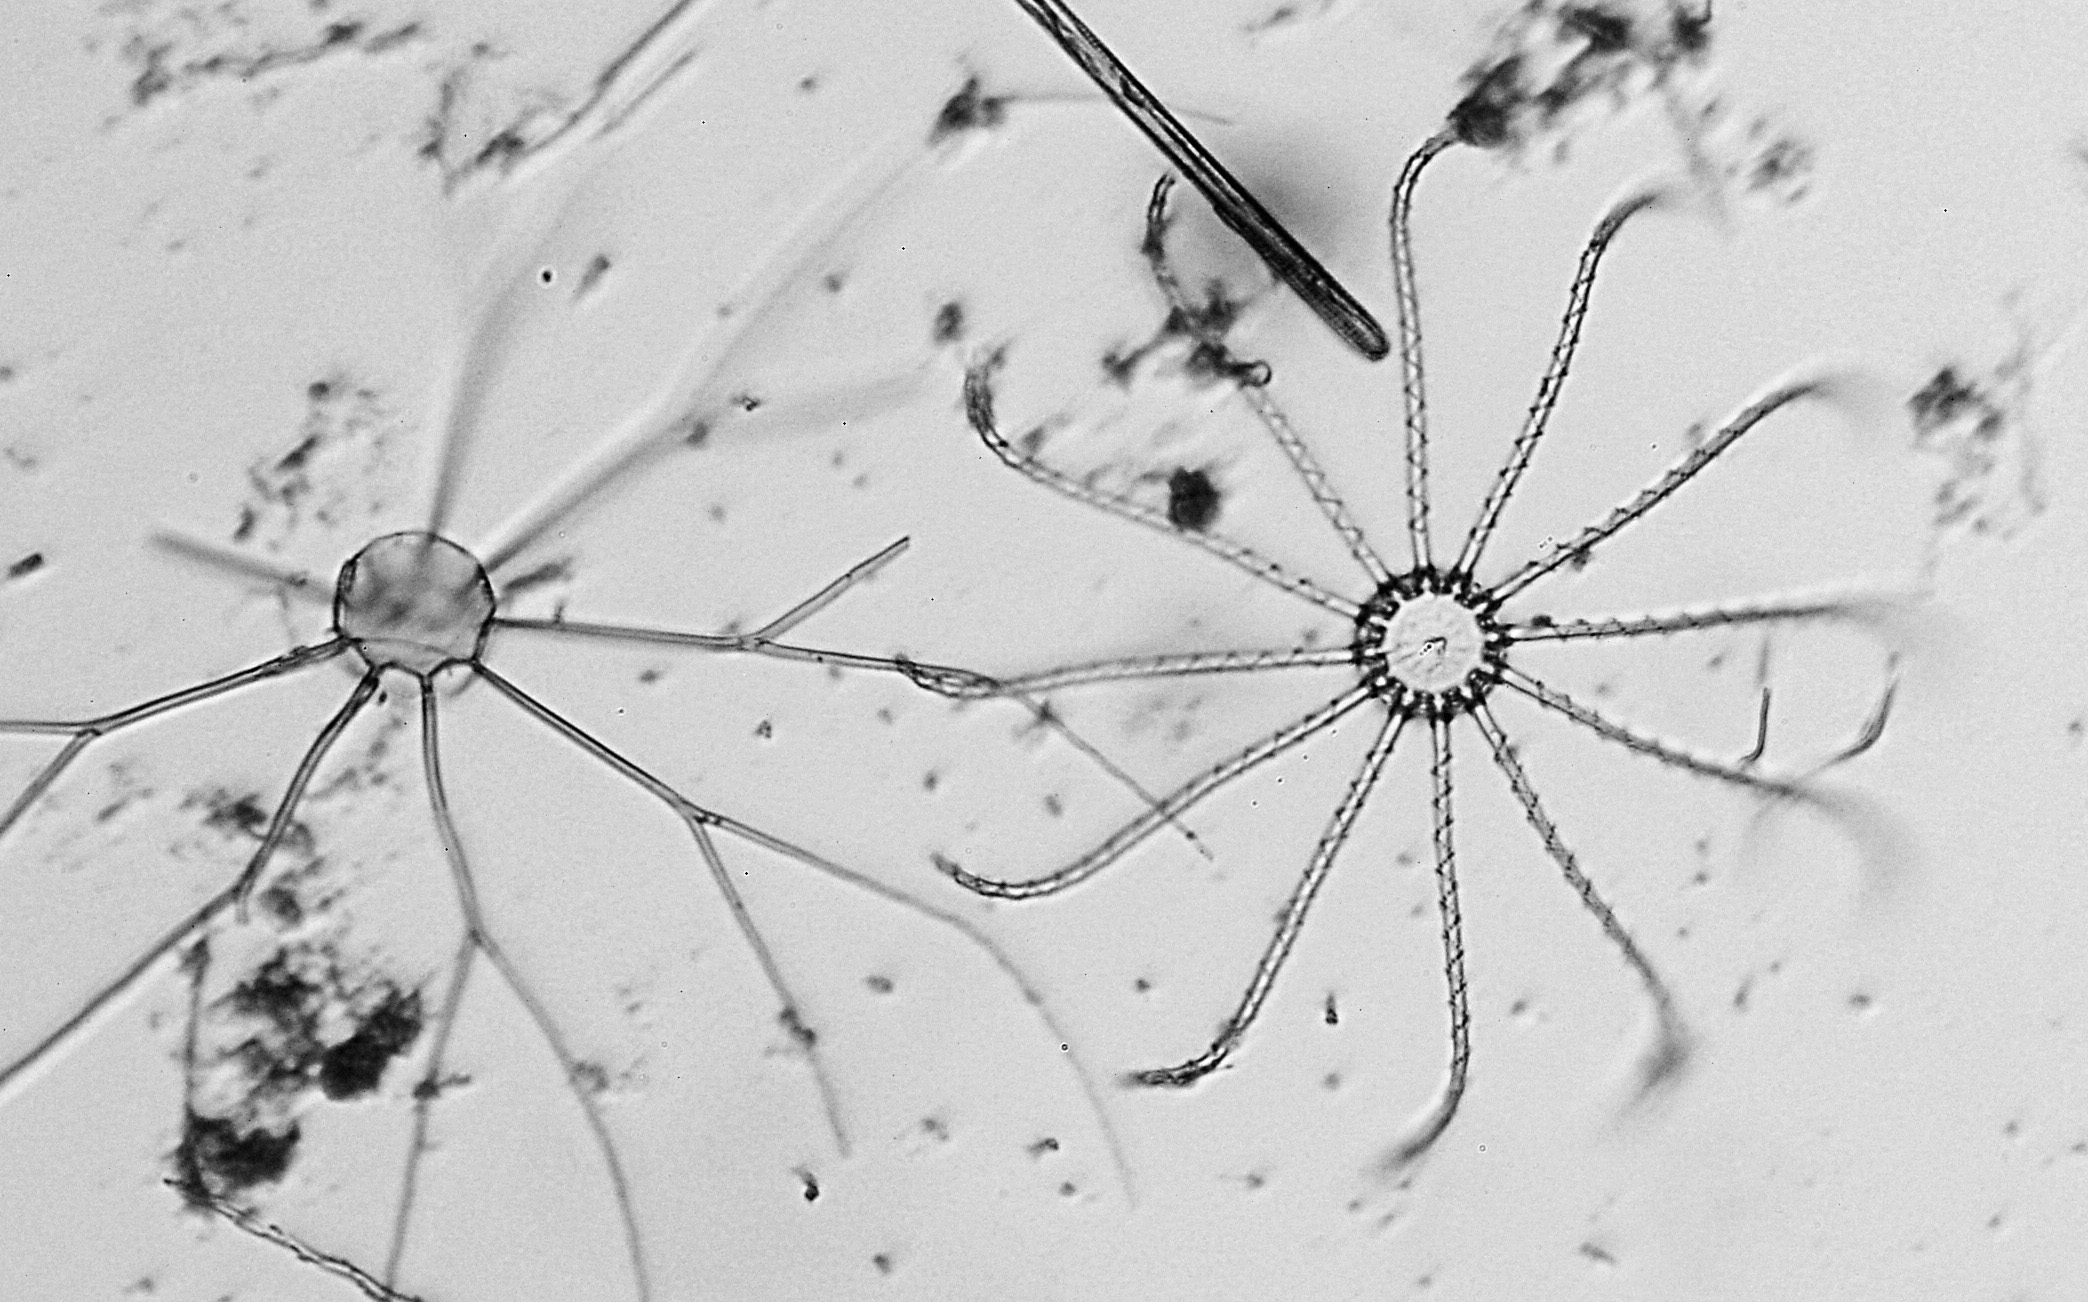
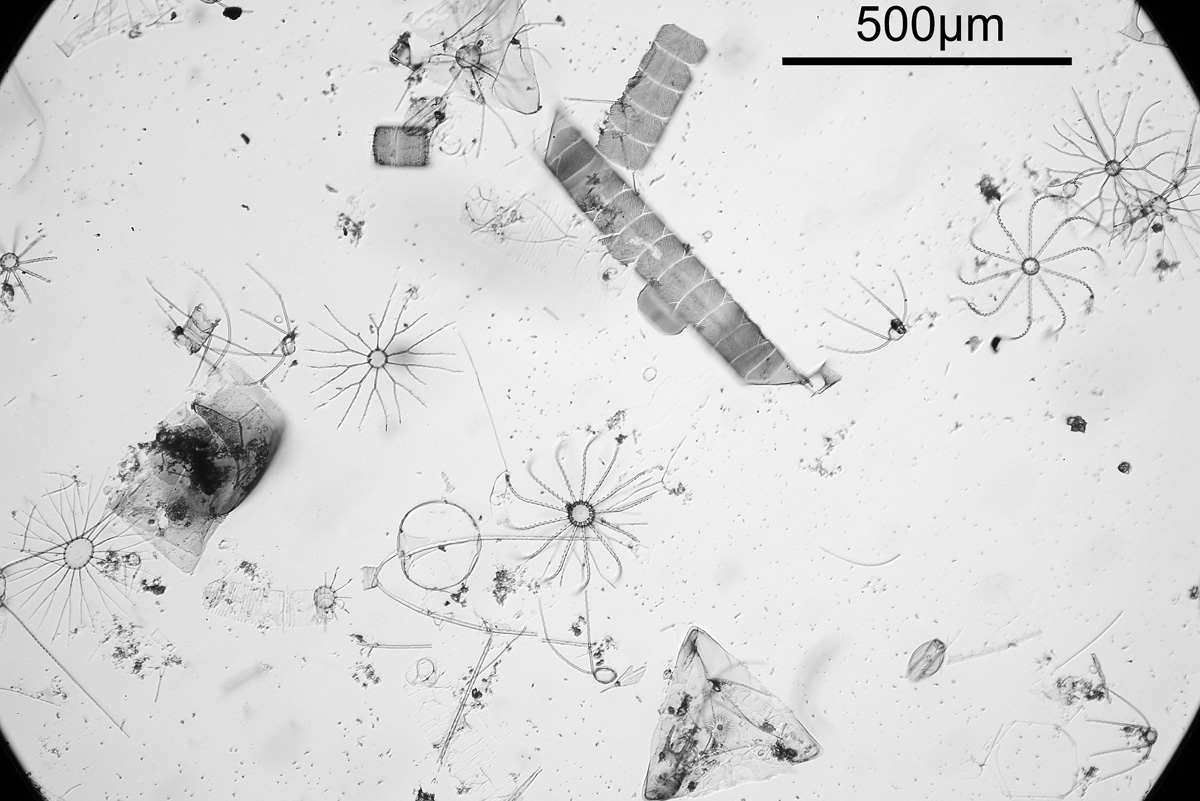
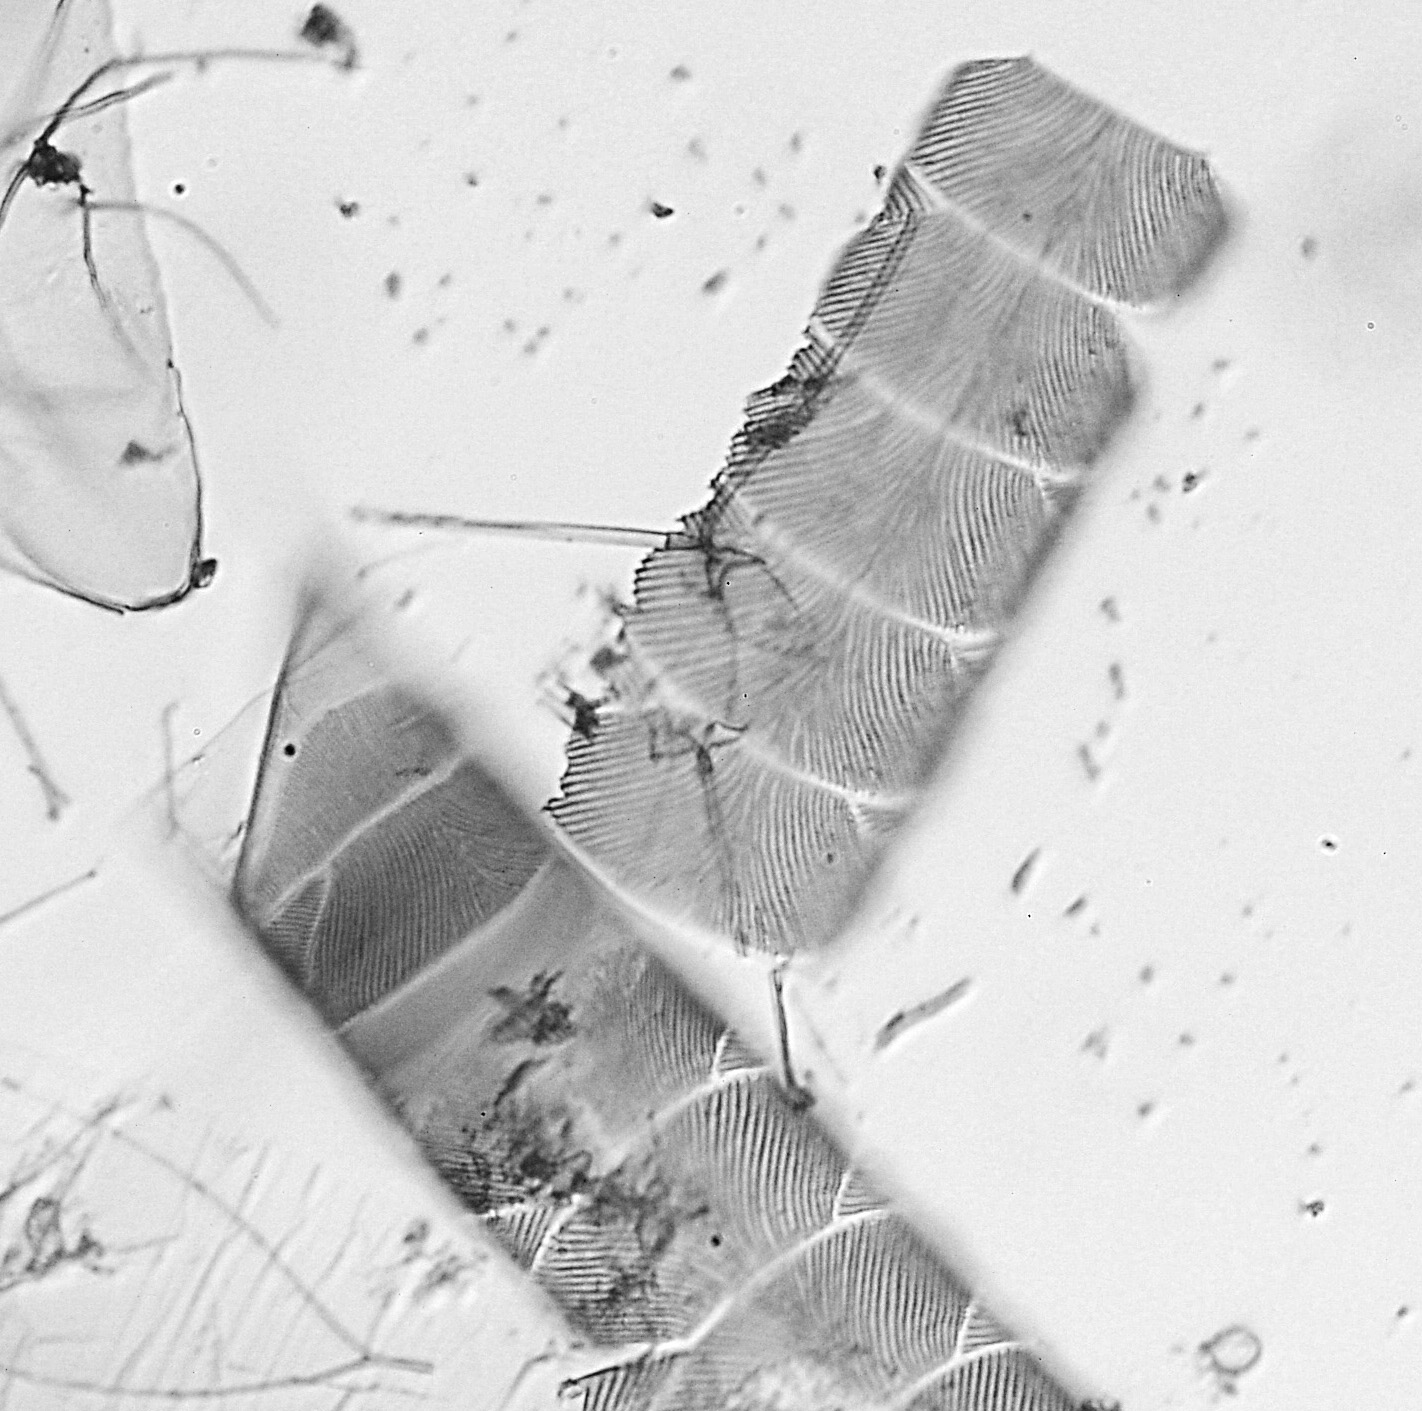
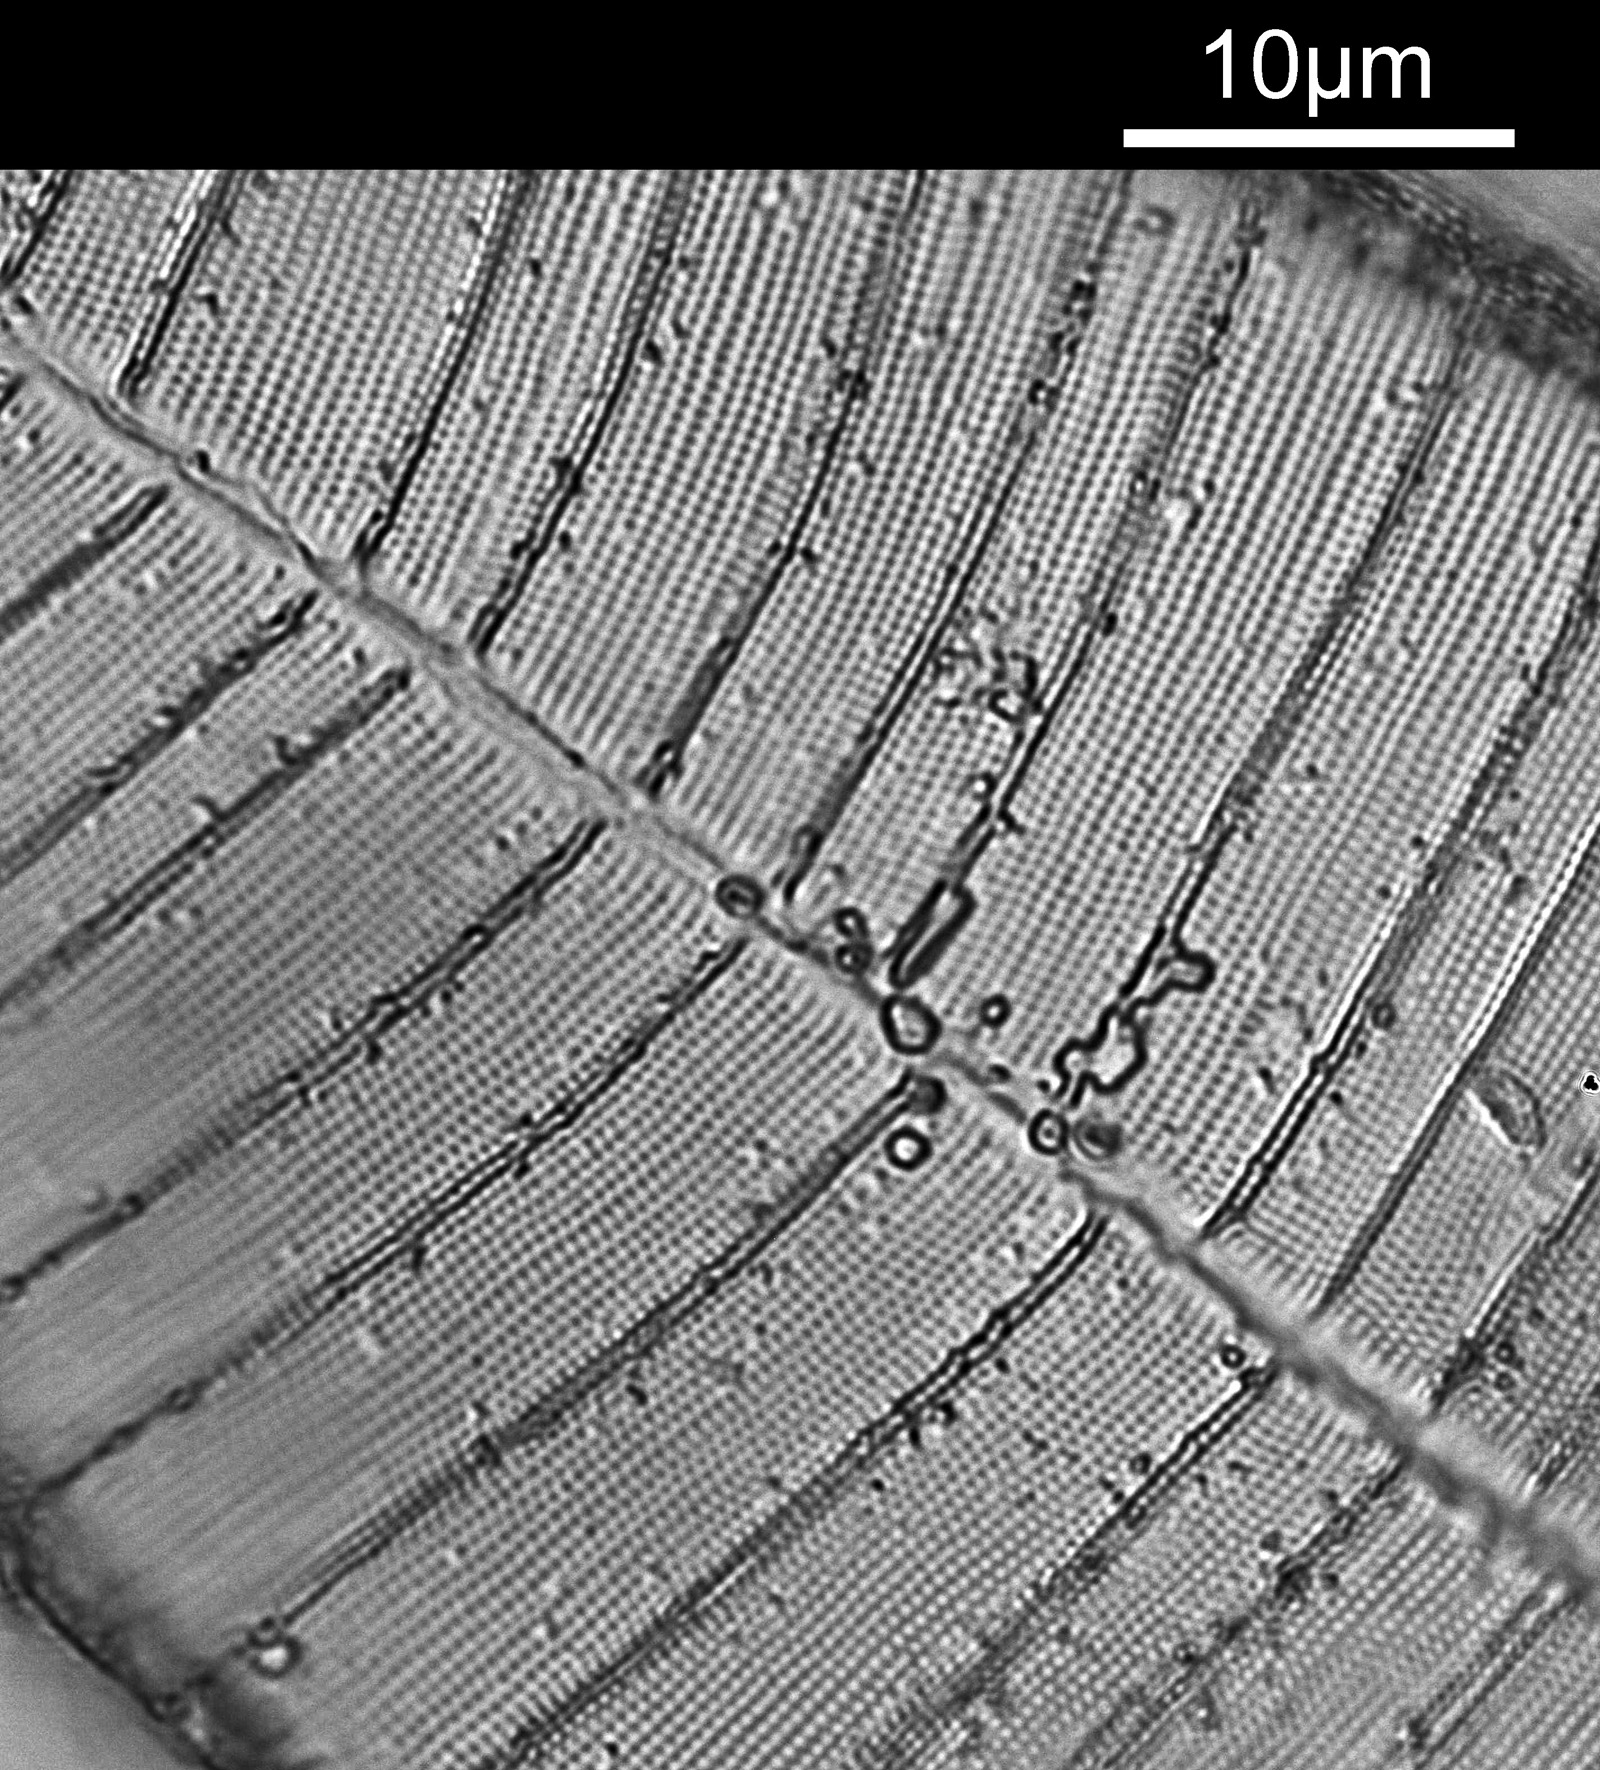
I’ve been busy with work, but last night took a break to look at a microscope slide which arrived recently. It was described as a ‘Polycistina’ slide from Barbados and it had an unusual feature on it.
Here’s a couple of pictures of the slide taken using different iris settings on the condenser.
Polycistina slide, condenser iris setting 0.4 – shallow depth of fieldPolycistina slide, condenser iris setting 0.2 – greater depth of field
The unusual feature is the one with tendrils, and it has been mentioned that this could be a plant trichome. In the images above, there were two settings used for the condenser iris – the first one was open to NA 0.4, and the second one it was closed down to about 0.2. Everything else was the same between the two images (Nikon d800 monochrome camera, 10x Olympus UVFL NA 0.4 objective, white LED light) although exposure time was increased for the smaller iris aperture. This shows the effect that iris aperture setting can have on depth of field in an image. Closing down the aperture too far though can be a bad thing due to diffraction starting to occur, and also a shallow depth of field helps emphasize the subject. As with many things in life choosing what looks right is a balancing act.
The sample is quite thick, and as the stage was moved up and down different parts of the image came in and out of focus. This can be seen in the video below where the stage was gradually moved up.
It was actually quite interesting to view the slide using a low magnification (4x) objective. The sample was so thick that slight movement of my eyes when looking at it through the eyepieces gave a ‘3D’ image as the features moved differently depending on their depth in the slide.
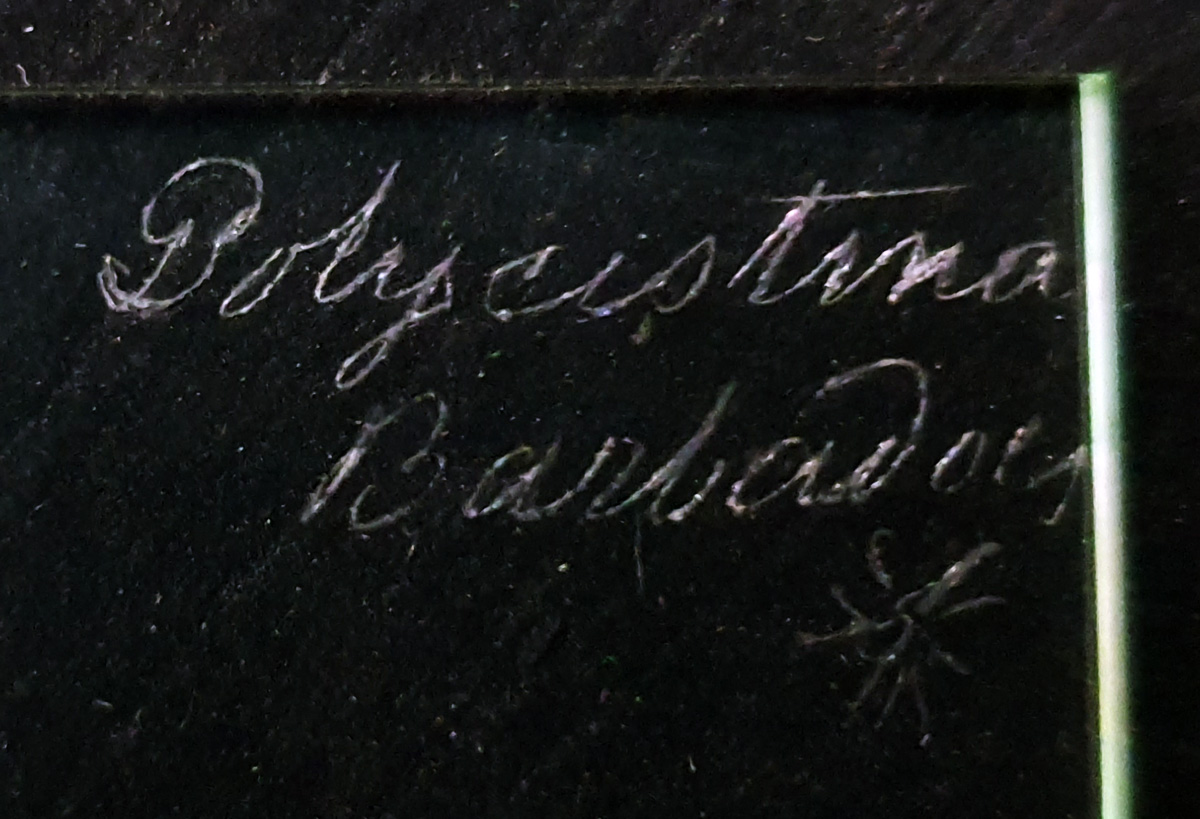
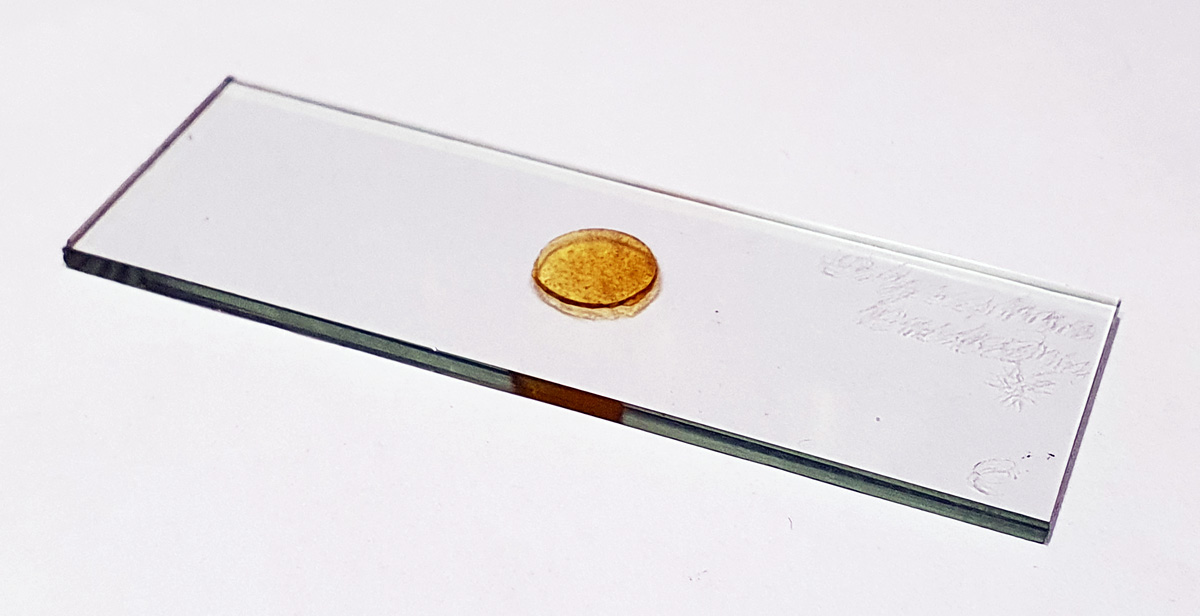
The slide itself is interesting and the maker even engraved the shape of the unusual feature onto the slide. Unfortunately there is no makers name. The slide itself is very thick.
Label on the slide, showing the ‘feature’ at the bottom rightThe sampleThe slide
Microscopy continues to fascinate me, providing a window in to the wonderful world of the tiny and the amazing structures that nature can produce. As always, thanks for reading, and if you’d like to know more about this or any other aspect of my work I can be reached here.
‘Life is not an exact science, it is an art’. A quote by Samuel Butler, and much as though the scientist in me would like to control every aspect of my life and my work, it does not always work out like that. Sometimes we cannot rely on science alone and must resort to gut feelings based on experience and understanding of the problem. In building my UV microscope there have been many challenges – the optics can’t be made of glass, the camera sensitivity needs to be increased, and what to do about the lighting? Having dealt with the optics and the camera, the lighting has been an issue for me lately. At 313nm and 365nm, a mercury xenon lamp is a good option. Nice strong emission lines and focussable. Below 300nm things get tricky. I did build a 254nm source using a low pressure mercury lamp, and that did enable me to get some images with the microscope, but it has it’s challenges. While it has a nice sharp line at 254nm, it does still require filtering to remove other emission lines, and while the efficiency is high for producing UV the overall power is low. Also it emits light 360 degrees, so I can only harness a fraction of what it produces. What I needed was a better light, and this is something that has kept me awake at night for quite a while. In the end I settled on a deuterium light source. Plenty of UV, especially in the 200-300nm range, which was just what I needed, along with relatively little visible and IR light. However what I couldn’t find was a direct comparison with the little 3W low pressure mercury lamp I had. In the end I just had to jump in based on a best estimate and a gut feeling.
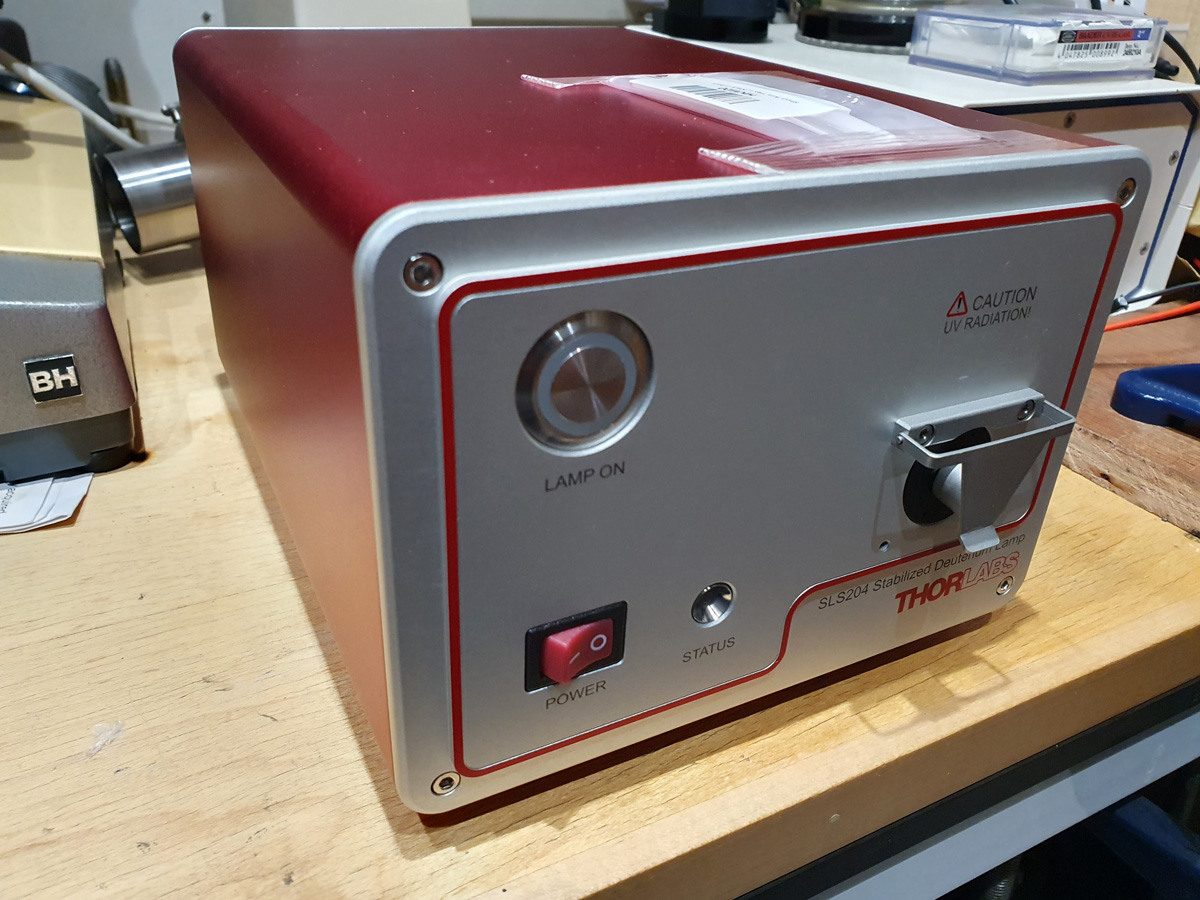
The light source I went for was a Thorlabs SLS204 deuterium lamp. The main reason for this being that the fiber port could be removed, and there was a SM1 thread present to allow me to easily attach things like condenser lenses and other optics to focus the beam. Here’s the light source.
Thorlabs SLS204 deuterium light
The fiber port where the light comes out is underneath the protective cover on the right hand side. The cover, and the black circular part which holds the fiber port underneath can be removed to reveal the deuterium lamp and that is where condenser lenses and other optics can be attached. That is a big tick Thorlabs. Couple of things are not big ticks though. The tool to remove that black circular piece is not included with the light, so I’ll need to order that separately (and pay for more postage, grrrr). Also there is no internal shutter for the light, unlike on my Ocean Insight one. As such when the deuterium lamp is on and with the safety cover removed, there is nothing to block light coming from the lamp housing. This could be a safety issue for my application, and as such I’ll need some form of manual shutter or at least an iris to reduce the output. Not ideal.
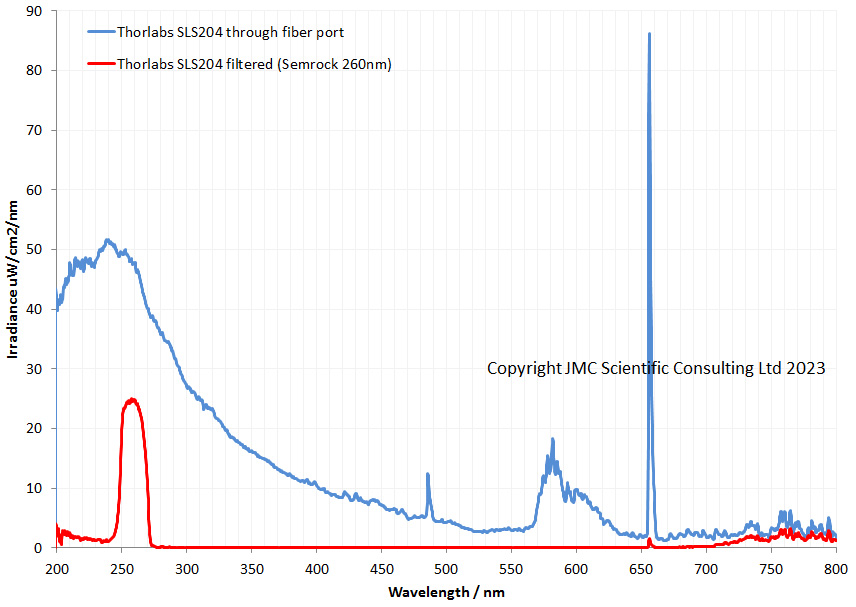
Enough of my moaning. How does the output spectrum look? As a first look I just put the fiber (with a cosine corrector) from the Ocean Insight FX spectrometer up against the output port of the light. I then also put a Semrock 260nm brightline filter in place, as this blocks most of the visible and even some of the IR to get an idea of how effective it would be. These were the spectra produced.
The light produces the as expected profile for a deuterium lamp. Lost of UV and a strong line in the visible at about 655nm. The Semrock filter does a good job of removing the long wavelength UV and a lot of the visible up to about 700nm but after that doesn’t offer any additional blocking. Will this be good enough on it’s own? I am not sure about that, and that remains to be seen. The good thing is that it lets plenty of light through in the 250-270nm region, and is not a line spectrum like the low pressure mercury lamp. This should help with its use as a source for microscopy.
Is the deuterium lamp the perfect solution? Well, no, unfortunately not. It still requires filtering, and it is not as intense as a low pressure mercury light. However it offers a continuous spectrum with plenty of light in the 250-300nm region and as such is worth exploring, despite the hefty price tag. The next step is to get a condenser lens in there and build an adapter to fit my microscope. The light also might be useful for UV photography in the 200-300nm region, so that is something else to think about in the future.
Science doesn’t always go to plan, and at some point many of us are faced with making decisions based on our best estimates. While this is scary, it is part of science, and is something which needs to be dealt with if you want to make new discoveries. If we knew all the answers there would be no new discoveries. Thanks as always for reading, and if you’d like to know more about this or any other aspect of my work, I can be reached here.
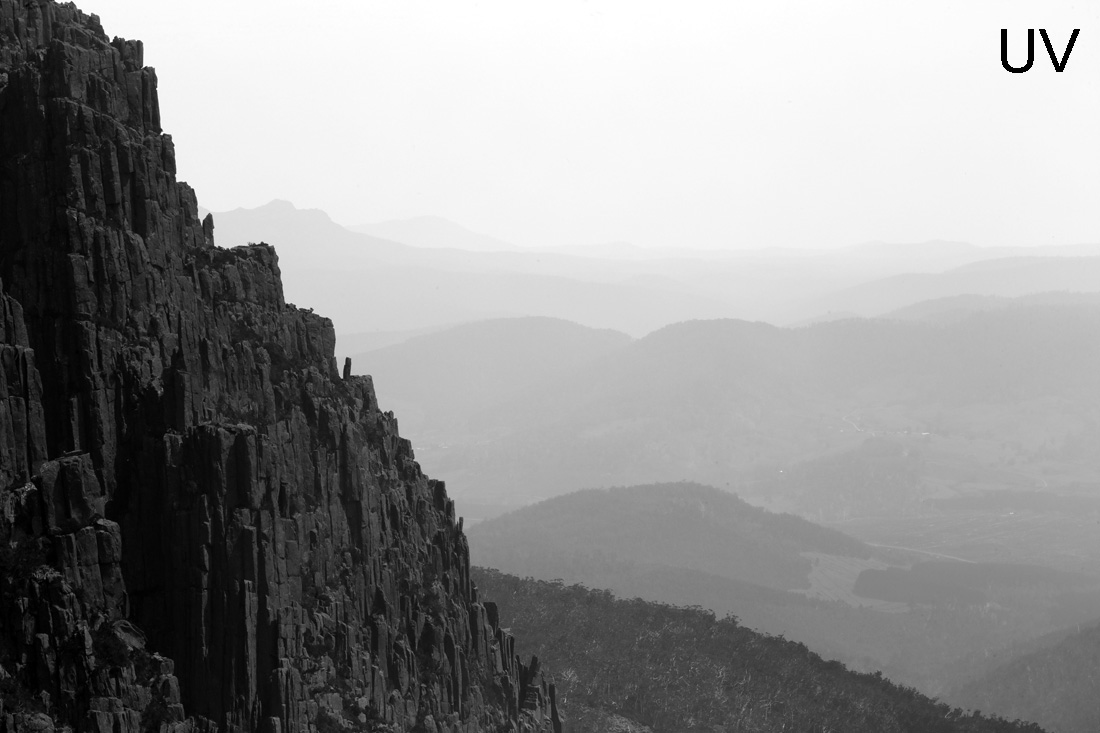
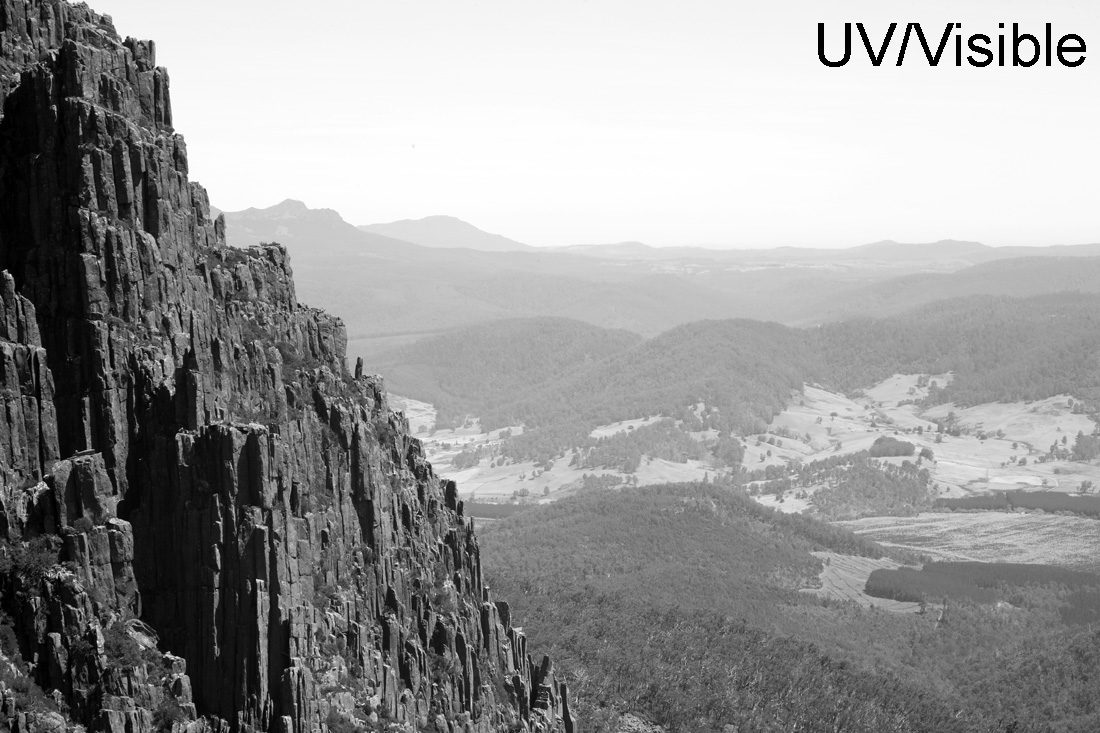
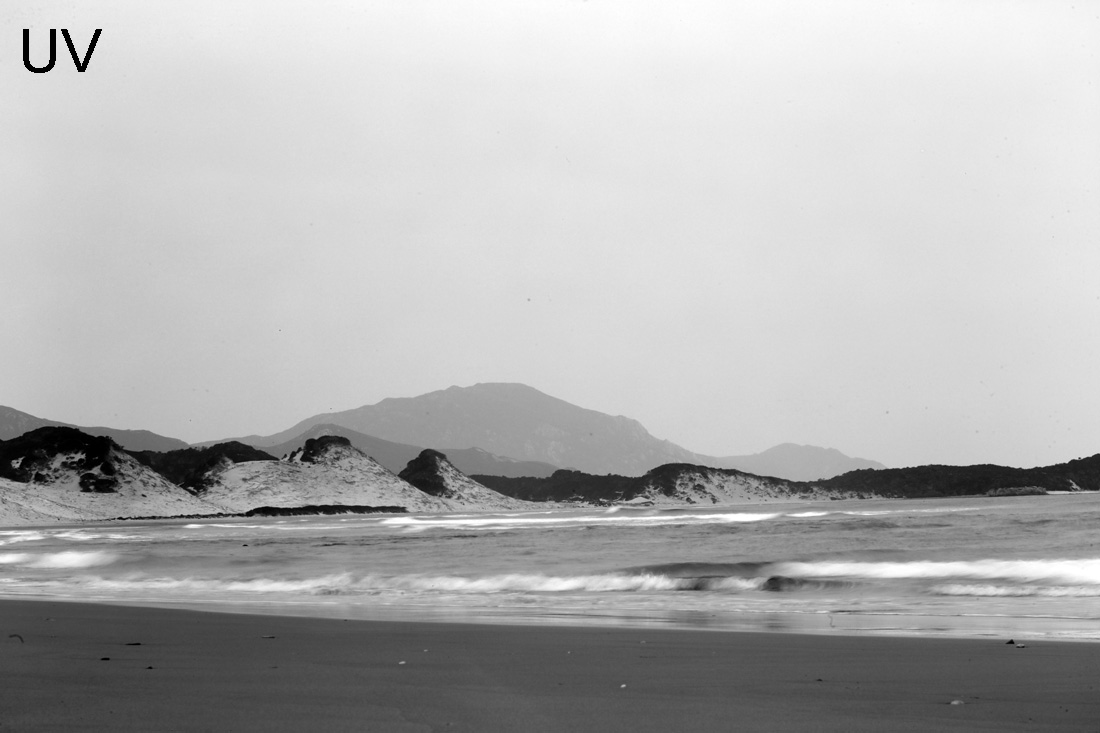
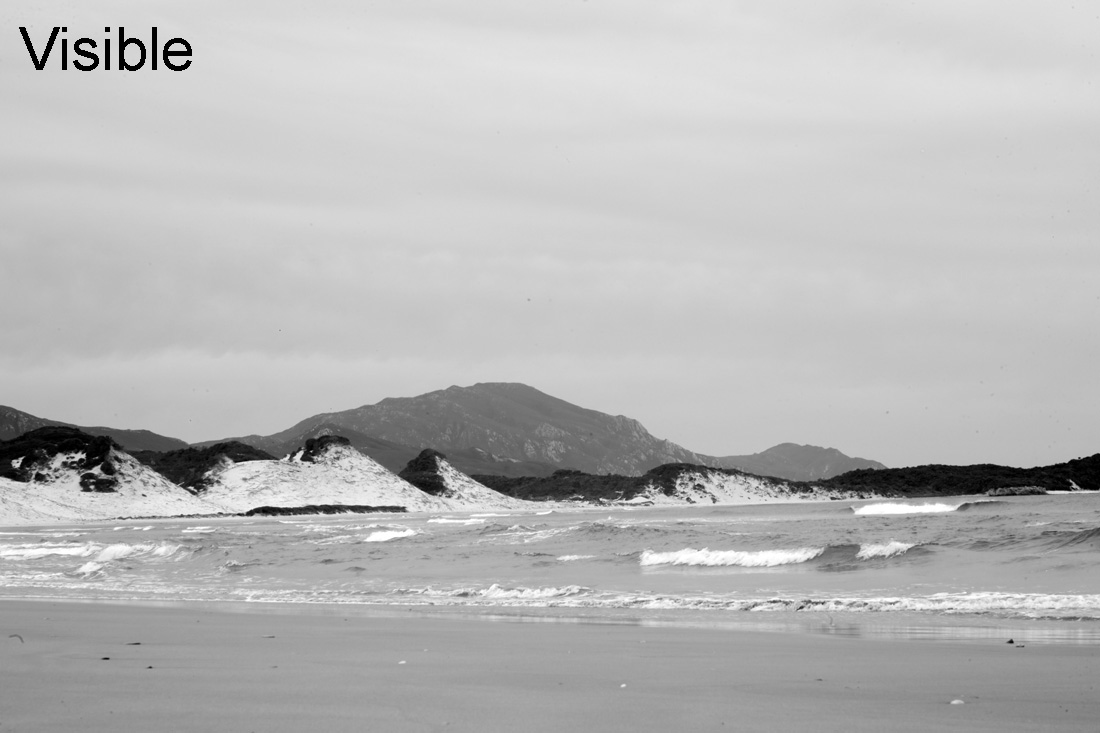
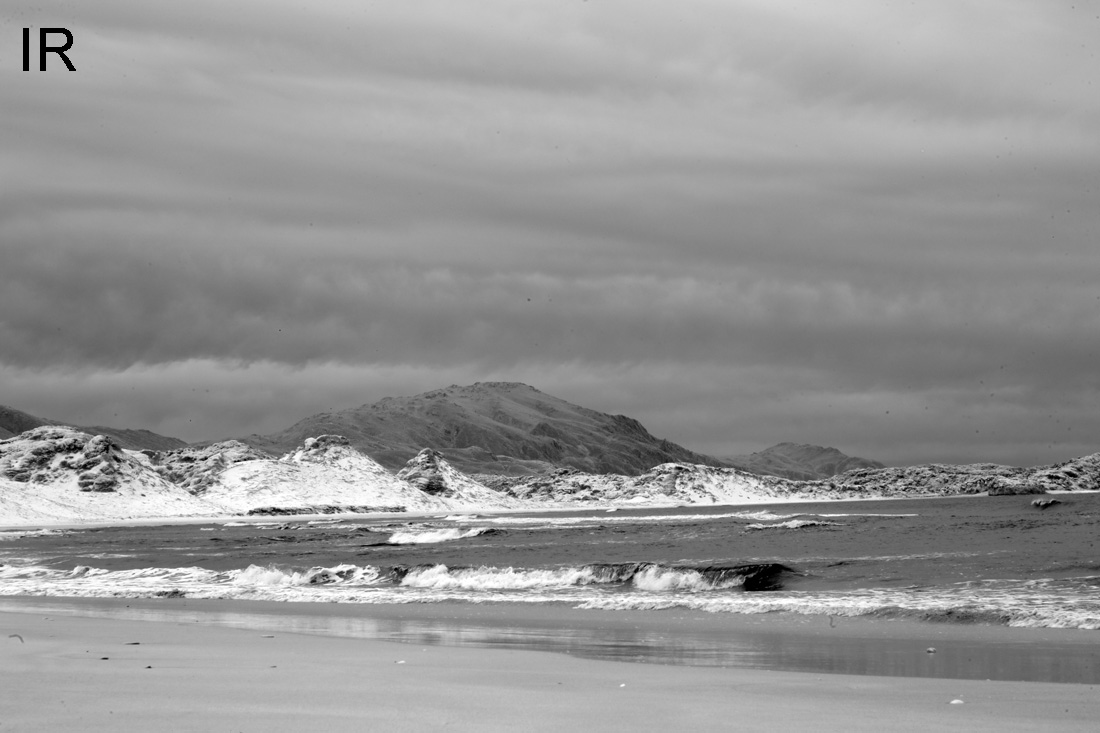
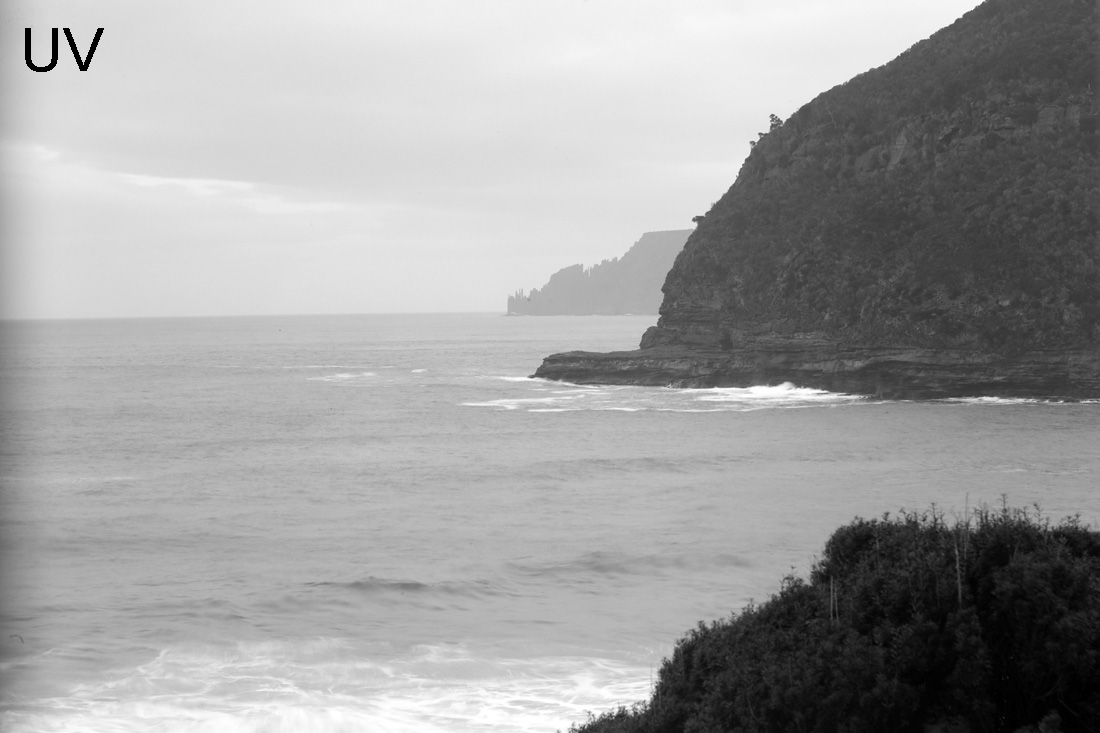
While we are used to seeing the world in the visible spectrum, moving outside of that into either the Ultraviolet (UV) or Infrared (IR) regions can make scenes look very different. During a trip to Tasmania I took one of my multispectral cameras with me to compared some landscape photography in the UV and IR with visible light images, and these are what I am sharing today.
The comparison images are shown in black and white, to remove the issues of whitebalancing non-visible images. A multispectral Canon EOS 5DSR was used along with an 85mm f4.5 Asahi Ultra Achromatic Takumer (which has quartz and calcium fluoride lens elements instead of glass to allow it to transmit UV). The following filters/filter combinations were used in order of increasing wavelength range;
UV – Baader U
UV/Visible – Chinese BG39 2.5mm alone
Visible – Chinese BG39 2.5mm + B+W486
IR – Hoya R72
First set of images – The view from Ben Lomond.
Note that the visible image here is actually UV+visible as the UV portion of the spectrum was not removed by the BG39 filter alone. However the UV contributes relatively little to the image, so the image should be considered as mainly visible light. In UV the haze is emphasized, making the distant landscape blend more into the sky. It also lessens the appearance of clouds making the sky look more homogeneous and giving more of a feeling of distance to the landscape. The contrast between bright sunlight and shadow on the rocks is also reduced and foliage is darkened. Conversely, in the IR image blue sky becomes darkened, foliage almost white, and haze is reduced.
Next area Stephens Bay in the South West National Park, and about as remote as you can get (which is saying something in Tasmania).
It was quite a dull day when we were there, with no blue skies, but the effect of going from UV to Visible (this time a UV blocker was used in combination with the IR blocking filter) to IR can again clearly be seen. As an aside, this is a fascinating area and hugely culturally significant as there are Aboriginal middens along the beach which are full of shells and date back thousands of years.
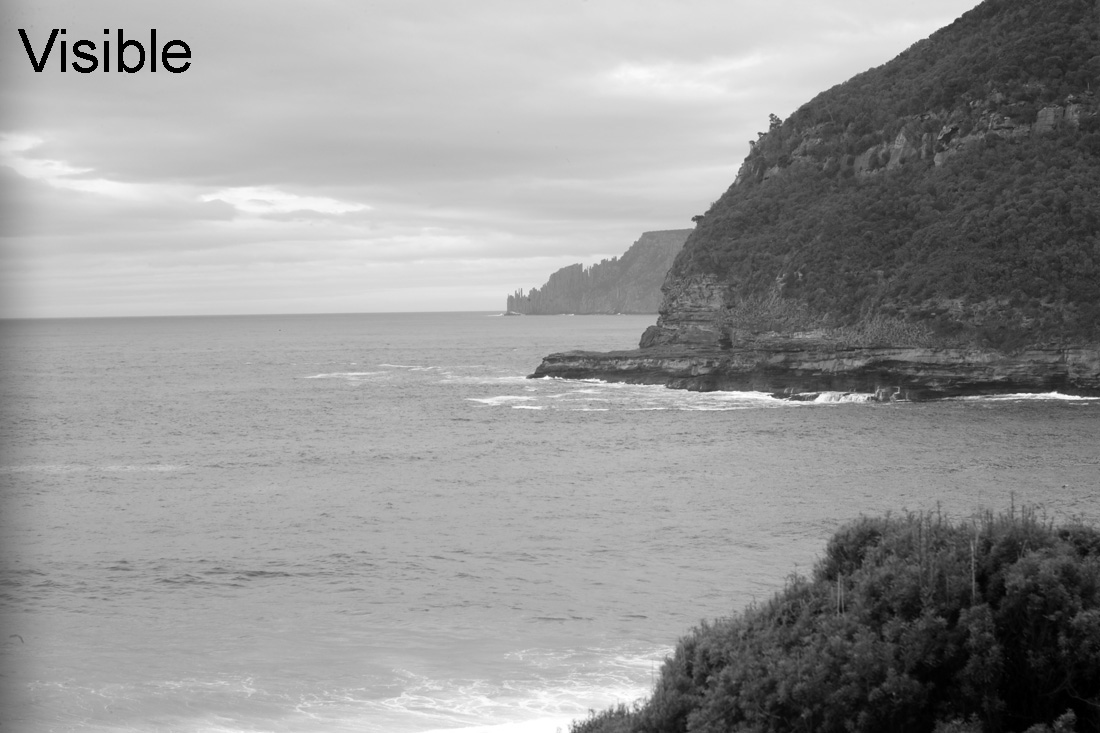
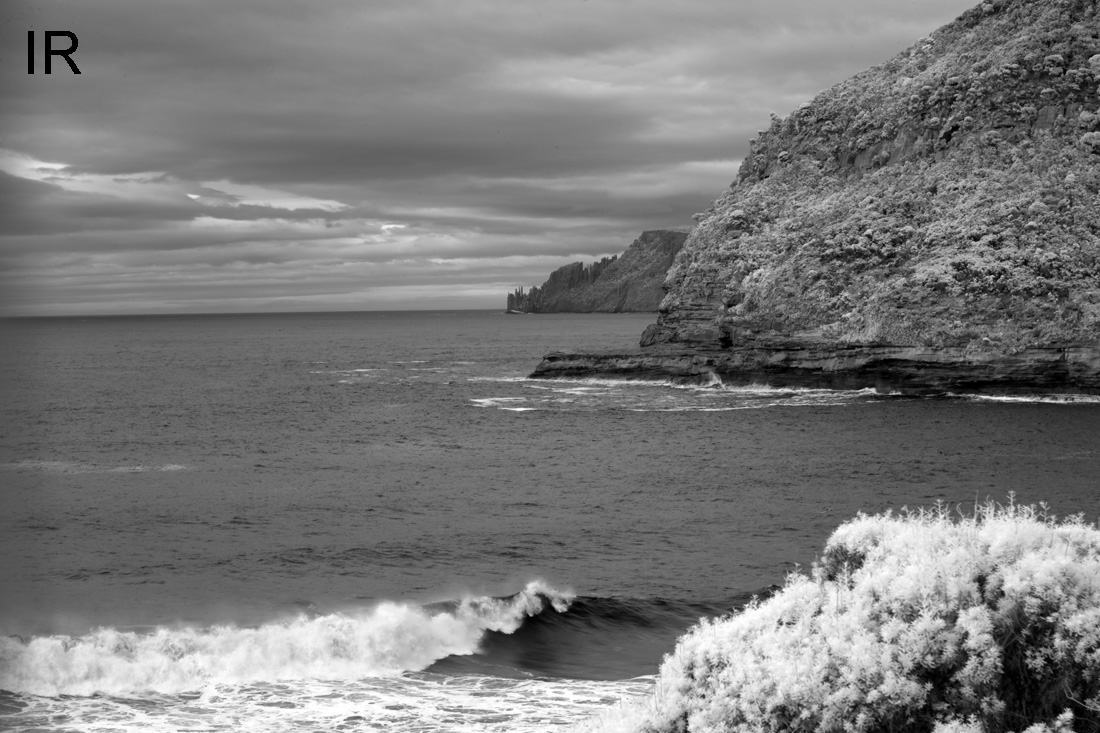
The final area for today’s post, the view to the dolorite spires of Cape Raoul from Maingon Bay Lookout at Remarkable Cave on the Tasman Peninsular.
Again these show the expected behavior going from UV through to IR.
Varying the wavelengths we use for imaging has a huge impact on how a scene is rendered, and this is as applicable to areas such as dermatology and forensics as it is to landscape photography. Thanks for reading and if you’d like to know more about this or other aspects of my work, I can be reached here.
Anyone who has chatted to me will probably have gathered that I have a huge soft spot for Tasmania, as it doesn’t normally take me long to start talking about how amazing it is. In previous visits I have taken my UV camera along to capture some photos there (UV levels are very high in Tasmania which make UV photography easier, but has a nasty habit of burning you if you forget your sunscreen and hat). I’ll share some of the images from these visits in the future as they demonstrate nicely the effects of UV imaging compared with visible light and IR imaging when photographing the landscape. To start things off though, the first post on this topic is something a little different – UV induced fluorescence photography. This uses UV light to illuminate the subject, and the visible light this produces due to fluorescence is then photographed. The subject for this experience was a rock with some of the orange lichen on it. Orange lichen is present across most of Tasmania and makes for striking landscape photos, and it got me wondered what this material looked like under UV induced fluorescence. I am certainly not a lichen expert, so this will concentrate more on the imaging and less of what specifically the lichen is.
The rock itself came from Green Point Beach in the North West of Tasmania (part of the Rocky Cape Group). The rocks on the beach had some damage from regular strong waves, so I picked up a piece a few centimeters across which looked to have recently broken off from the main outcrop. The rocks in this part of Tasmania are old. Very old. They are about a billion years old, and appear to be something like quartz arenite.
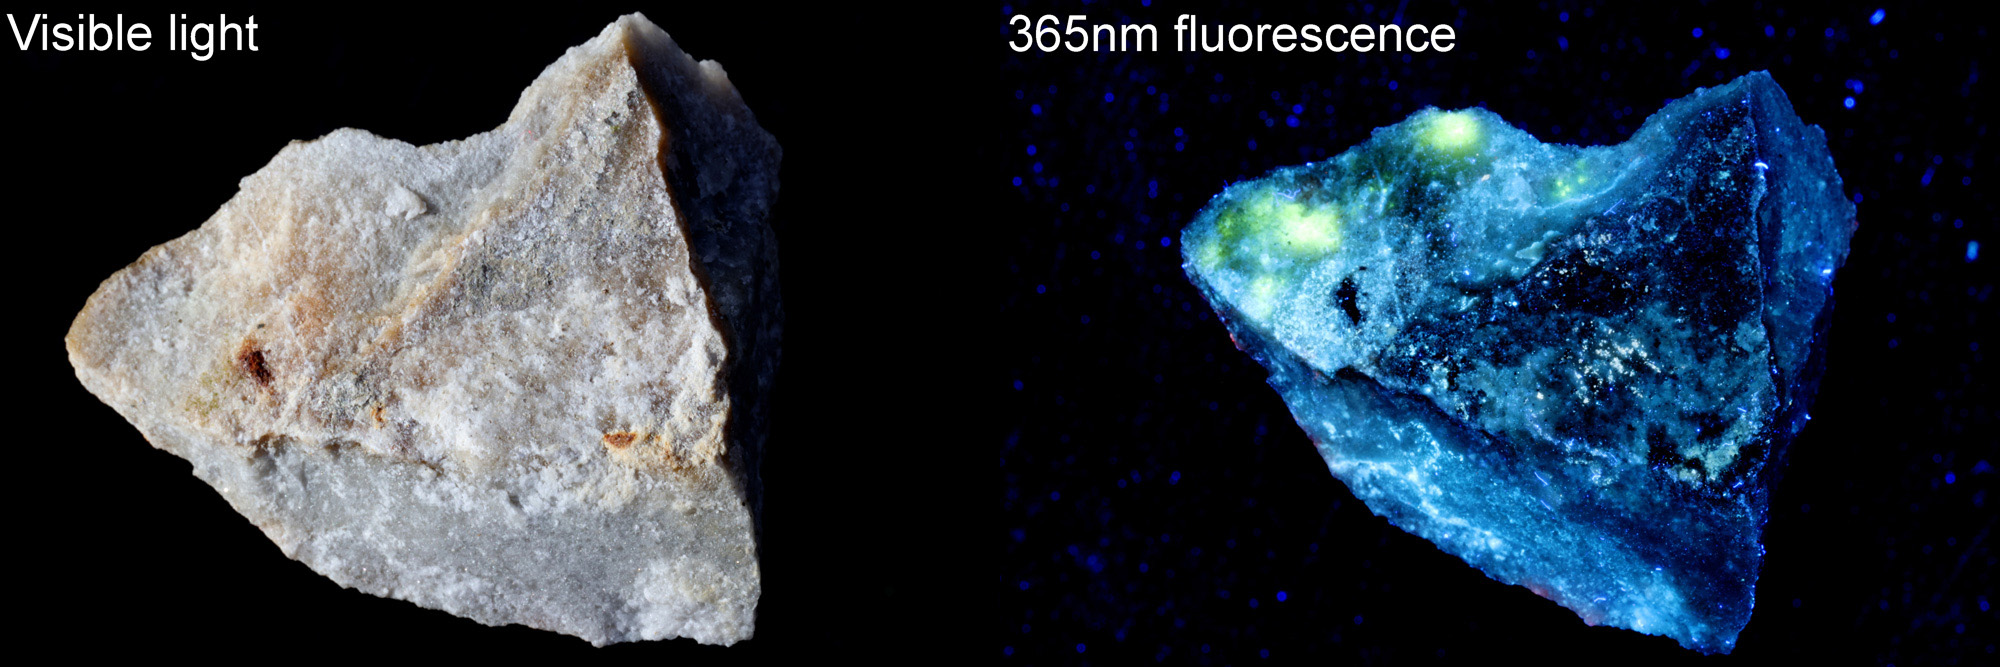
Here’s the front of the rock in normal visible light and in UV (365nm LED light) induced visible light fluorescence.
And the rear of the rock, again in visible light and UV induced fluorescence.
The front surface of the rock sample shows the vivid orange colour in visible light. Interesting this lichen also fluoresces orange under illumination by UV light. The matrix of the block itself mainly fluoresces blue, however there are some bright yellow regions as well, perhaps indicating slightly different mineralogy in those areas.
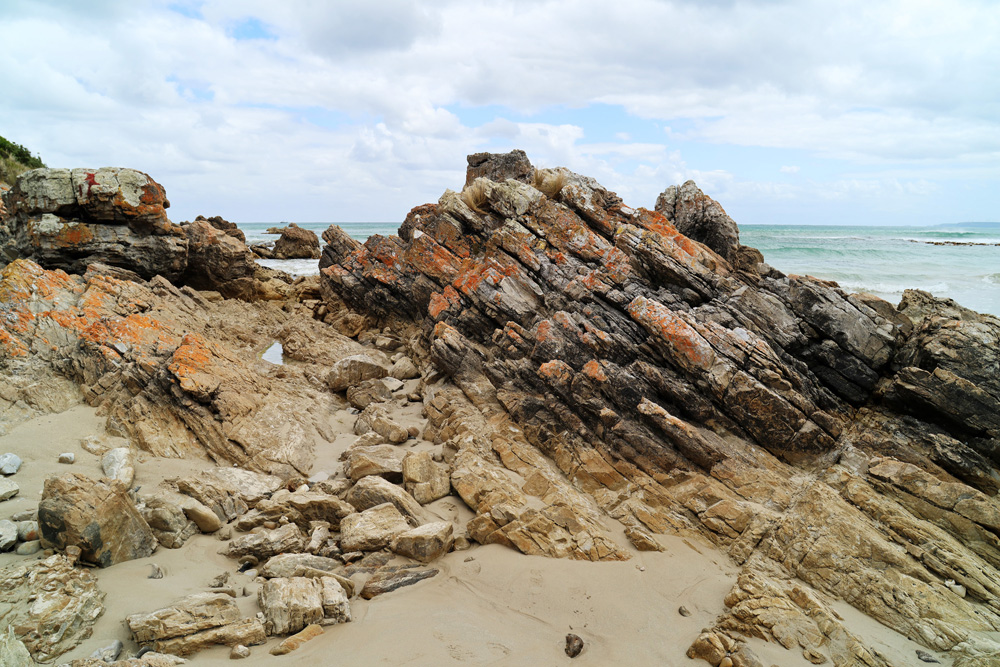
Here’s the rock formation on the beach.
This does raise an interesting possibility – could UV induced fluorescence be used in the image of lichens to help with their identification? Do all lichens which are orange in the visible spectrum fluoresce the same way? This is something I don’t not know, but UV fluorescence is used in many research areas so might be worth trying in the future. It would also make for an interesting form of landscape photography – light painting the scenery with a portable UV light and imaging at night or in twilight.
Technical details. For the fluorescence image the light source was a 365nm LED light which was filtered to remove visible light. the camera was a Canon Eos R7 and a 420nm long pass blocking filter was use to eliminate any reflected UV light. A daylight white balance was used for the UV induced fluorescence image. The lens was a 105mm Rayfact (UV Nikkor) macro lens at f22. ISO 200 was used for the images, and the UV fluorescence image was of course taken in the absence of natural visible light. A black background and sunlight was used for the visible light image.
As always, thanks for reading and if you’d like to know more about this or any other aspect of my work, I can be reached here.
I try and keep an eye out for old and antique microscope slides as they often provide some really interesting subjects for not much money (in some cases, although it should be said that some old microscope slides command extremely high prices). Today’s post shares two slides, a diatom arrangement by Richard Suter, and a bacteriastrum strew (mounter unknown).
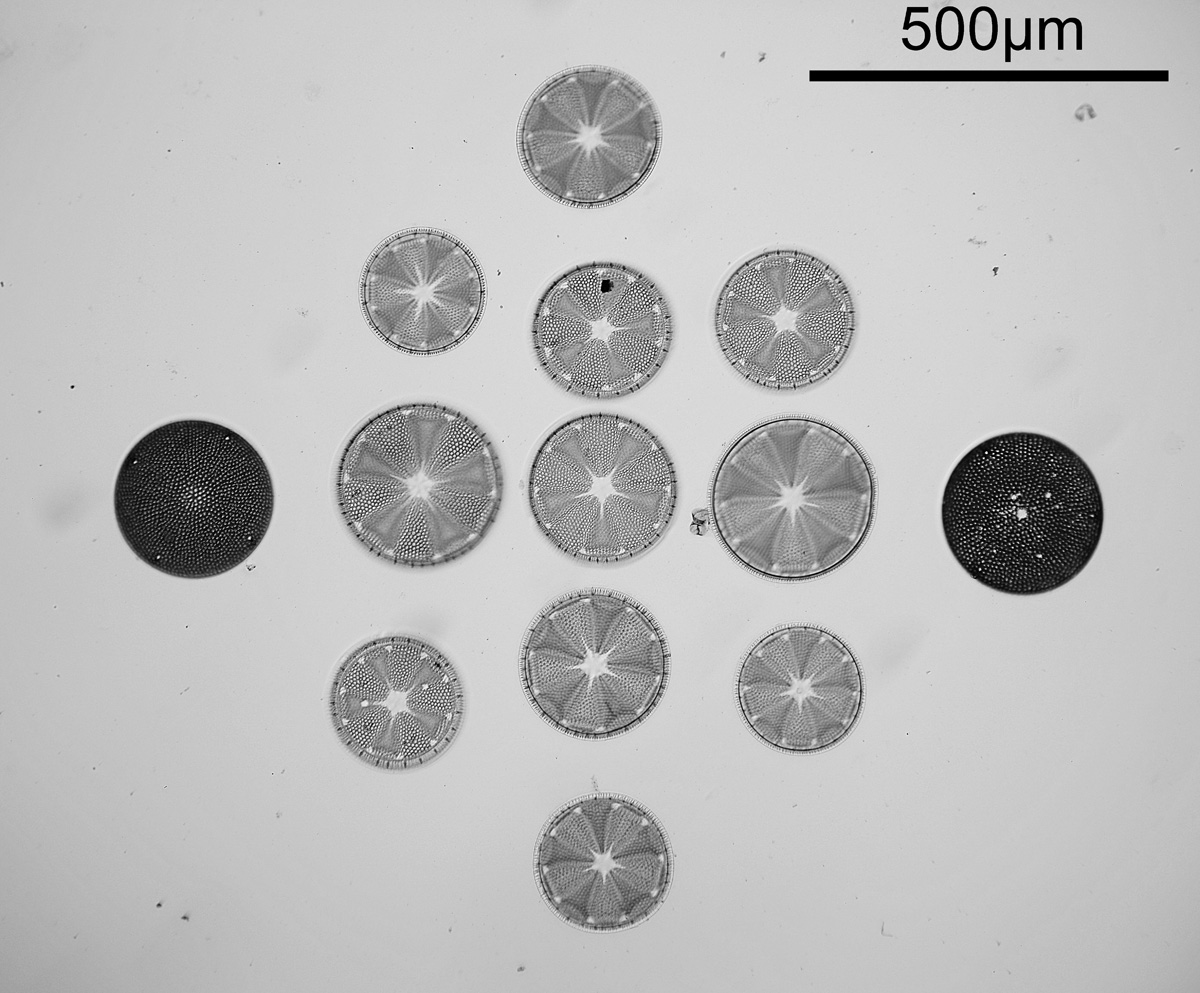
First the diatom arrangement slide by Suter described as being Heliopelta Metii. Here’s the slide, taken with 450nm light and using a 10x Nikon Fluor NA 0.5 objective, cropped slightly to removed the dark corners of the image.
Heliopelta metii arrangement slide
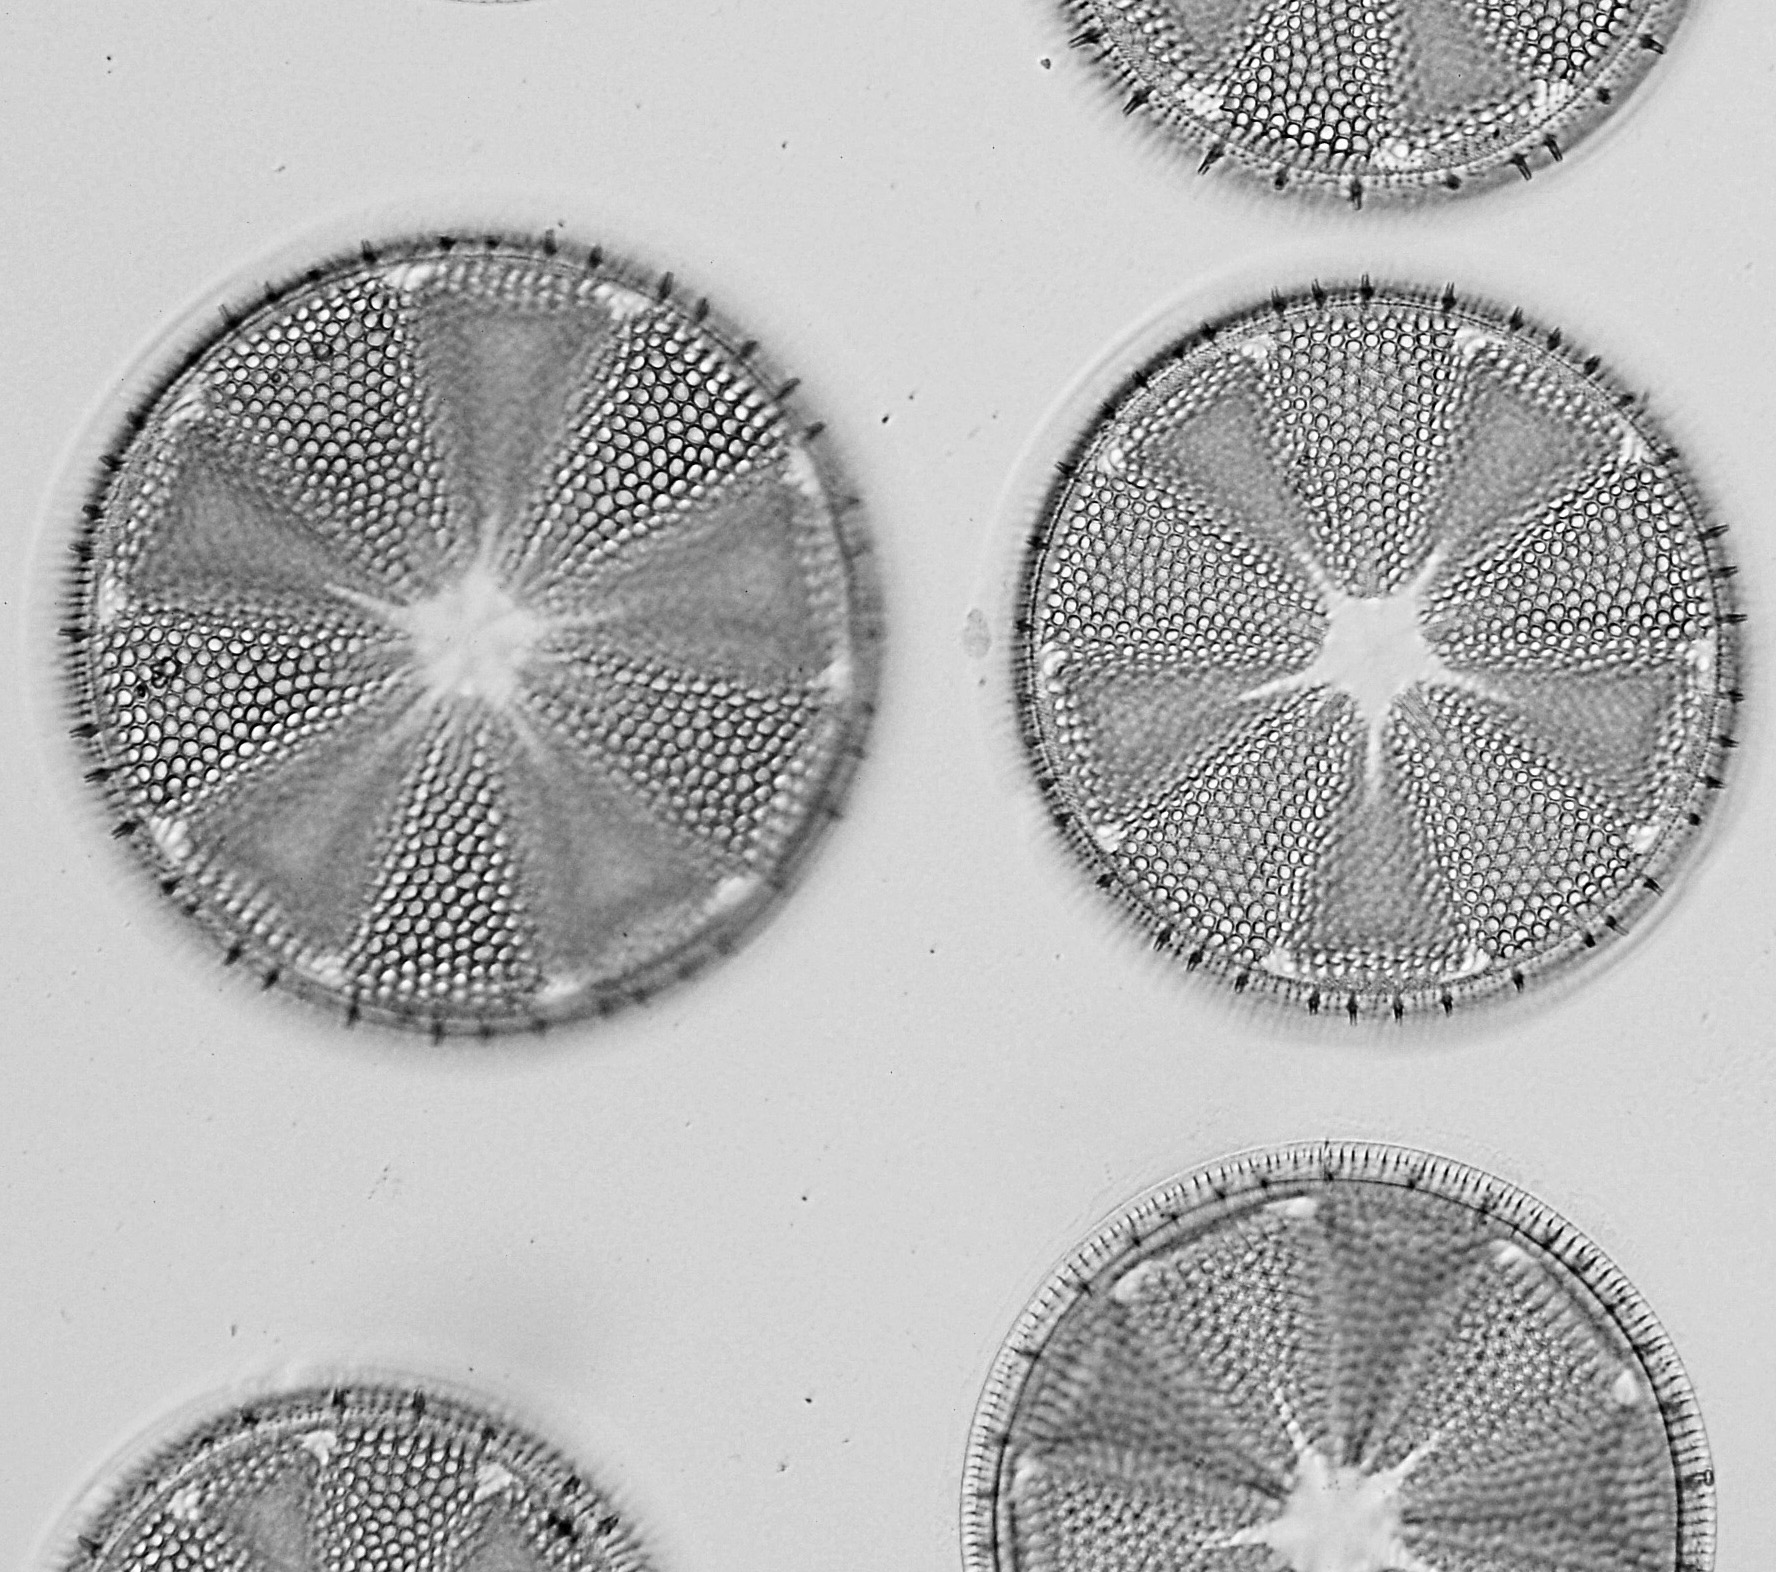
The slide is very clean and all the diatoms intact. A lovely arrangement. And a closeup of part of the slide (just from cropping the original image).
Closeup of the Heliopelta metii slide
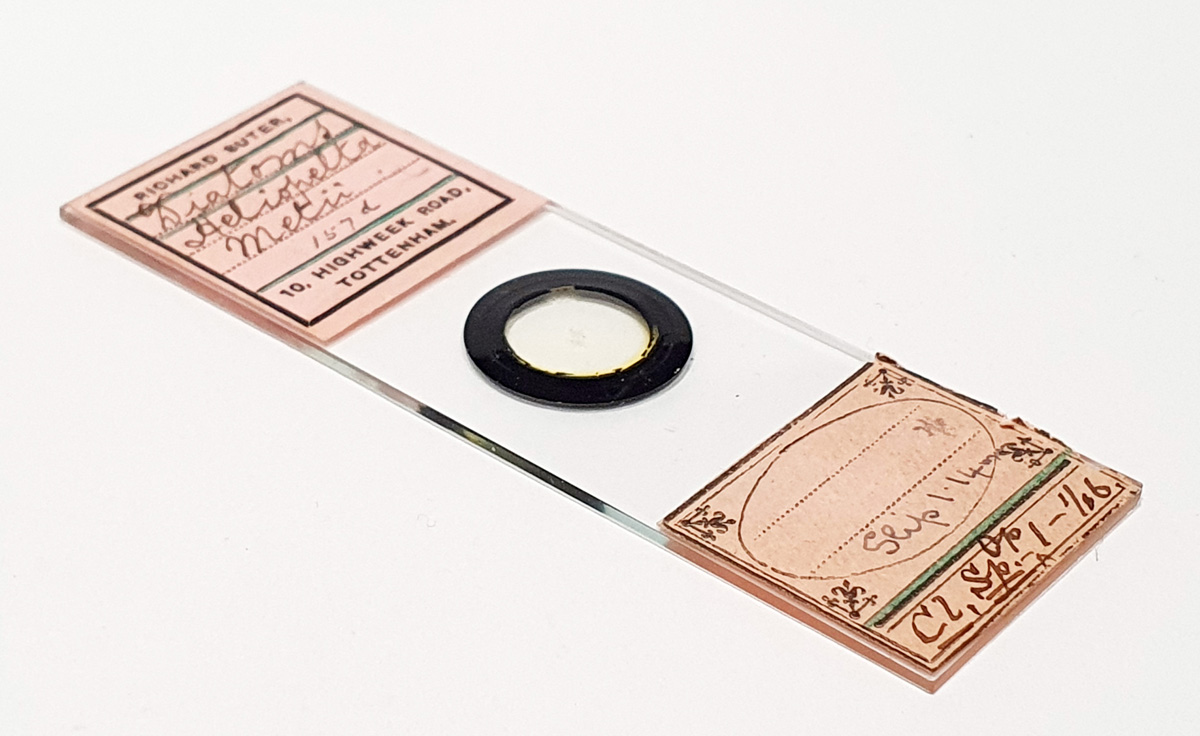
The above was a single image, so will be worth coming back to for some stacking at some point with a higher magnification. A very pretty slide and well worth the investment. This is the slide itself.
Heliopelta metii slide by Suter
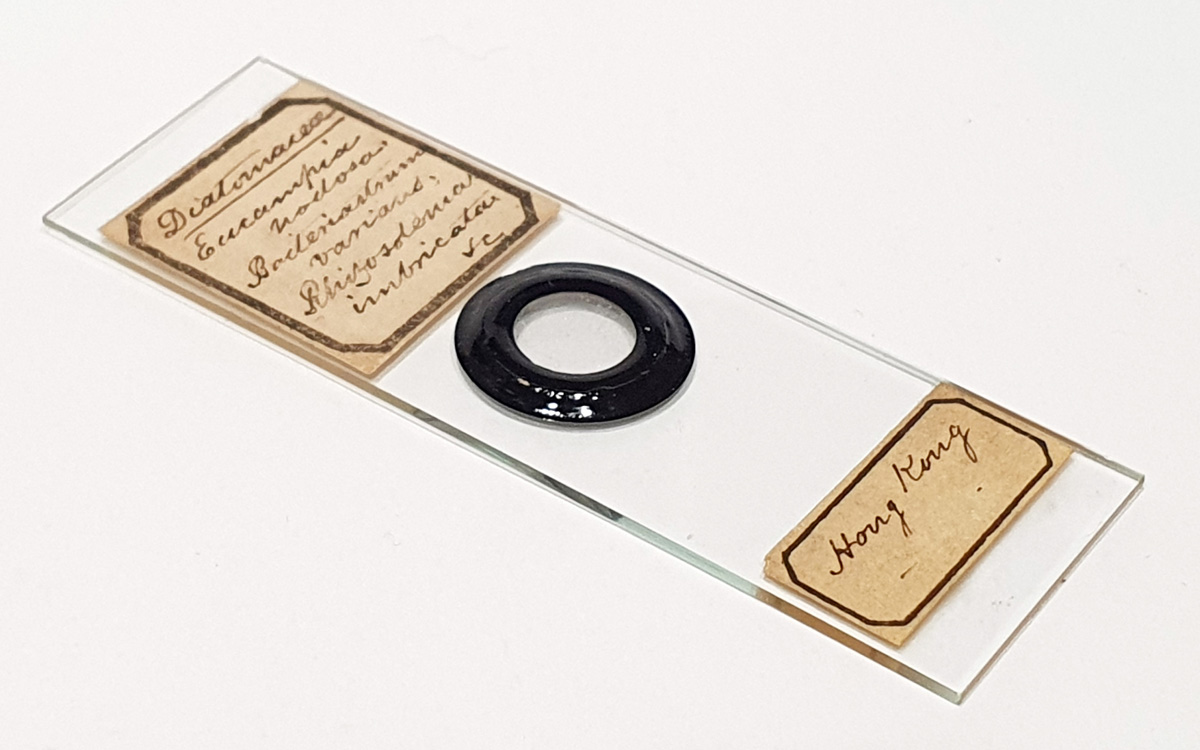
The second slide for today is a Bacteriastrum strew. These diatoms are fragile and often break up, making them more of an unusual subject to find. First the slide itself (not sure as to the mounter of this one – if you know drop me an email please).
Bacteriastrum strew slide
And some images of the slide, again taken with 450nm LED light and the Nikon 10x NA 0.5 Fluor objective. Shown as full frames (or nearly full frames) and a couple of tighter crops.
Full frame (very slightly cropped to remove dark corners).
Bacteriastrum strew slide, area 1, full frameBacteriastrum strew slide, area 1, tight cropBacteriastrum strew slide, area 2, full frame Bacteriastrum strew slide, area 2, tight cropBacteriastrum strew slide, area 2, tight crop
Overall these two slides were really pretty and very interesting to look at. It is well worth keeping and eye out for interesting looking old slides, as other they can be cheap way to get some really well prepared subjects. As always, thanks for reading, and if you’d like to know more about my work I can be reached here.
I built my UV microscope to help with my sunscreen research, but in doing so I quickly realized that UV offered the chance of improved resolution due to the shorter wavelength of light being used. While not so important for looking at sunscreen emulsions, this has proved very interesting for examining diatoms and looking at their structures. But how much of an improvement does it actually provide, especially when compared with more modern optics, and different ways of lighting a sample? This will probably be my last post of 2022, and I’ll show a comparison of a diatom imaged using UV at 313nm and with visible light (450nm) but with a different setup. It’s not quite a ‘apples with apples’ comparison, but as close as I can get. Sort of ‘apples with oranges’.
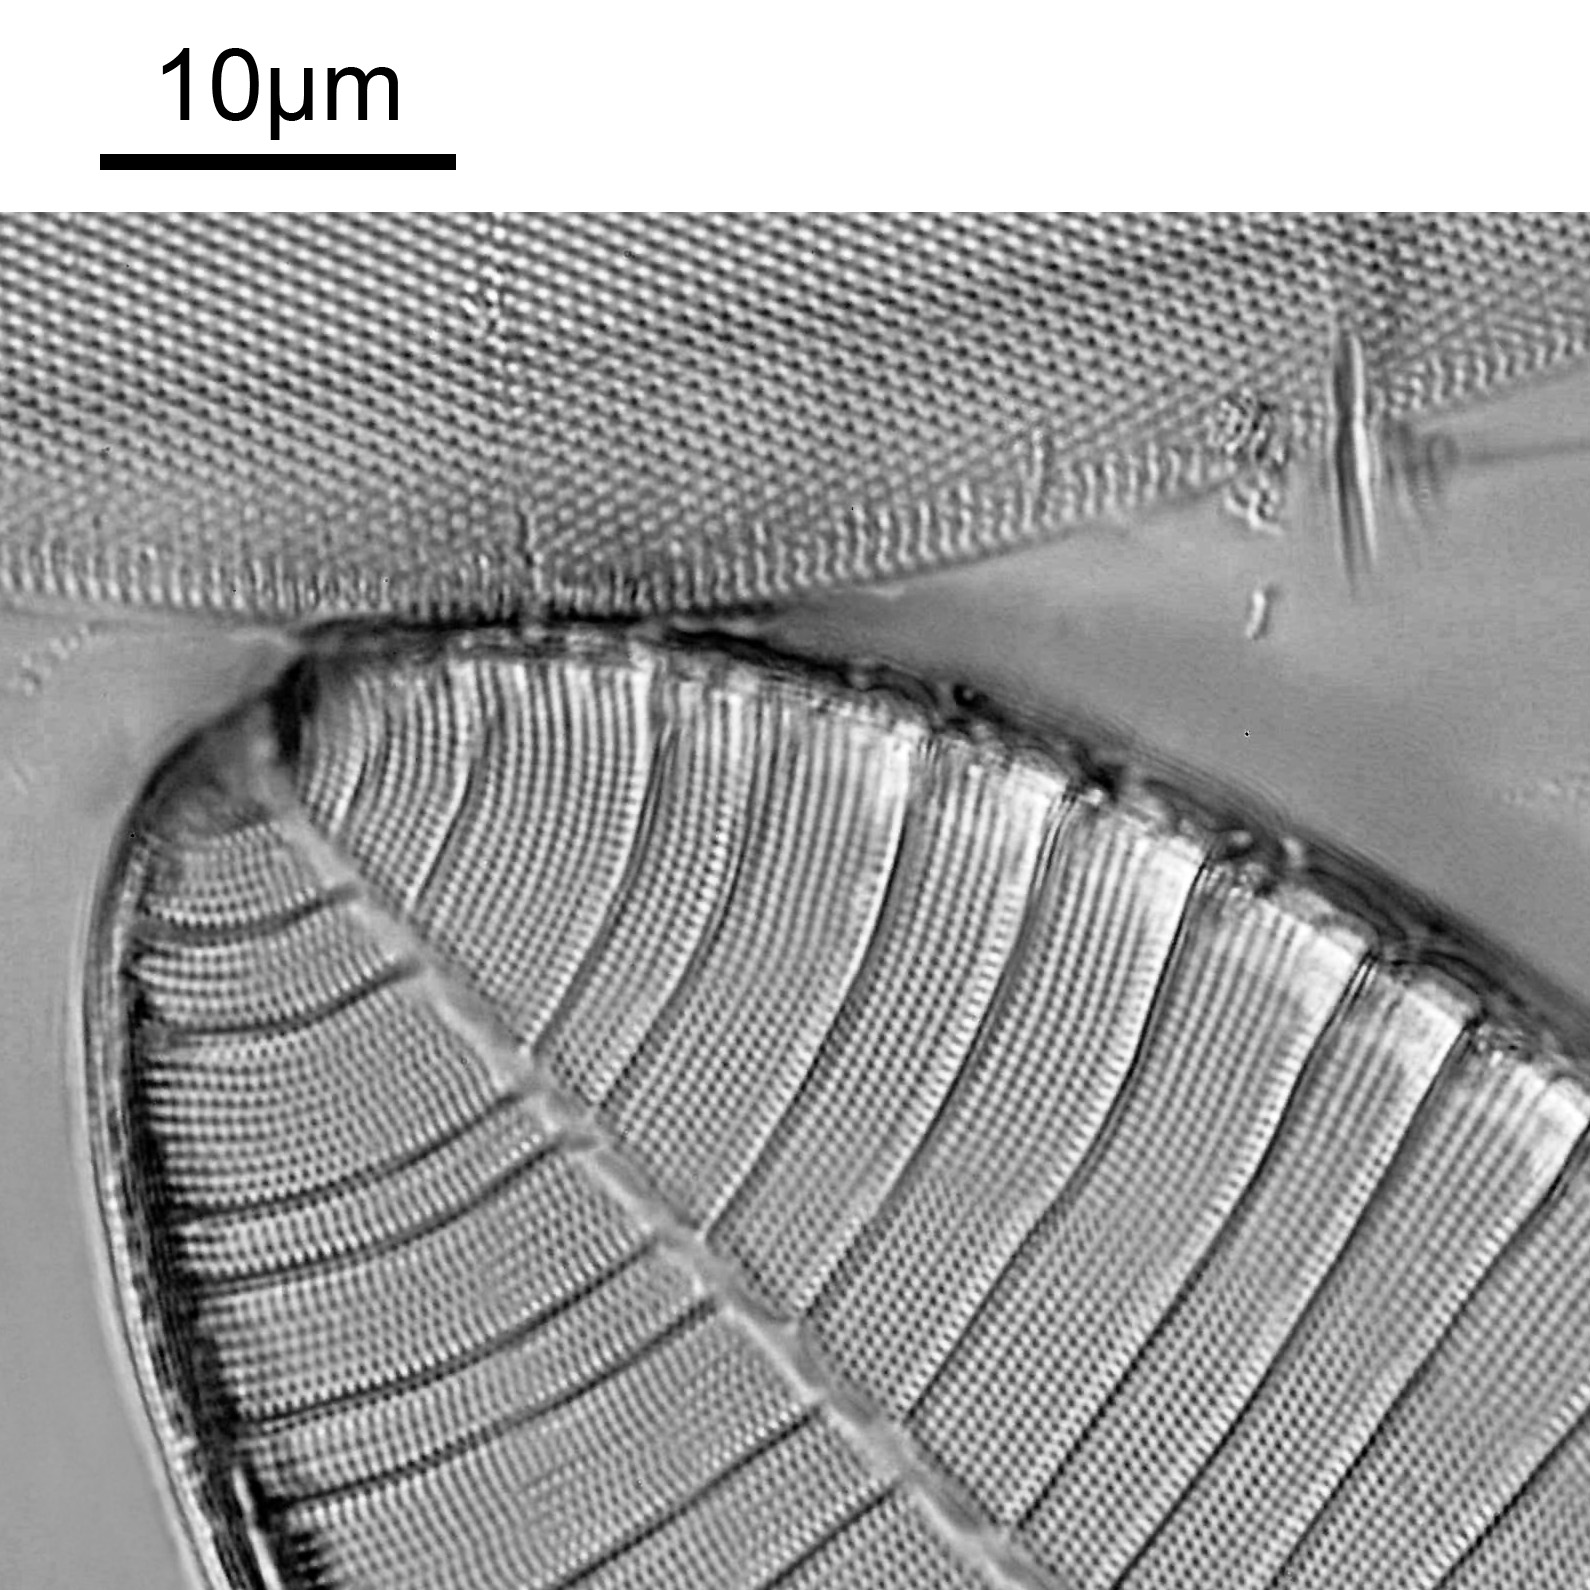
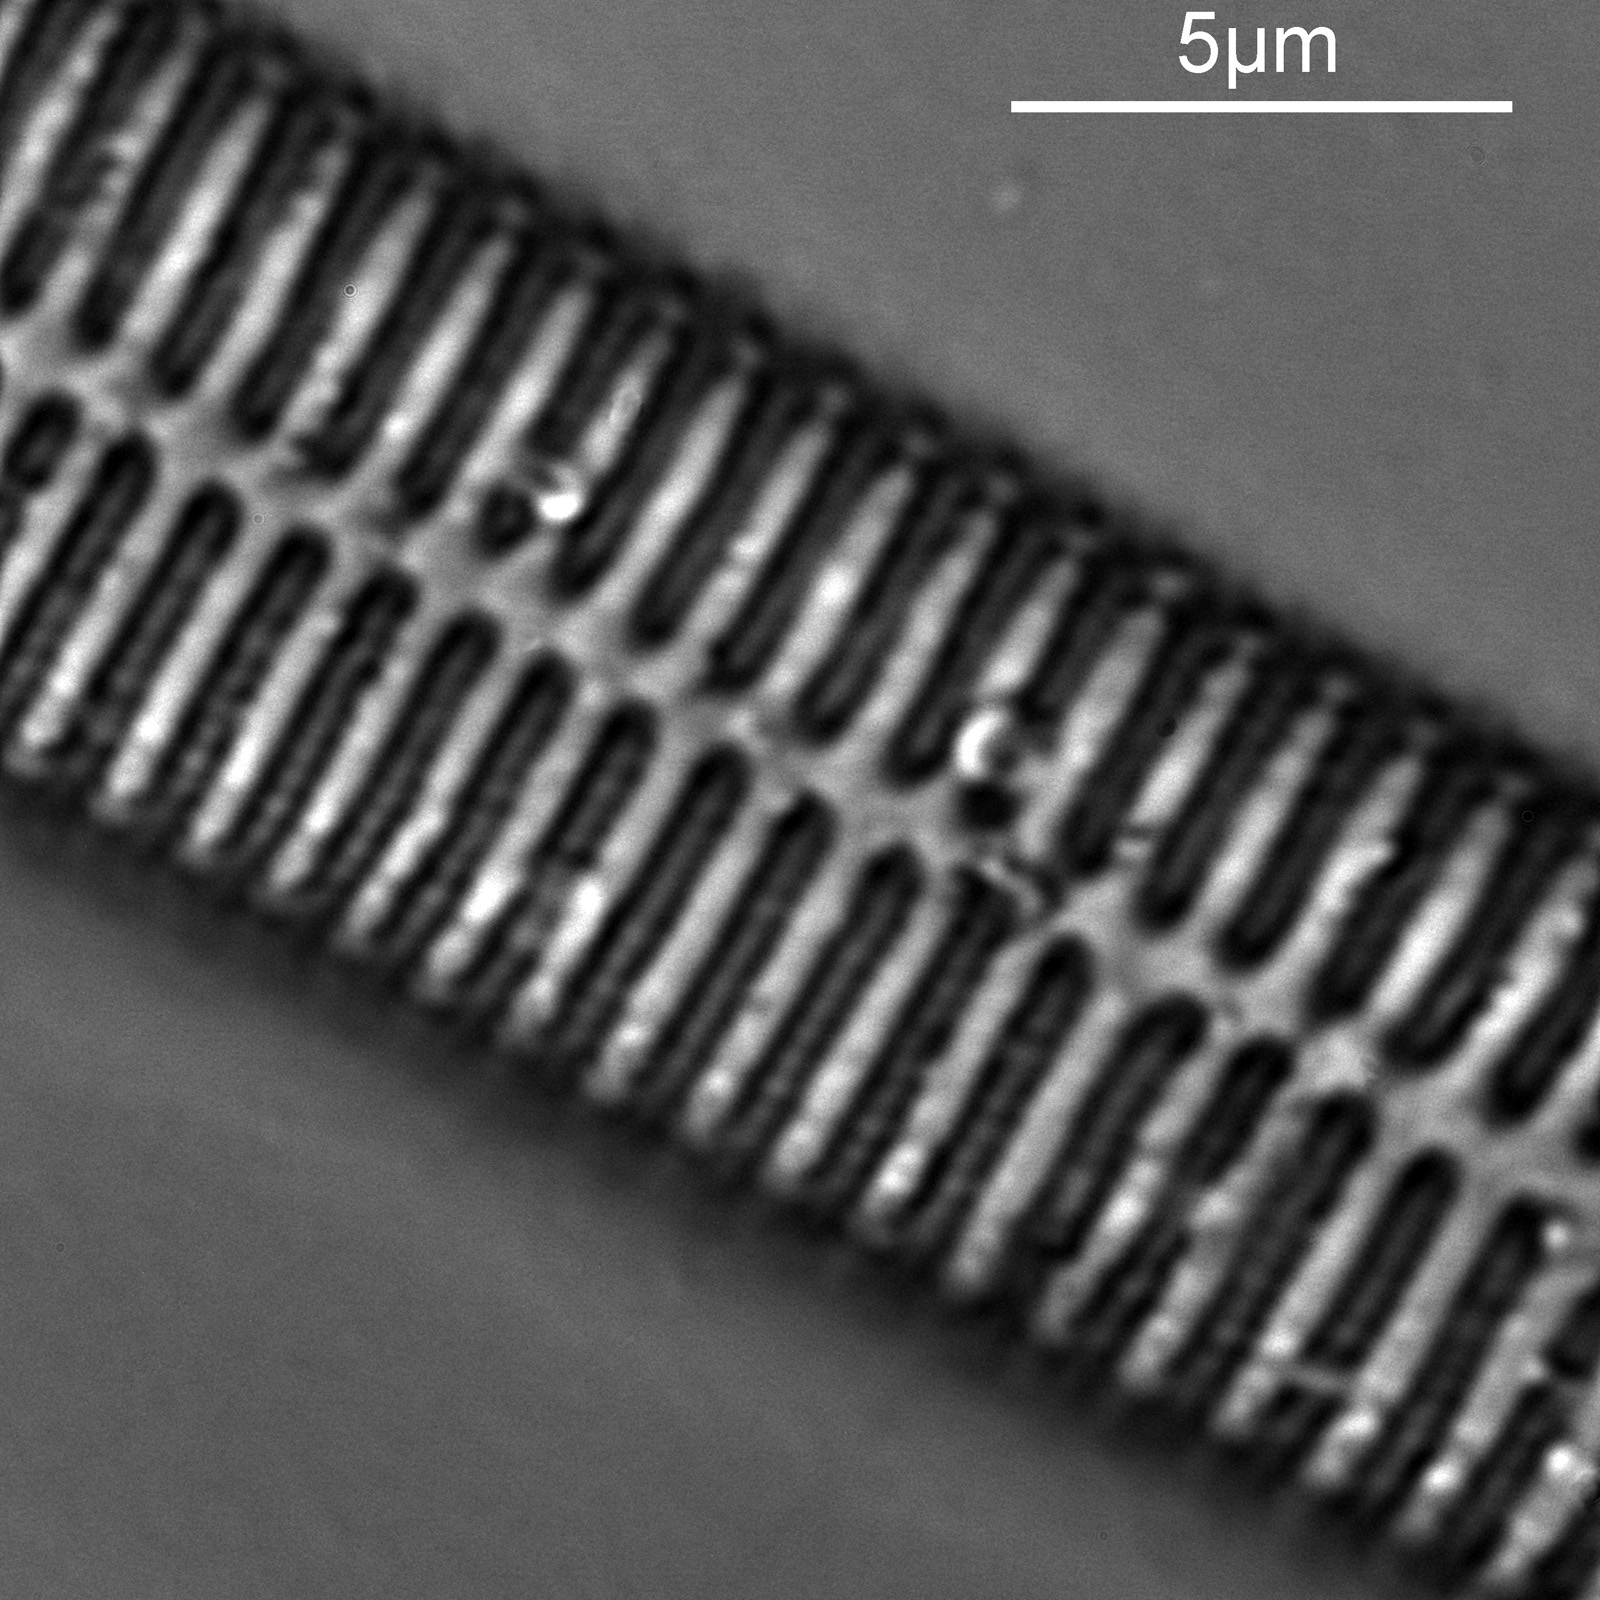
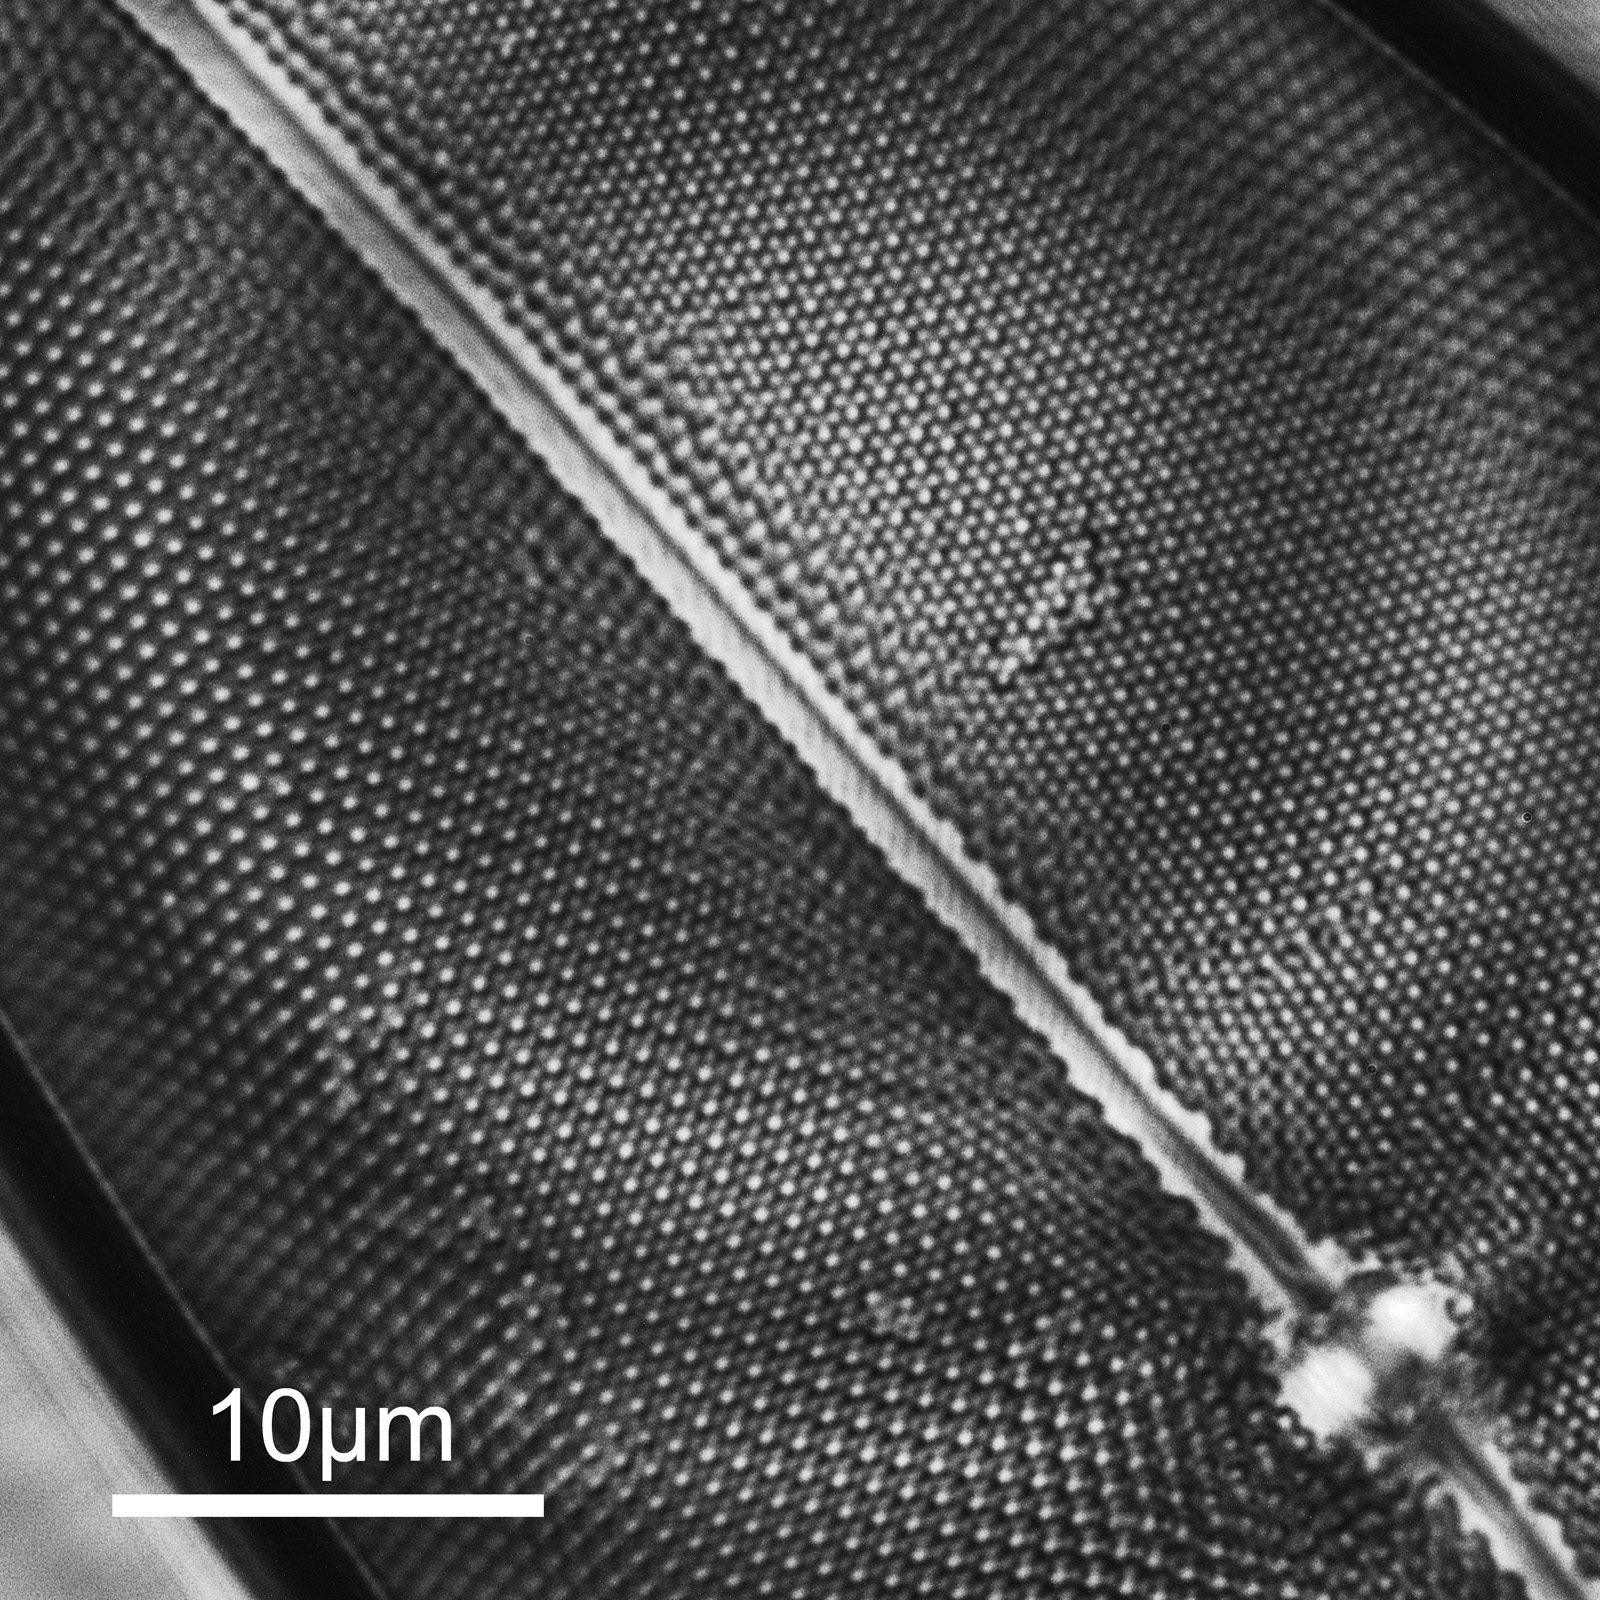
The subject will be a Surirella gemma diatom as this has some really fine structures. Here it is imaged with 313nm UV light with a 100x NA 1.2 objective.
313nm UV image of Surirella gemma diatom
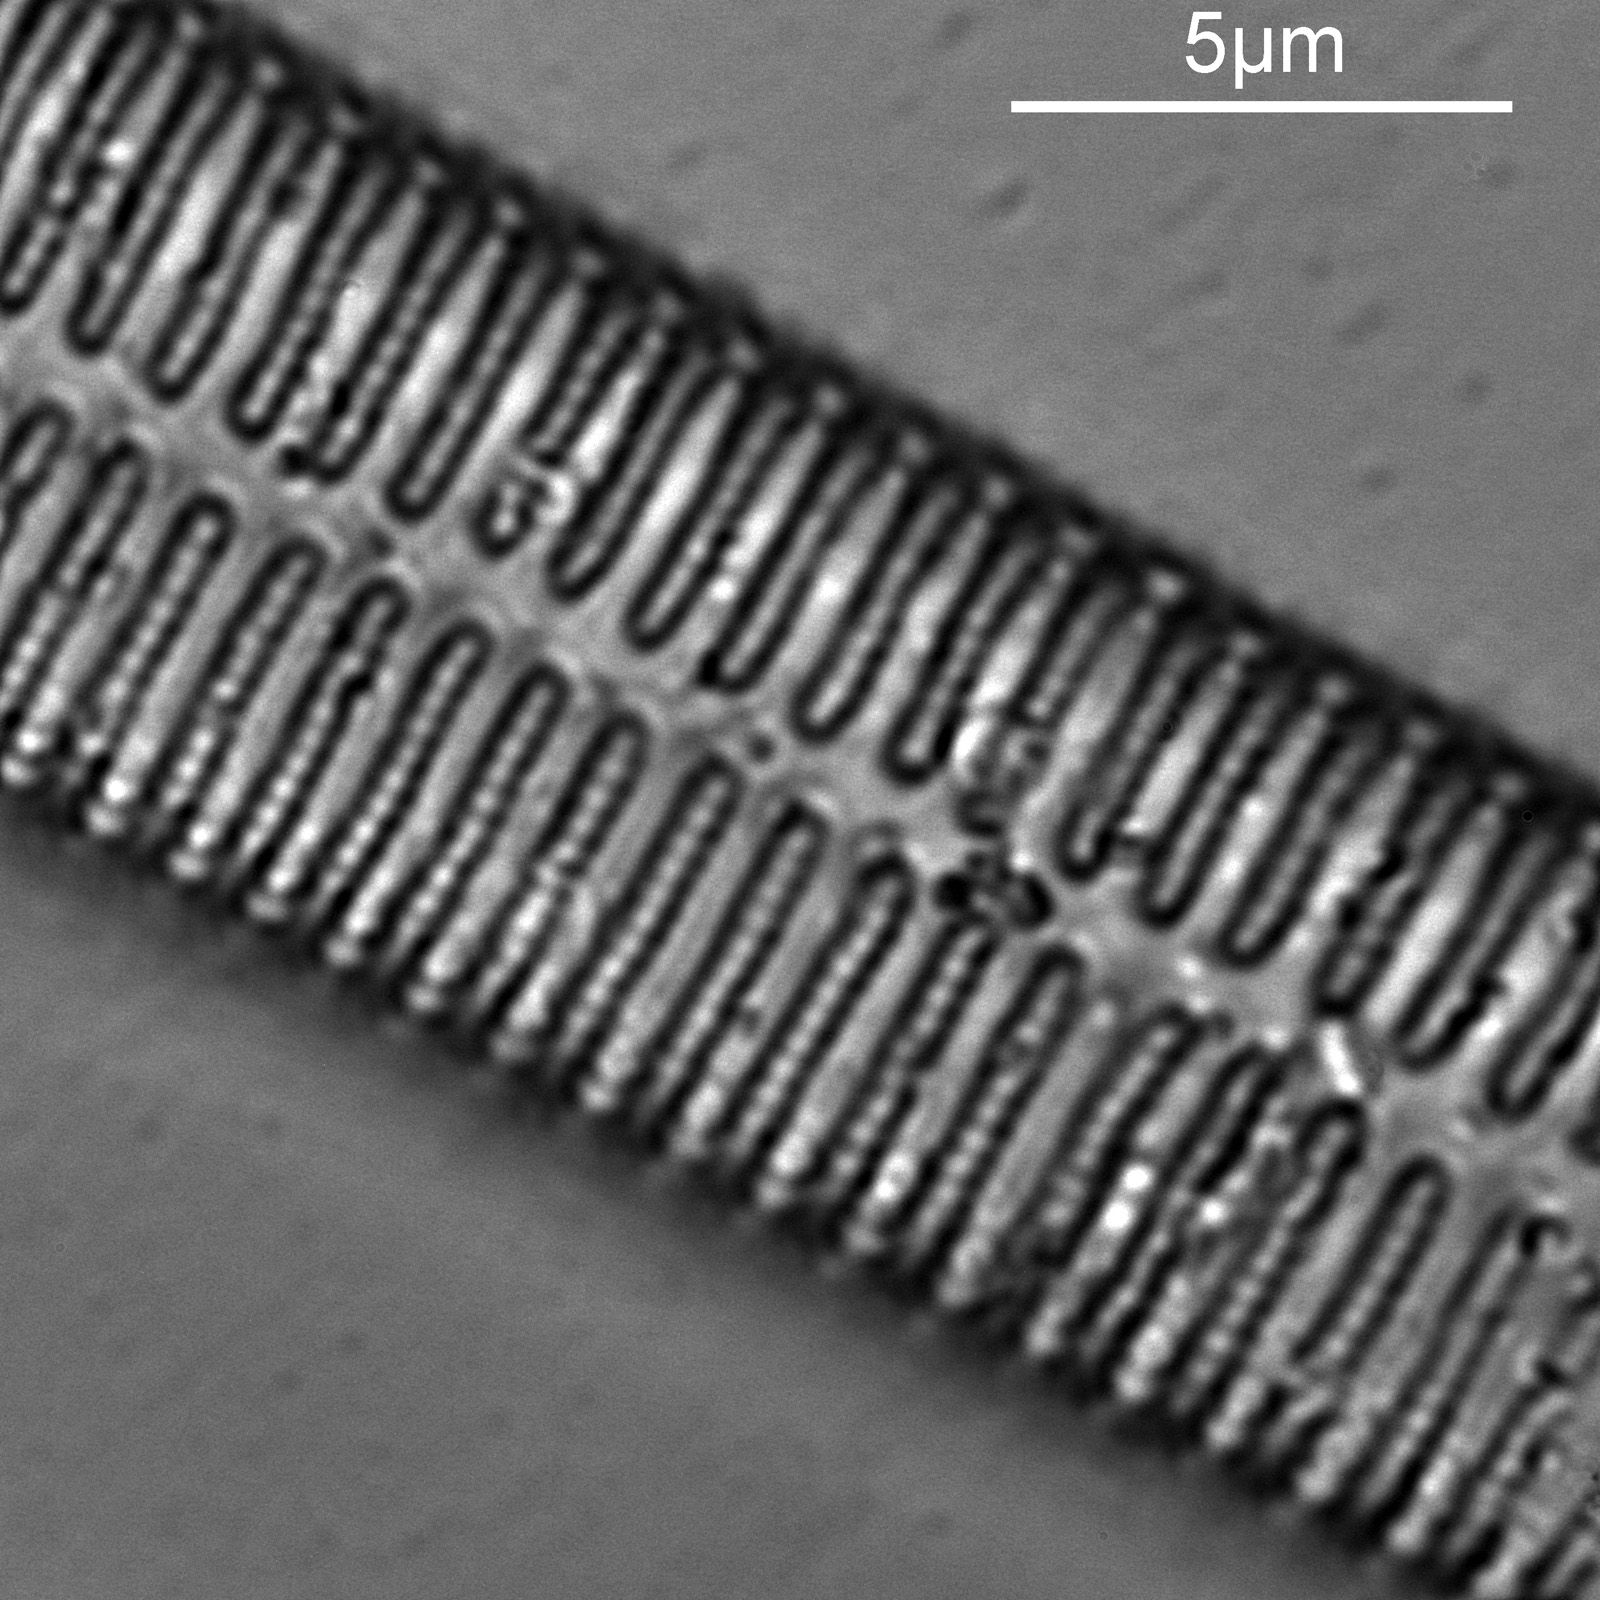
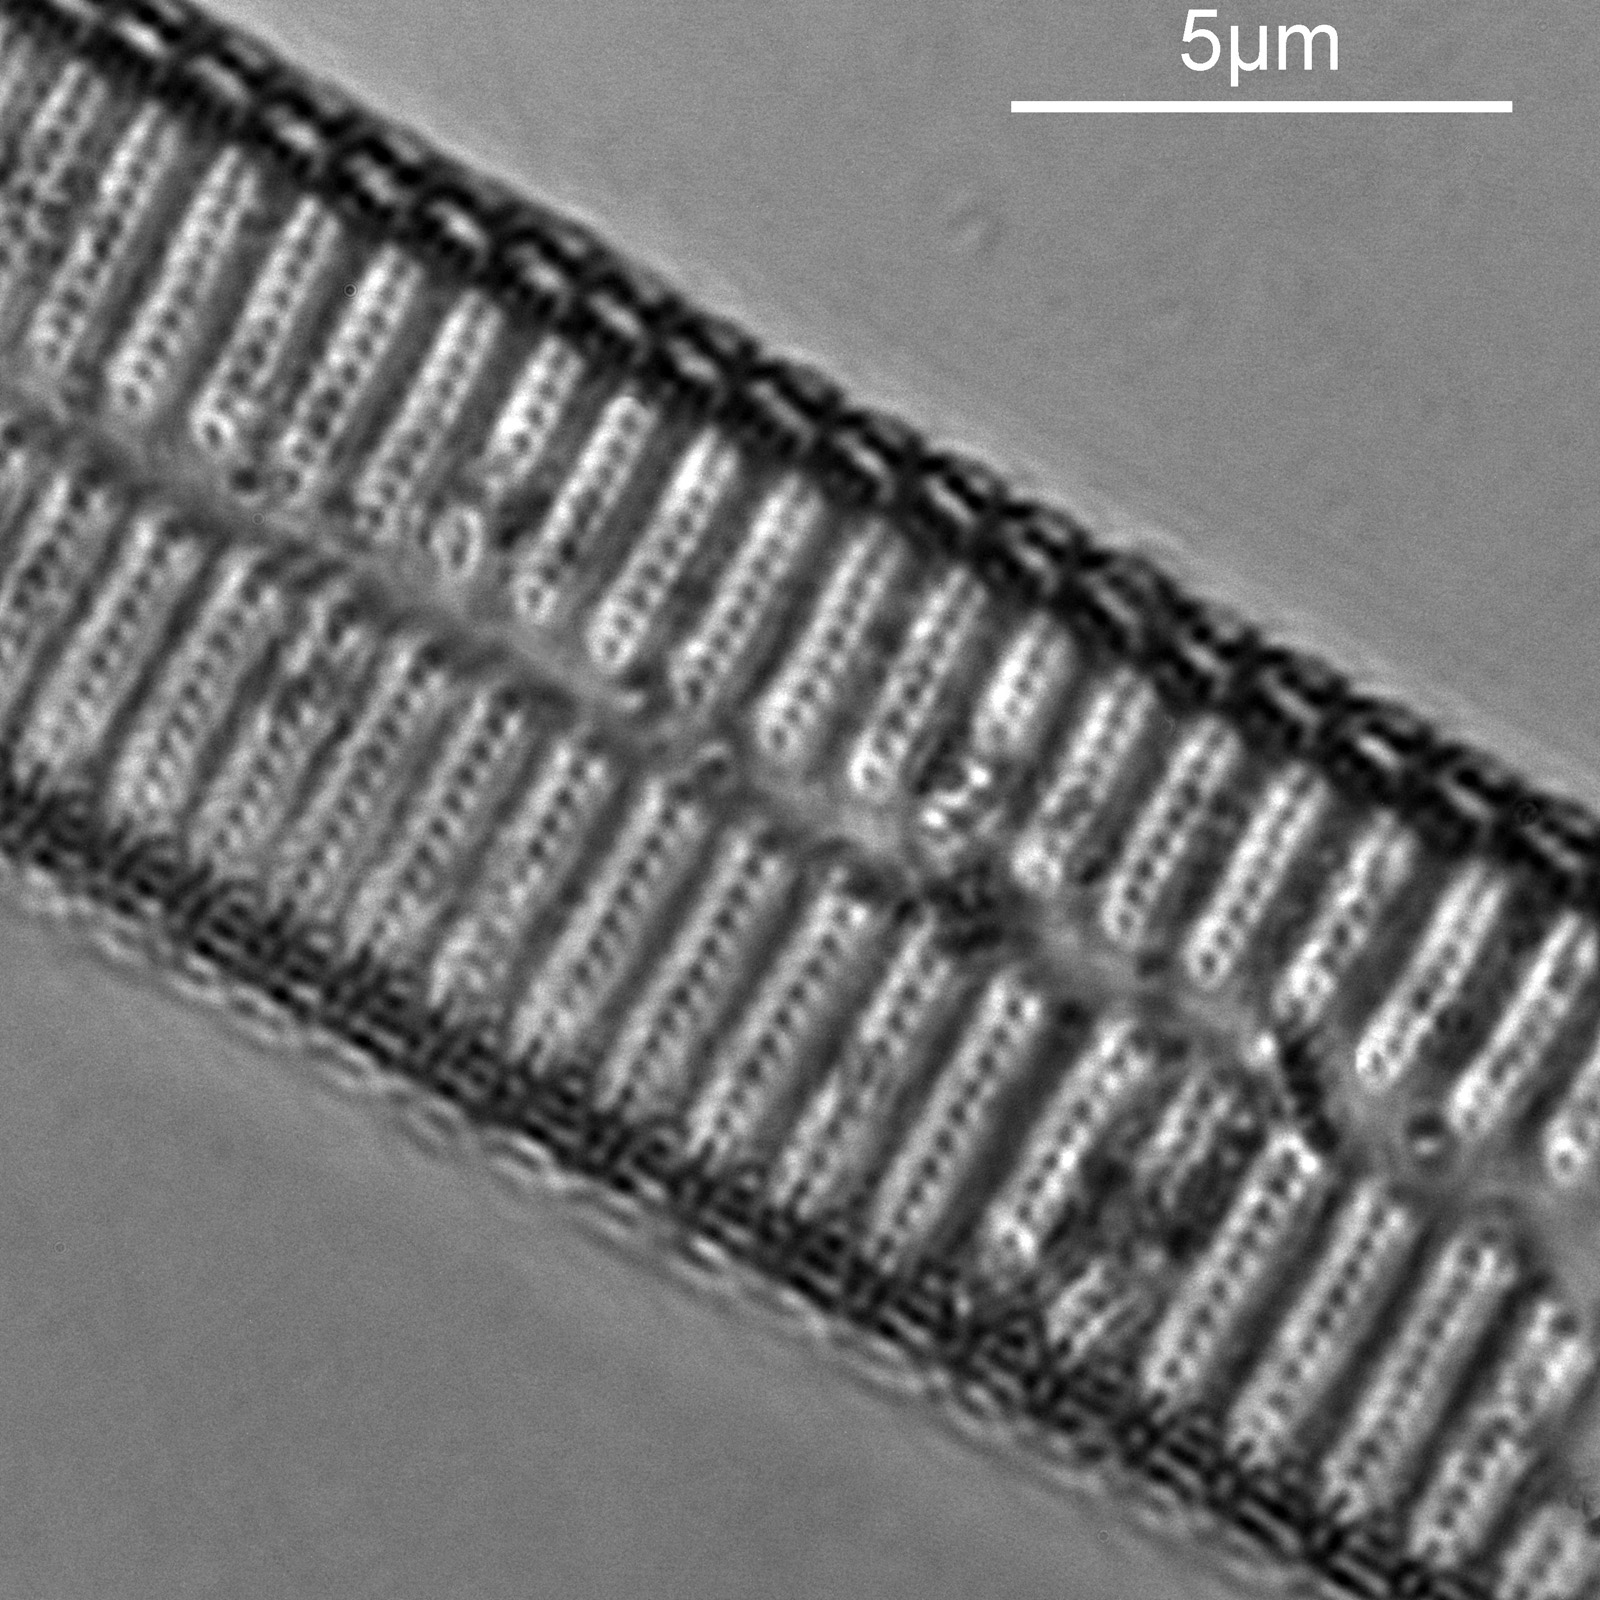
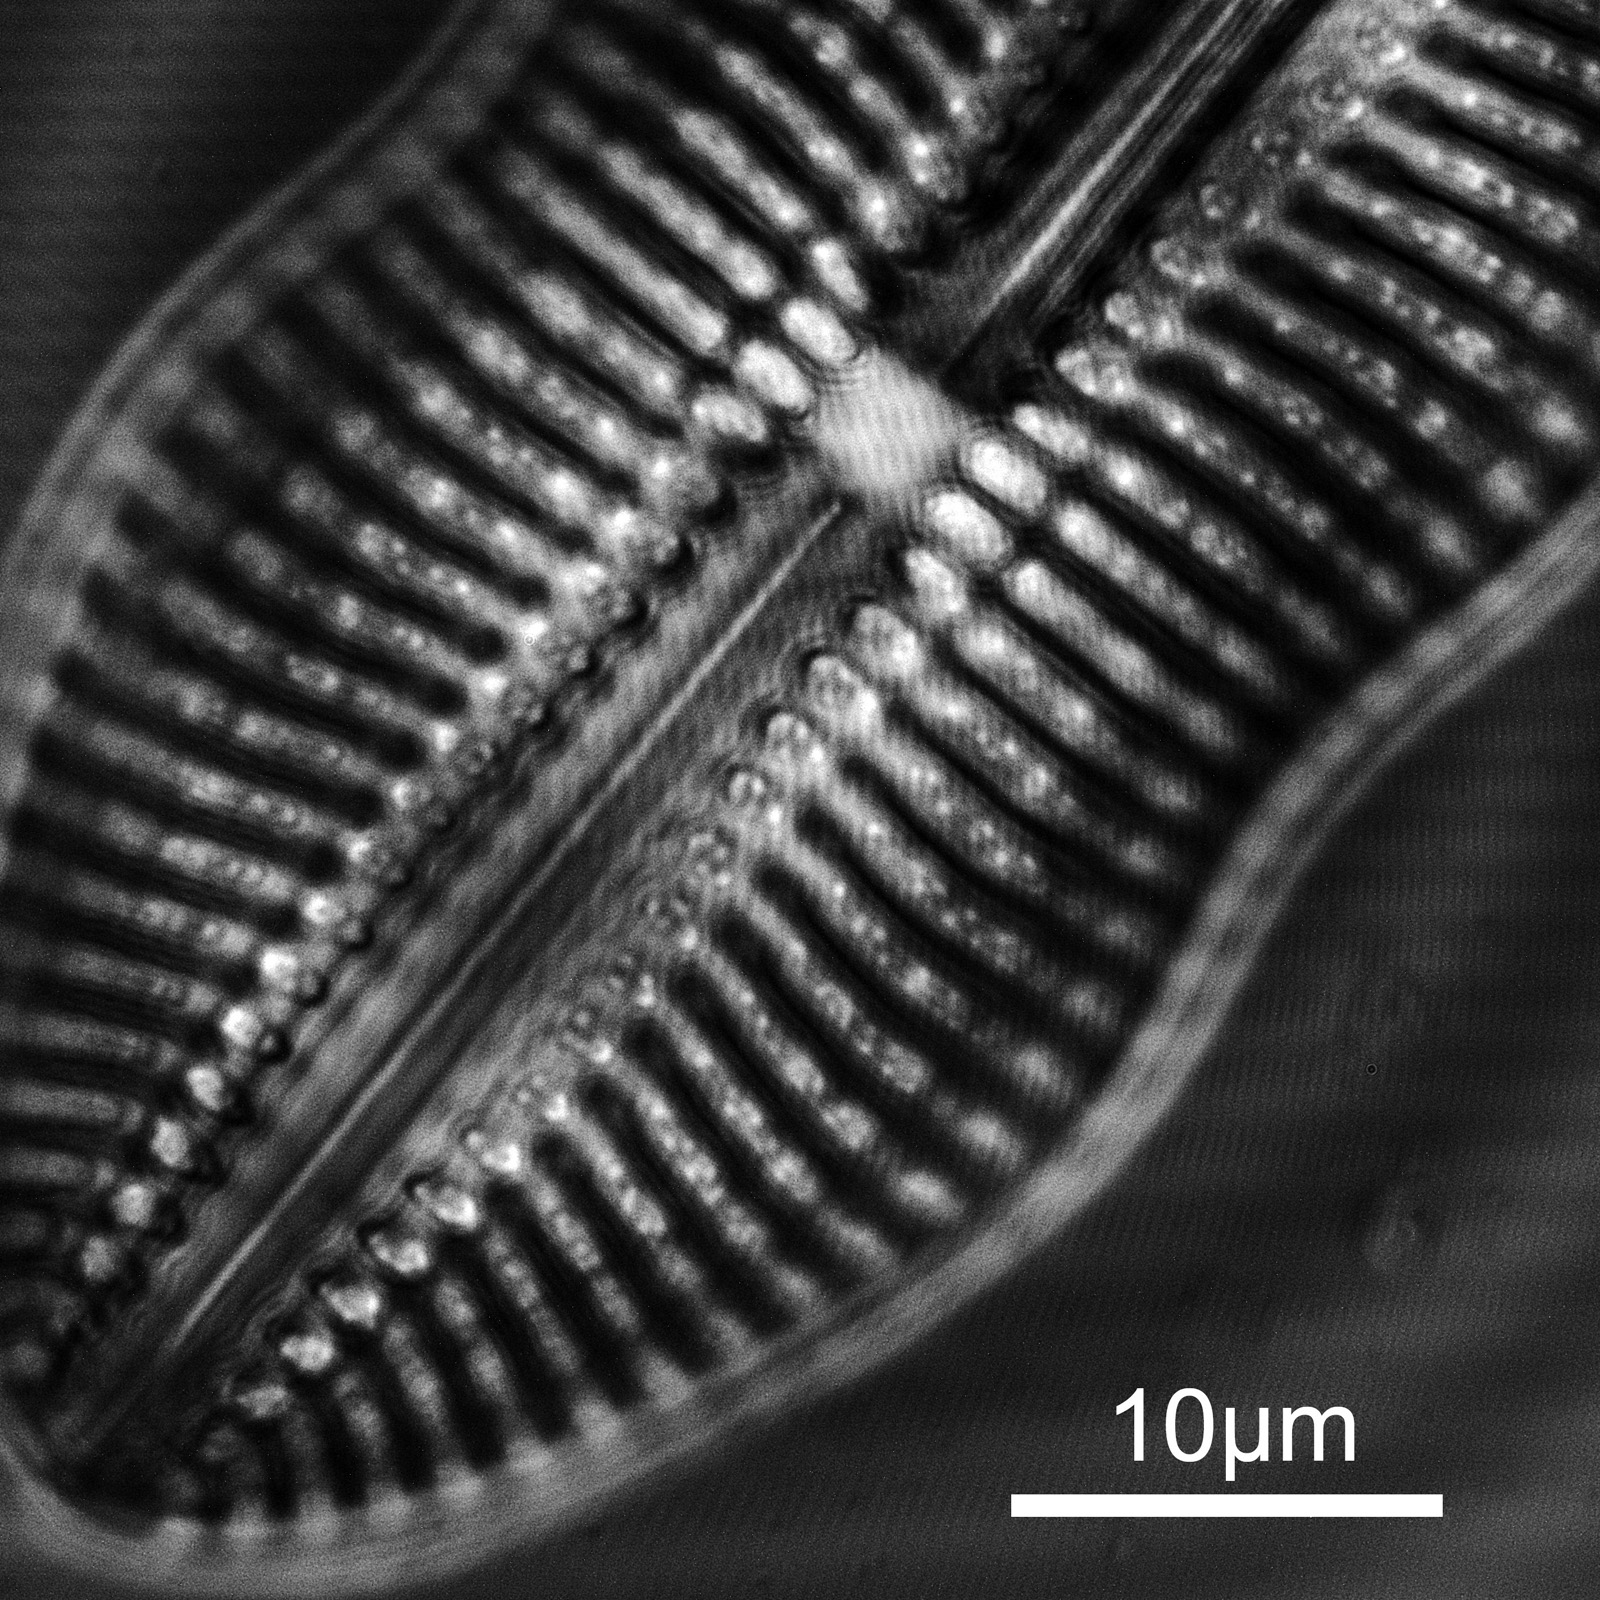
And now an image taken using 450nm light with an NA 1.4 objective.
450nm light image of Surirella gemma diatom
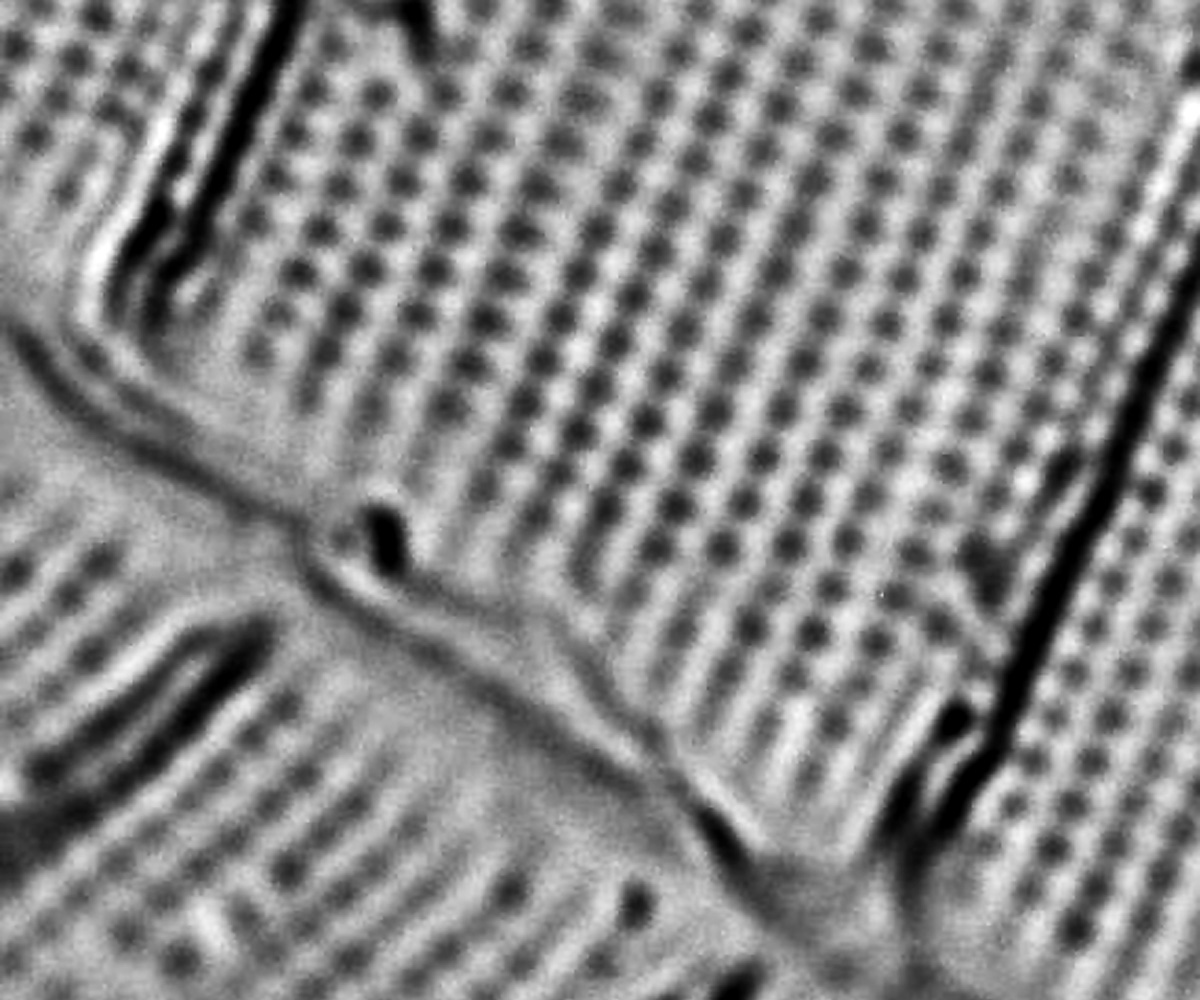
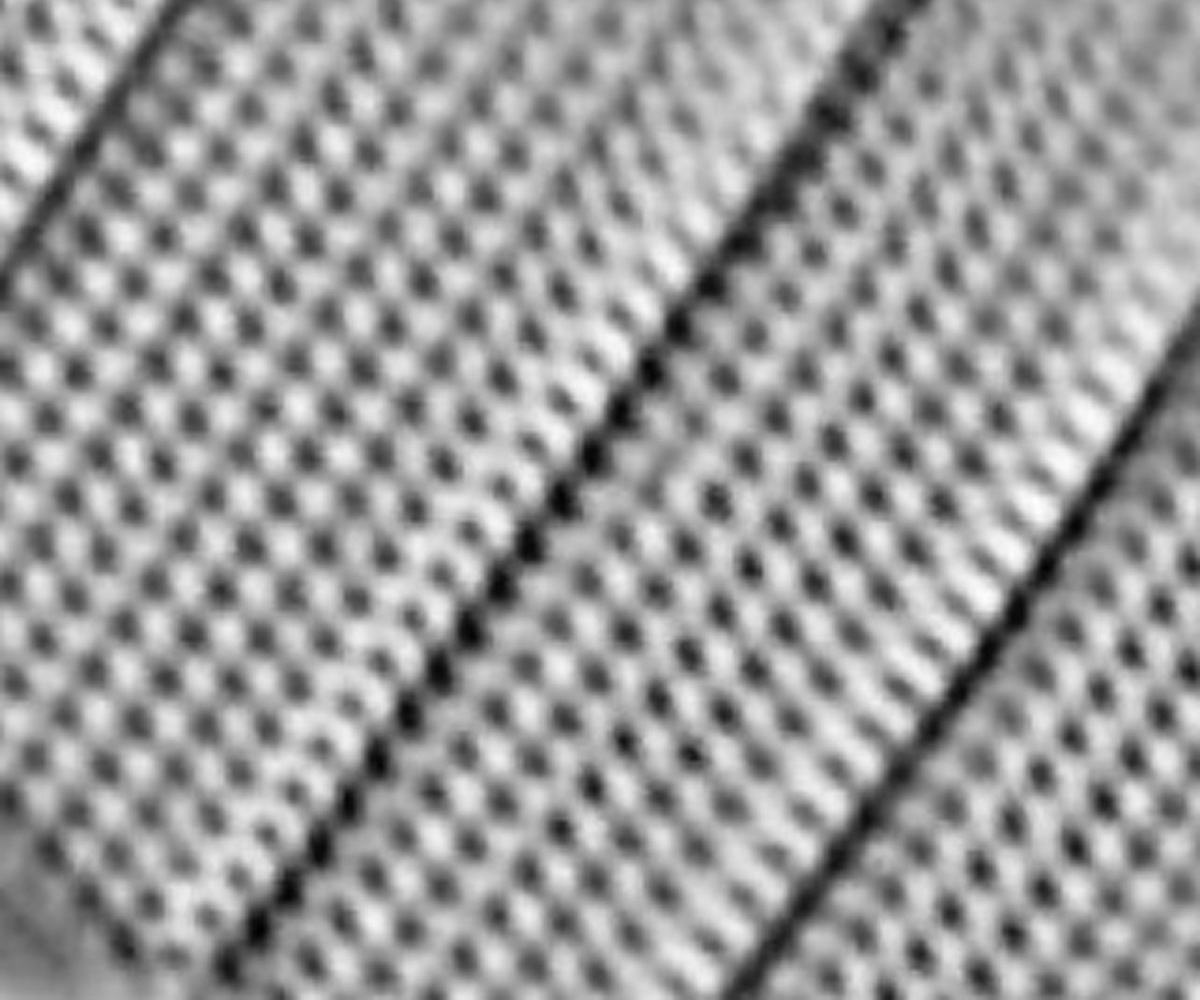
As you’ll have no doubt noticed the images have a different field of view. So a better comparison is to look at a crop from each image (both have been cropped and then resized to 1200 pixels across). First the 313nm light image.
Crop of the 313nm light image
And second a crop from the visible light image done at 450nm.
Crop of the visible light image taken using 450nm light
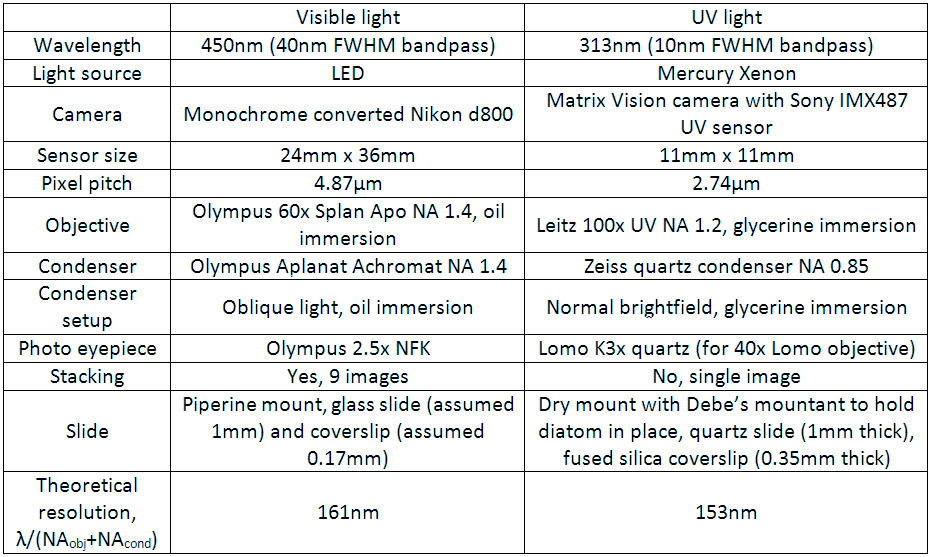
Both images seem to offer similar resolution, although the 313nm image is a little noisier. There were many differences between these images, including objective used, condenser, camera, photoeyepiece, the 450nm image was stacked while the 313nm image was not, the slides are different as are the mounts for the diatoms. As I said, ‘apples with oranges’ rather than a true ‘apples with apples’. These differences occur as optics optimized for use in the UV are not ideal for visible light, and visible light optics wont work at 313nm. However the aim with this is to compare a visible light with my best imaging conditions with UV light with a fairly basic imaging setup. The comparison between the two imaging setups is show below.
Comparison between the setups at each wavelength
With the 450nm light I was able to use a higher NA objective and condenser compared with 313nm light. I used oblique light at 450nm, which helps resolve small features, and it was a stack of 9 images. The slide mount was also different – a nice high refractive index one of piperine, vs a dry mount in Debe’s for the UV image.
The interesting thing though is when you look at the theoretical resolution based on the wavelength of light used and the NA’s of the condenser and objective. They are very similar, less then 10% apart, with the UV objective being only slightly better. This explains why the images look pretty similar in terms of how they are resolving the small features. ‘But’, I hear you say, ‘you said that UV offers better resolution, so what is going on?’. The NA’s of the objective and condenser for the UV image were lower than the ones used for the visible light image, and this is offsetting the effect from the shorter wavelength. Visible light images can absolutely provide amazingly high resolution images of diatoms.
So, is there no point to UV imaging? Well, it’s not quite a simple as that. The NA of the condenser I used for the UV image was only 0.85. I do have a NA 1.25 one as well, I just didn’t use it as until recently I didn’t have a suitable mount for it. If I used that at 313nm, with the NA 1.2 objective, the theoretical resolution then goes down to 128nm. If I used the NA 1.2 objective and NA 1.25 condenser with 254nm light, the theoretical resolution improves again to 104nm.
Of course there are various other technique to improve visible light images, such as differential interference contrast, cross polarization and phase contrast which I haven’t looked at here. As a result modern techniques can certainly provide very very high resolutions, and the advent of these techniques was a contributing factor to the decline in the use of UV imaging for microscopy. However UV can offer high resolutions in a very simple optical setup – no need or DIC, cross polarization – and without complex image process. UV can offer these high resolutions with simple brightfield microscopy, and this is why it still has a place in imaging today.
As always, I hope you enjoyed this post, and thanks for being part of my research journey for 2022. Here’s to a better 2023, and if you’d like to know more about this or any aspect of my work I can be reached here.
EDIT 26/3/23. The slide used for the 450nm light here is labelled ‘piperine’. Piperine is an alkaloid found in black pepper, and it has always confused me as to why it would be used as a microscope slide mountant. However its use is mentioned in Microscope & Entomological Monthly, SH Meakin, The study of diatoms, 1939, Pages 209-212.
Yesterday I had an exciting parcel arrive – a set of microscope slides that I have had made for me by a very nice gentleman who I met during an ebay purchase (Opticsman0127, check out his slides here). I sent him some quartz slides and fused silica coverslips and he made me a set of slides with different diatoms on them for my UV work. These have been mounted dry using a bit of Debe’s mountant (gelatin) so as not to have the mountant absorb too much UV. Today I am sharing some images from one of the slides – a diatom strew – taken using 313nm light.
For these images I used a mercury xenon lamp and filtered the light to image at 313nm. The camera was my new Matrix Vision one with the UV sensitive Sony IMX487 sensor (see here for some images done at 254nm with it). I decided to use 313nm here as the light source I have which covers that wavelength is more powerful than my 254nm lamp, and I wanted to try a higher NA objective – a 100x Leitz NA 1.2 objective (see here for some information on that). Condenser was my antique Zeiss quartz one (NA 0.85) and the photoeyepiece is a Lomo quartz 8x one. The images are not stacks, but just single images taken in brightfield. I noticed that at this magnification there was some left/right movement in the images which would have complicated stacking. The images have been reduced in resolution for sharing.
One of the really hard resolution tests for any microscope is the diatom called Amphipleura pellucida, as it has features of the order 200nm. This makes it extremely hard to image with normal light microscopy, and techniques such as cross polarized and annular oblique imaging are needed to see them even with objectives and condensers of NA 1.3 or more. I was trying this at 313nm with an NA 1.2 objective and 0.85 condenser (both using glycerine as immersion fluid) and normal brightfield, with a slide which just had a dry mount of gelatin. It’s a bit of a white whale for me as I have yet to get good images of it. Although I now have a slide I can do UV imaging with, this was always going to be fun.
First a set of 3 images done at different heights within the A. pellucida diatom. The field of view is so small that only part of the diatom can be seen and it is close to one end of it.
A. pellucida, focus position 1A. pellucida, focus position 2A. pellucida, focus position 3
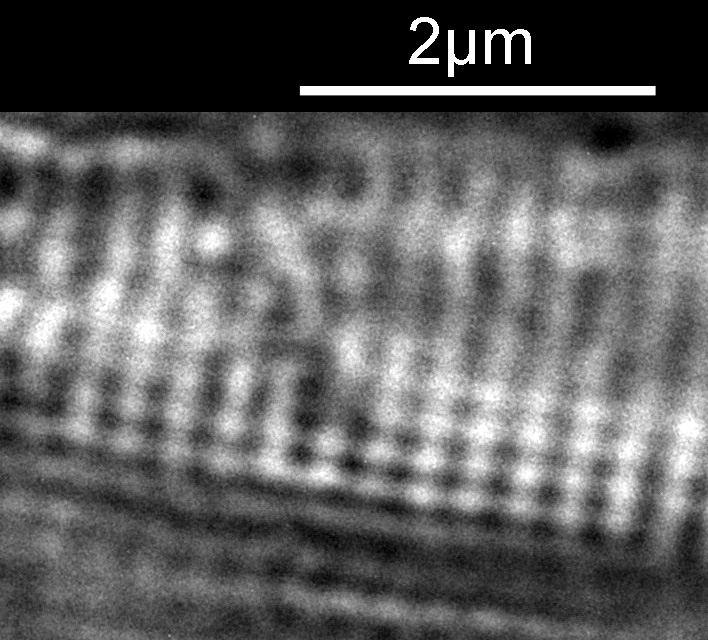
In the first two images above, there are faint vertical lines which become more visible in the second image. These are I believe called striae. In the third image, these lines start to break up and form a dot pattern. These are the punctae in the structure coming into focus. Let’s go in closer to the third image and have a better look. This is a crop from the image above, taken before the image was resized for sharing.
Crop from the Image 3 of the A. pellucida
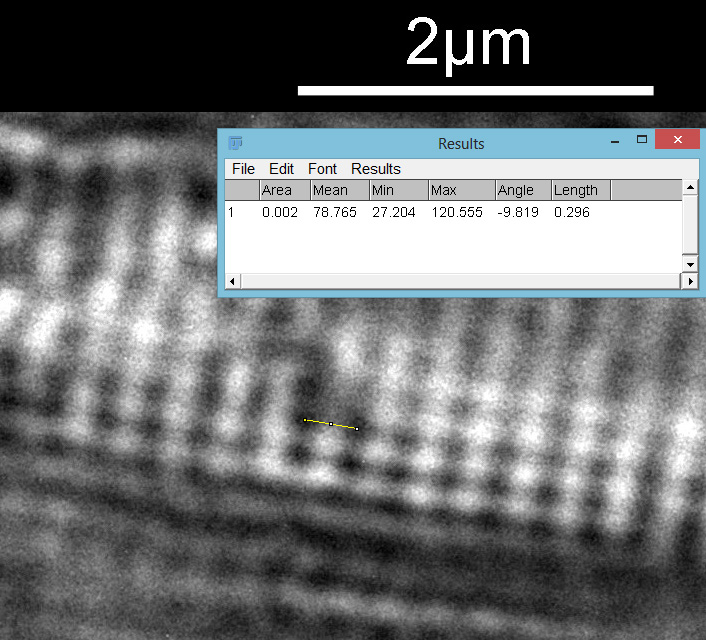
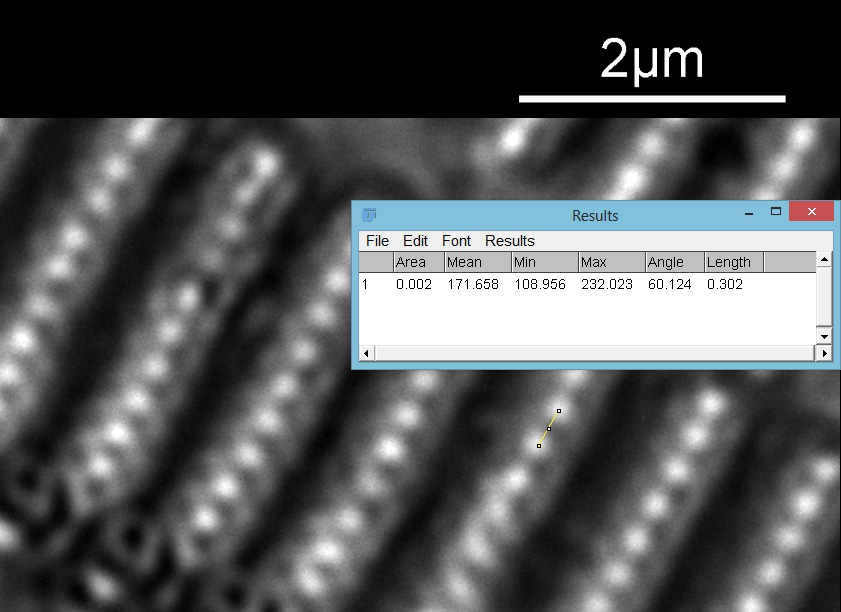
The regular dot pattern can be seen more clearly now. What is the spacing of these features? I put the image into ImageJ and did a couple of measurements. I have chosen to measure the distances between the dark spots, but it would be the same if I had chosen the white spots. First the distance between the striae.
Distance between the striae on A. pellucida (296nm)
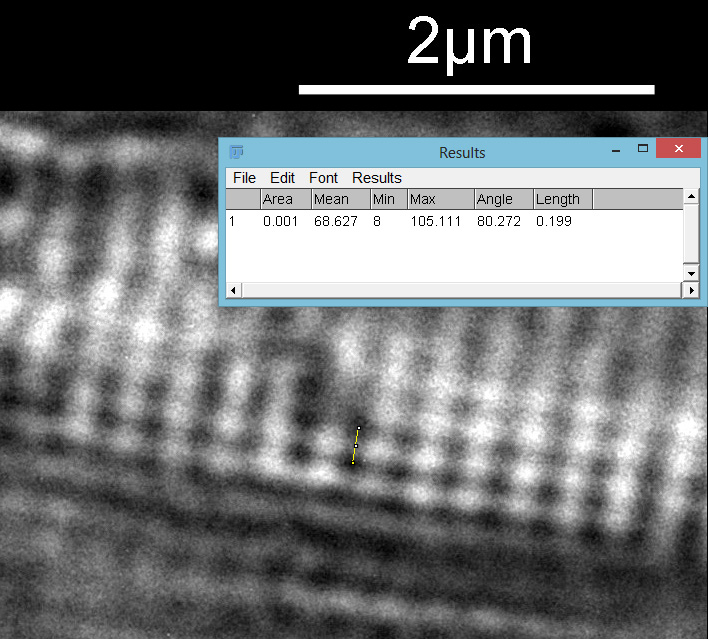
Then the distance between the punctae on a given stria.
Distance between the punctae on A. pellucida (199nm)
From this it looks like the striae are about 300nm apart and the punctae about 200nm, which is in keeping with SEM data I’ve seen on this species of diatom. This shows why they are such a challenge for the light microscopist. Even with the 313nm light being used here, I’d expect the maximum resolution obtainable with my setup to be between 135nm and 150nm depending on which calculation I use, so this is getting close to that.
Have I finally caught my white whale? While it is lovely to see the features on it, I wont stop trying to get better images, so I do not consider it caught just yet.
For the second diatom, I moved around the strew and found what I think is a diatom from the Synedra family, although I don’t know which one (if I find out I will update this). At this point it is worth highlighting one of the challenges I have found with using this new camera. The image below shows what I can see through the eyepiece of the microscope and was taken with the camera phone, with the 100x objective.
Camera phone image through the eyepiece with the 100x objective
In the image above is a blue box. This is the approximate size of the image that the Matrix Vision camera sees when used with the 8x Lomo photoeyepiece and is about 16 microns square. As you can imagine it is a challenge even finding the subject with the camera as even the smallest touch on the stage causes it to disappear.
As before a series of single images showing part of the diatom taken at different focus heights.
Synedra diatom, focus position 1Synedra diatom, focus position 2Synedra diatom, focus position 3Synedra diatom, focus position 4
As the diatom is moved up and the focus position varies, there are dramatic changes in the images, and the features which are visible. In the third image a series of bright dots appears in lines at 90 degrees to the diatoms central axis. As we go further, the dots reveal themselves to be what look like pits in the structure. Presumably these are holes in the structure, and with the focus at one position the light gets through, and when it is moved it cannot. Perhaps this is an interference effect given the wavelength being used and the size of the features?
As with the A. pellucida image, I took a crop of one of the images and put it into ImageJ to get some measurements on the distance between the dots.
Distance between the dots (302nm)
On this diatom the dots look at be about 300nm apart.
Where has this new work taken me? The Matrix Vision camera continues to impress me, and live view at 313nm enabled me to focus down to fractions of a micron to get the images (the camera is so sensitive, I was able to do live view imaging at about 1s exposure to get the focus right). The field of view is tiny though, so I need to go back and re-evaluate some of the my other quartz photoeyepieces to see if I can find something which presents a wider image to the camera. At the moment the pixel resolution with this setup would be about 178 pixels per micron (5.6nm per pixel). Given the max resolution I would expect is about 130nm, that means I am wasting a lot of the resolution. A photoeyepiece which gives a wider field of view would help here, giving me both a larger area being imaged, while hopefully not compromising actual resolution. More work needed here in the future. 254nm illumination should be even more impressive than 313nm, but my current homemade light source is not powerful enough to use with this objective so that will be another job for 2023.
Before I go, a quick photo of the slide itself.
The slide itself….
I look forward to spending plenty of time on this and the other slides in 2023. As always, thanks for reading, and if you’d like to know more about my work I can be reached here.
My new UV camera uses a Sony IMX487 sensor, and as I showed recently certainly offers improved UV sensitivity, and its behaviour at 280nm is very impressive (as I have shown here). With my spectral sensitivity testing though, I can only get down to 280nm. With the UV microscope I built, one of the goals was to use it for imaging at 254nm (see here for some early work on that), however at the time, my cameras had very little sensitivity that far into the UV and I was dealing with very long exposure times, often 10 minutes or longer. Another issue was that live view didn’t work so focusing was a nightmare. Today I will share some initial images taken with the new Matrix Vision camera with the Sony IMX487 UV sensor.
The slide imaged was my custom made diatom slide (made with quartz and fused silica instead of glass for the slide and coverslip) on my modified Olympus BHB microscope, and using the 254nm lamp I built. The objective was a 40x Leitz NA 0.65 UV objective with glycerine immersion and the condenser an antique Zeiss quartz one. The optical filter was a 254nm one from a forensics camera. The images are single shots (not stacks) and show parts of two diatoms on the slide. They are shown as full frame images and are not cropped, although I dropped the resolution of the images from 2848×2848 to 1600×1600 for sharing here. They have been sharpened slightly, and I played with the curves a bit as well.
First one, part of a Pleurosigma angulatum diatom.
And second one is part of another diatom (I am not sure what this one is).
The images are showing very high resolution – which is what would be expected given the short wavelength – especially given that the NA of the objective is only 0.65. There are some artifacts in the images (banding for instance) and I am not sure how much this is due to the camera settings, the light source itself or other optical components in the setup as I have seen similar effects before with another camera at this wavelength. I shall have to dig more into that. On the second image there are some very bright white points of light which are appearing in the structure of the diatom. I’ve not seen these before, but they seem to be ‘real’ features and not artifacts. This is what happens when you look at things with different wavelengths…..
With this new camera I was able to capture images in seconds rather than minutes (14s exposure and a gain of 20 were used for these images as opposed to 10-30mins and ISOs of 4000 and above) and I was able to focus using live view on the computer so it is definitely an improvement. Id like to be able to use lower gain for the images, but that means longer acquisition times than the software currently allows for, so is not a simple ask. The sensor is much smaller than I am used to with my SLR cameras (11mm x 11mm vs 36mm x 24mm) and finding the diatoms was a challenge even with this 40x objective. I dread to think how difficult it would be with a 100x one.
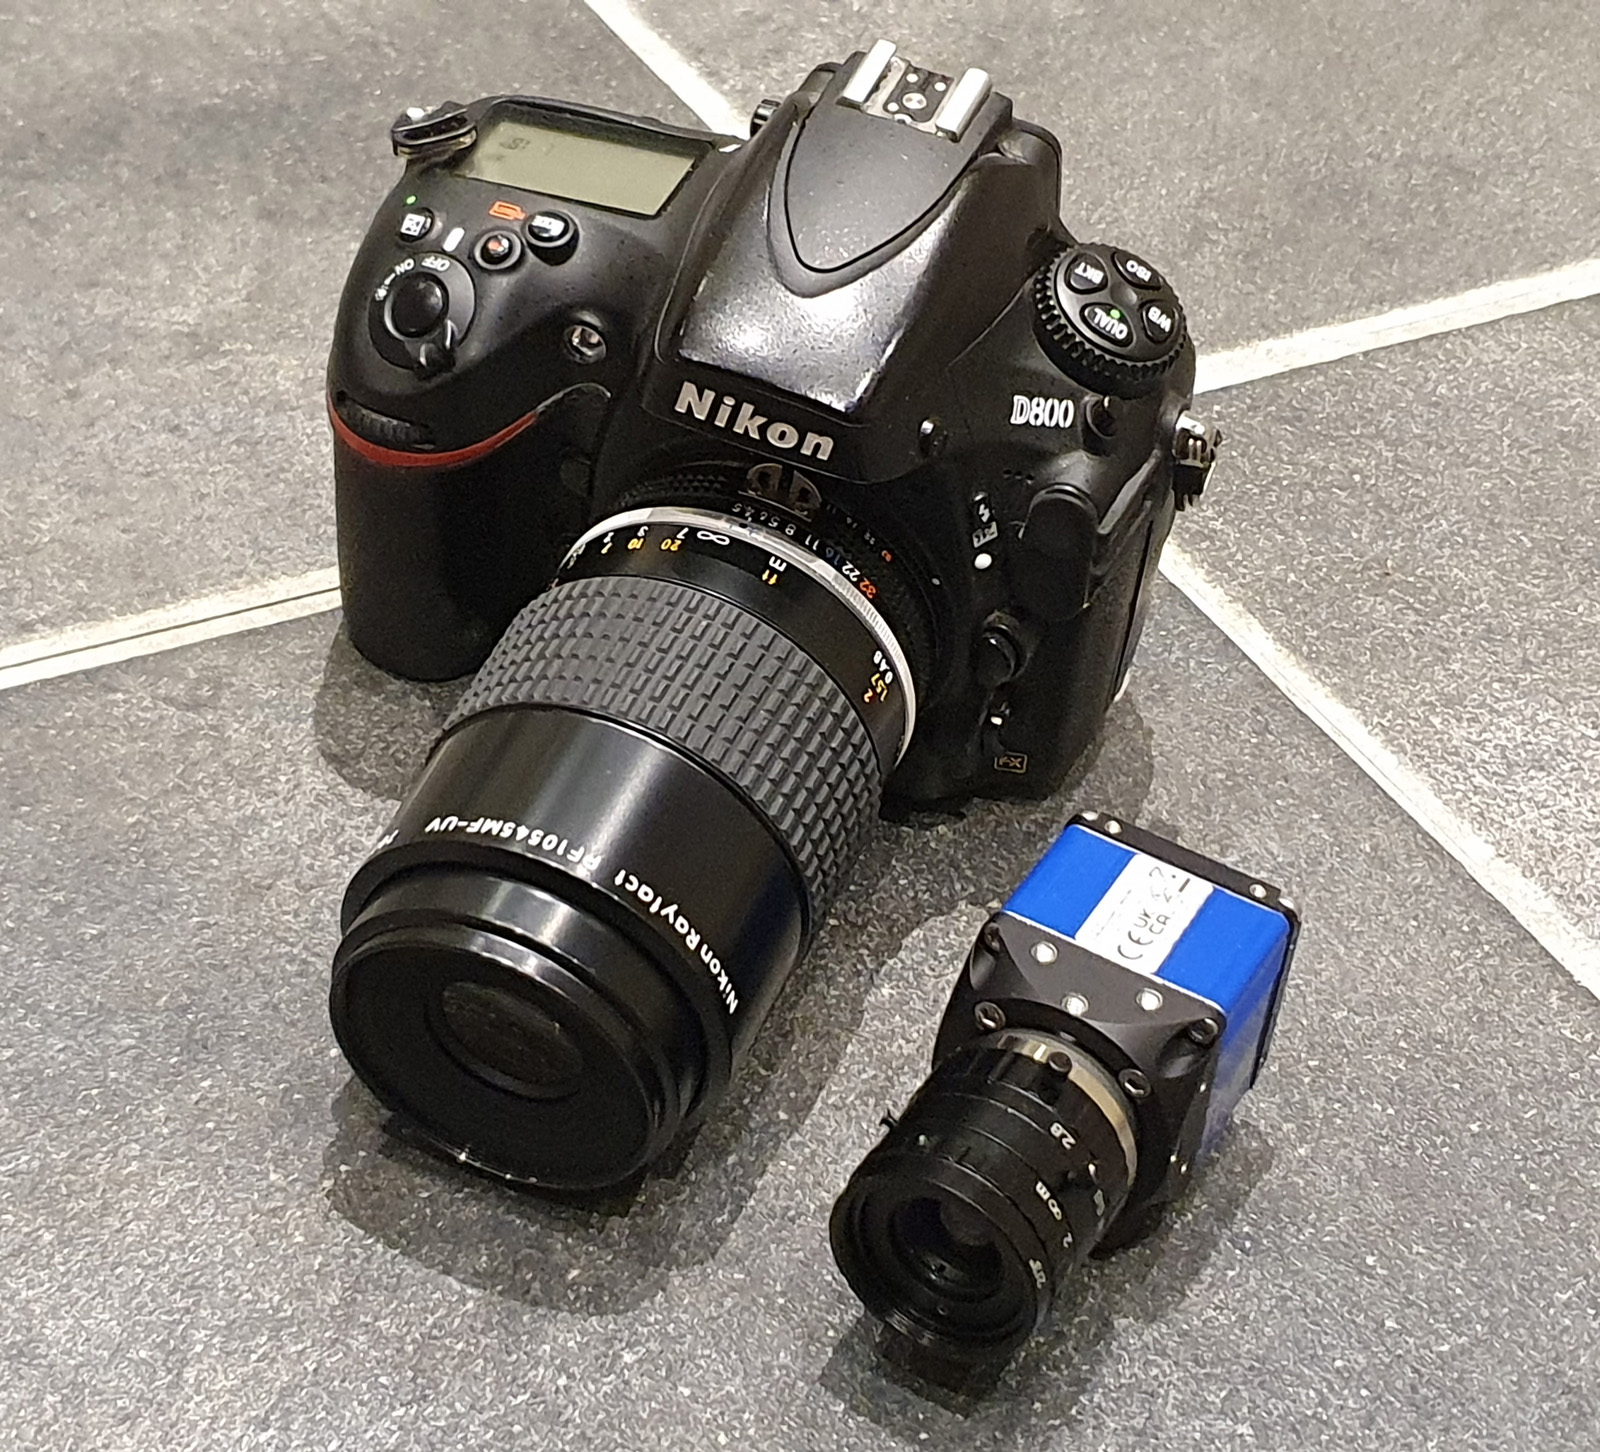
As far as I am aware these must be some of first images with this sensor (which aren’t from Sony) which are being shared. I hope to do more with this camera for imaging diatoms and also for my sunscreen work, and it continues to impress me with its capabilities. Before I go, a photo to compare the Matrix Vision camera with one of my SLRs (both with UV lenses on), just to show how small it really is.
Comparison of an SLR camera (on the left) with the Matrix Vision UV camera (on the left)
As always, thanks for reading and if you’d like to know more about this or my other work, I can be reached here.
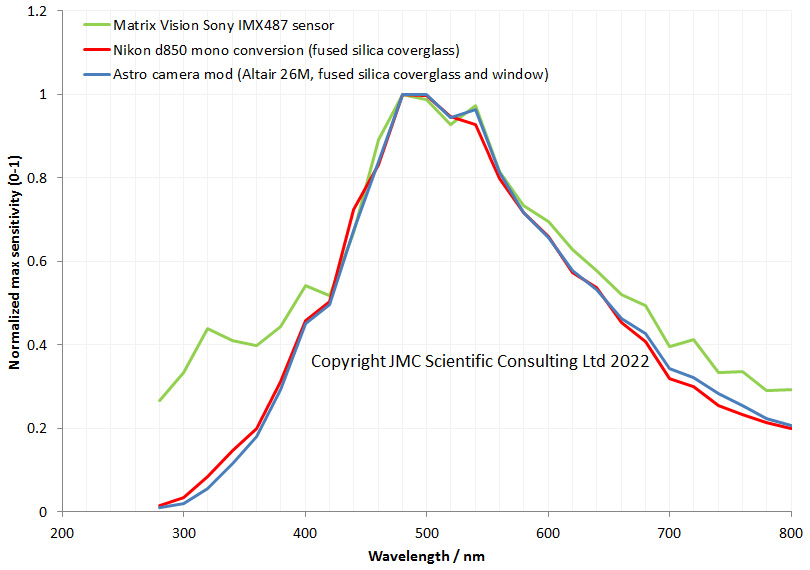
Having received a Matrix Vision BlueCougar camera with a UV sensitive Sony IMX487 sensor (which I reported here) one of the first jobs is to understand just how sensitive it is, especially in the UV. To do this I ran it through a test with my spectral sensitivity measurement system (see here for details on that build). As comparisons I used two different cameras – a monochrome converted Nikon d850 with the Bayer filter and microlens array removed, and an astro camera (Altair 26M) which still has microlenses. Both of these have fused silica coverglasses and are optimized for my UV work. I normalized the output from each camera to the max value to more easily compare them, and here is what the comparison looks like.
Comparison of the IMX487 sensor with other monochrome cameras
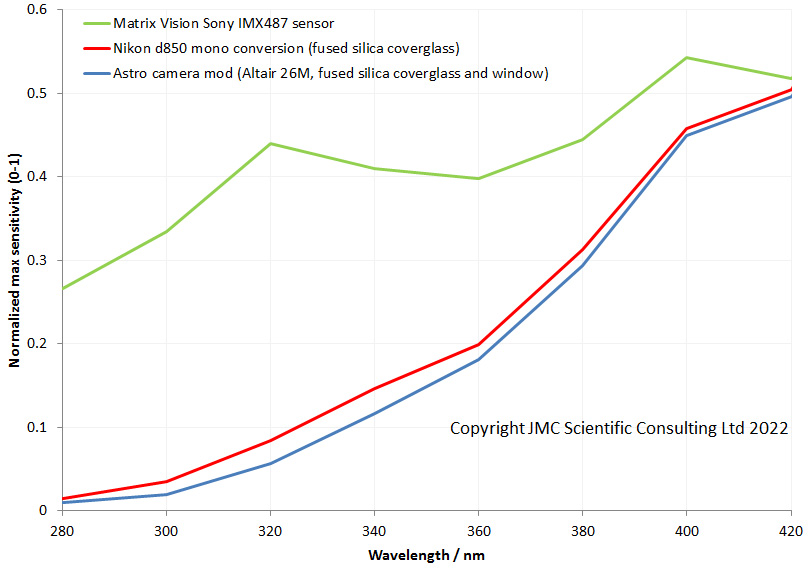
And a more close up view of the UV region.
Comparison of the IMX487 sensor with other monochrome cameras closeup on the UV region
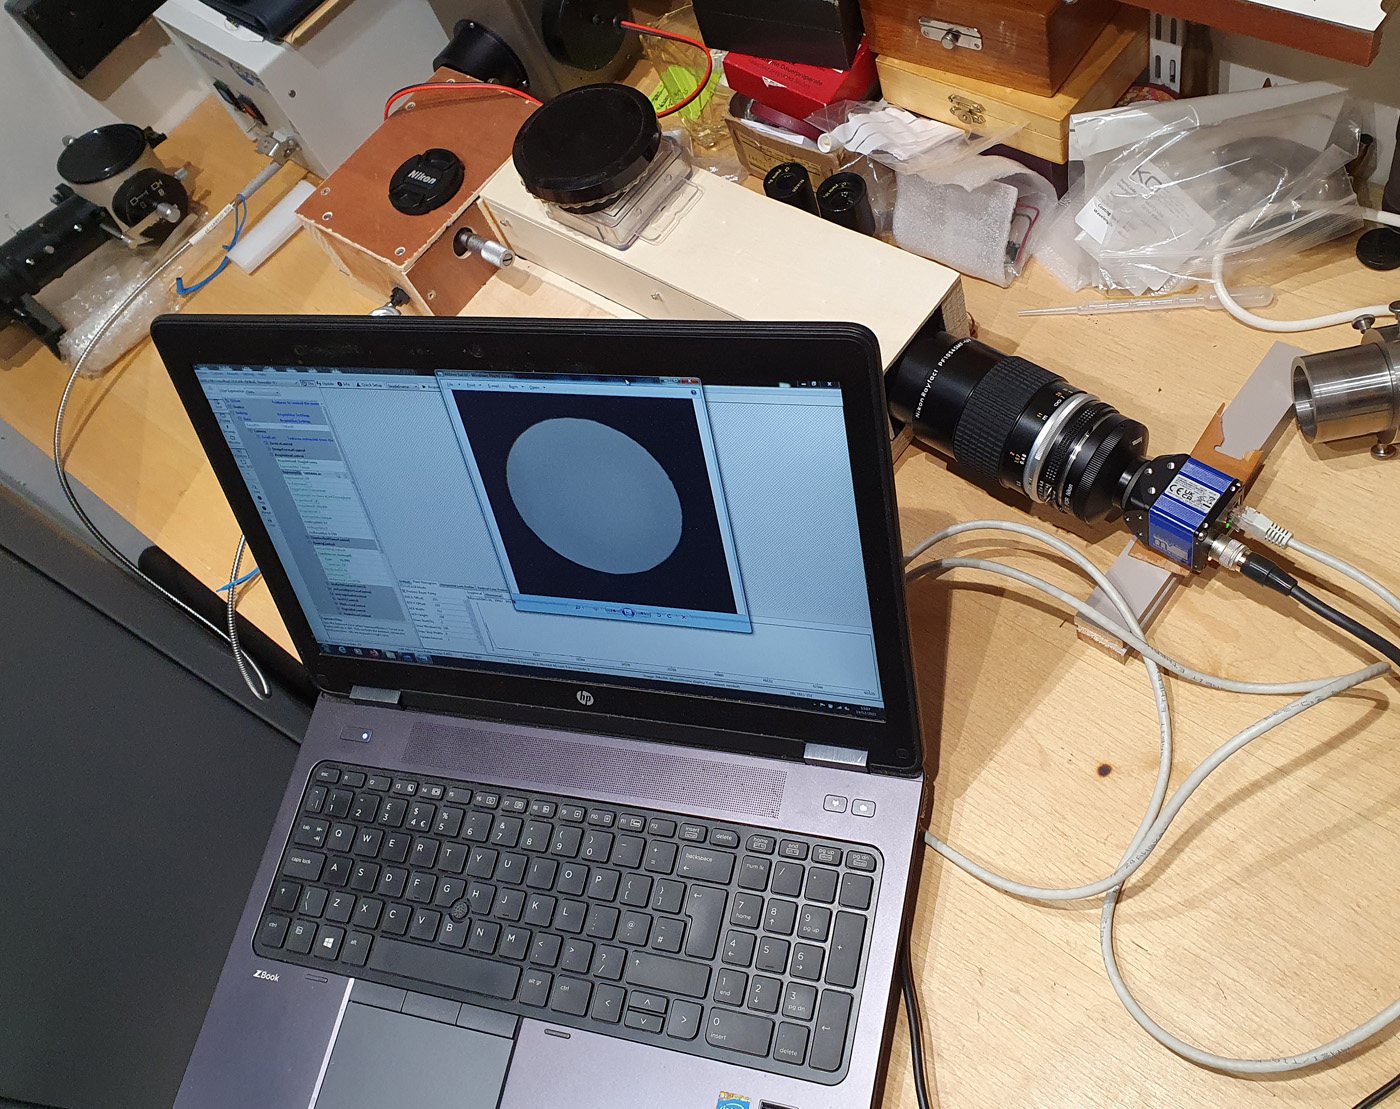
Here’s an image of the testing setup, on a suitably disorganized work bench.
Spectral sensitivity testing setup
Having seen a few different QE curves for this sensor, I wasn’t sure what to expect. This was why I needed to do the measurement myself, to allow for comparison with other meaningful cameras, and as of today (14th Dec 2022) as far as I am aware this is the only such comparison available. The Matrix Vision software for the camera was great for this test, as it allowed me to get the histogram data directly, without saving the files and then analyzing later, which saved me loads of time. Also I used binning to improve the overall sensitivity of the camera. As I am slightly limited by max exposure time (I used 5s for the Matrix Vision camera, vs 30s for the Nikon d850 and up to 4 mins for the astro camera) I did a 4×4 binning which reduced file size but drastically reduced the need to long acquisition times. This was kept the same for all wavelengths, so doesn’t change the shape of the curve and still allows for comparisons with other cameras.
After all that testing, what to make of this? I’m actually pretty amazed by how sensitive this camera is in the UV, especially below 350nm where it is dropping only very slowly. In fact for my microscopy at 313nm and 365nm, the sensitivity at these wavelengths is almost the same, while with my other cameras at 365nm they are about 4x as sensitive as they are at 313nm. This will make imaging at short wavelengths simpler, especially when combined with the live view capability of the Matrix Vision camera. While I cannot measure below 280nm with my setup, the sensor is supposed to offer good sensitivity down to 200nm, only dropping slightly between 300nm and 200nm, and this is where it really should shine when compared with the others. The only way I can test that though is to get it on the microscope and see how it behaves, and that is for another day. Sony have been pretty cagey about how they have made this UV sensitive. I have my suspicions, but more testing needed on that.
As always, thanks for reading, and if you’d like to know more about this or any other aspect of my work, I can be reached here.
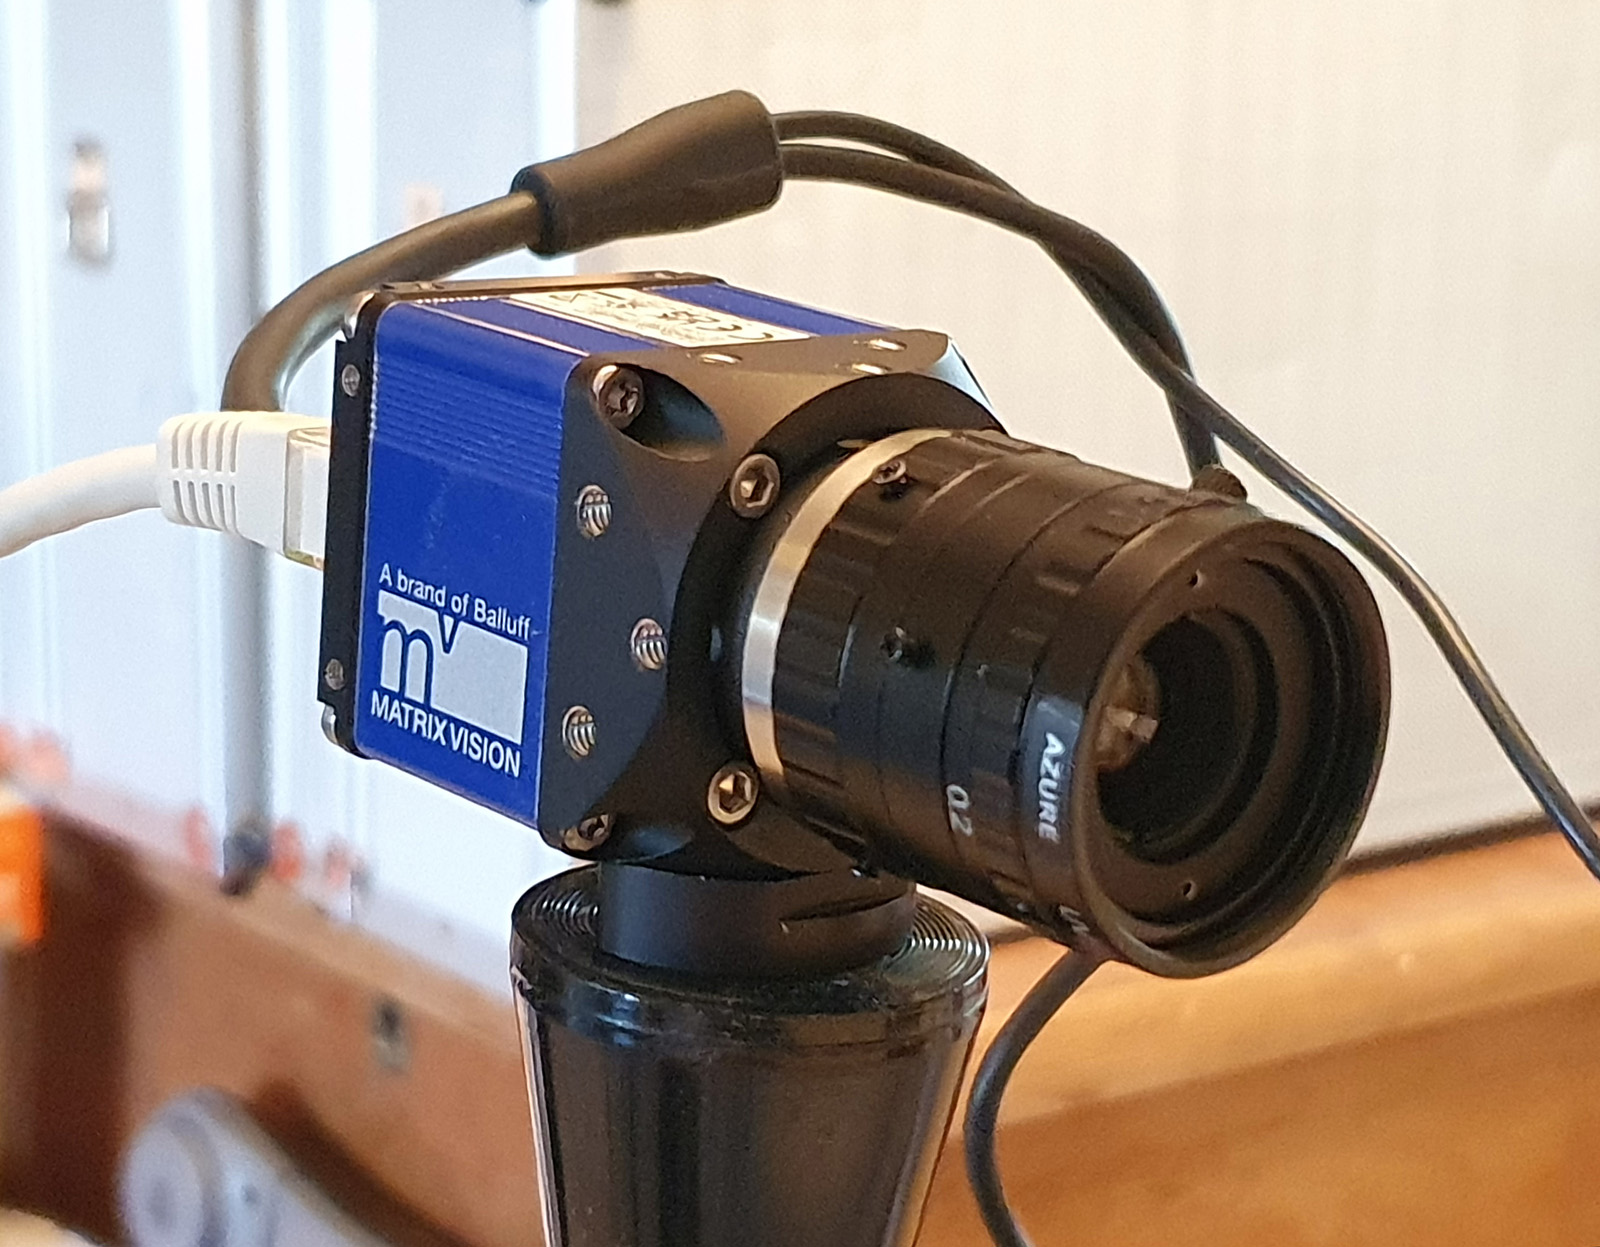
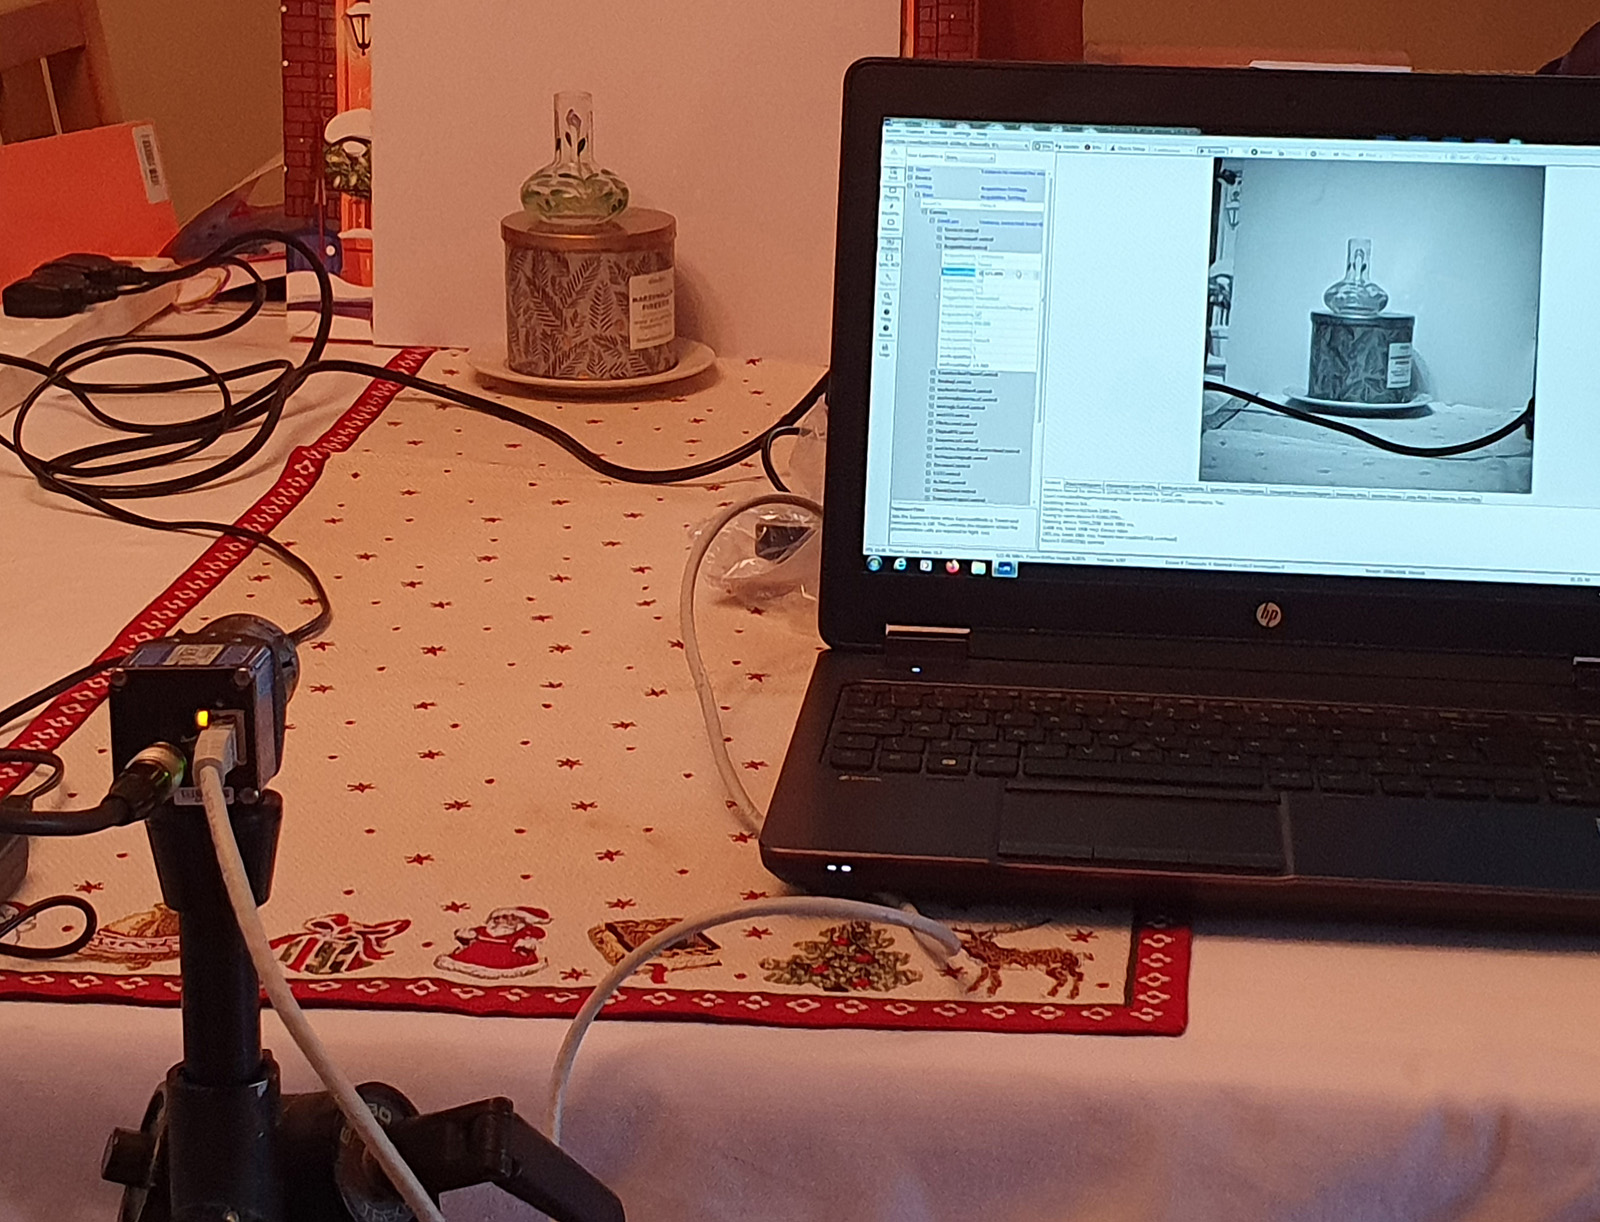
Good things come in small packages, and today’s arrival will hopefully fall into that description. With imaging in UV, sensor sensitivity is always a challenge, with the sensitivity getting worse as the wavelength gets shorter. With my UV microscopy, if I image down at 254nm, it is not unusual to have exposure times of 20 minutes or more, even with my monochrome converted cameras. What seems like an age ago now, Sony announced they were going to be making a new camera sensor which was specifically designed for imaging in the UV from 200nm to 400nm – the Sony IMX487 sensor. This is a small sensor, designed for C mount industrial cameras, but had an impressive 8Mp resolution, so it got me interested in the possibility of using it for my microscopy work on sunscreens and diatoms, or for other general UV imaging. I approached a couple of different vendors when they started announcing they were going to be making cameras with these sensors in and settled on Matrix Vision, who would be making it as part of the their Blue Cougar range (see here). The camera arrived today, so I thought I would share some image of it before the testing begins.
This thing is tiny. I thought it would be much smaller than my normal cameras, but I wasn’t quite ready for just how small it is (a diminutive 4x4x5cm and apparently they can make it smaller if needed). Here it is on a tripod with a 25mm f2.8 quartz lens attached (which is also dinky).
And a shot of an initial visible light image from the setup testing.
So far first impressions are good. The software is straightforward but comprehensive, and the camera is built very well. I did do some UV images at 365nm and 254nm, and it certainly gives images there, but I haven’t done anything systematic yet to see just how sensitive it is. The next step will be to do some spectral sensitivity measurements, which will give me the sensitivity from 280nm to 800nm. Then it’ll be time to get it on the microscope and see how it behaves. This should offer much more sensitivity than my monochrome converted cameras when imaging at 313nm and 254nm, without the drawbacks of the astro camera I tried (cooling fans causing vibration for instance). The ideal goal would be to be able to do videos in the UVA, UVB and even UVC if possible. While I have been able to get UVA and some UVB video files, the cameras I have had up until now just didn’t have the sensitivity for UVC video work.
I shall of course be updating with my findings on here, so check back in occasionally for new news. As always, thanks for reading and if you’d like to know more about this or any other aspect of my work, I can be reached here.