
Earlier this year I started my journey into the world of microscopy, and after a few weeks in thought ‘wouldn’t it be such fun to build a UV microscope’. This idea came along with all the optimism and naivety of someone who really didn’t know what he was letting himself in for. After all, I’ve been researching UV photography for a while and everything can just be reapplied, right. It’ll be easy, right. Well as Arnie said in Commando, that cinematic classic from the 80s, “Wrong”. Even though it has been challenging, it has been great fun and scientifically rewarding. You don’t really know how something works until it is in bits on your work bench.
A few weeks ago in an earlier post, I discussed about the glass elements in the binocular head which contains the eyepieces (covered here). The issue here was that the 2 elements – a circular window and a prism – which were present, blocked the short wavelength UV and would be effectively opaque below 300nm. Now this was a bit of a tricky situation. While I could potentially just get rid of the binocular head and have a tube which the camera would connect to, I wanted to keep the eyepieces and make it look like a normal microscope. To do this, there was only one thing to do, and that would be the replace the window and the prism with UV fused silica or quartz (or calcium fluoride) versions. The problem with this is that both parts would need to be custom made, and anything custom made out of these types of materials is expensive, especially something as complex as a prism made of multiple components.
For help with this I approached UQG Optics, who I have bought filters from before and who have always been good to work with. After drawing up a set of plans they are able to make components in the sizes that I need. Firstly the window. Being a circular this was relatively easy, however the size was unusual so is a custom build. The prism presented more of a challenge. As shown in the previous post, the prism is held within a metal slider. A few screws loosened, and a bit of gentle persuasion with a thin bladed screwdriver, and the prism was released from its cradle to reveal the following.
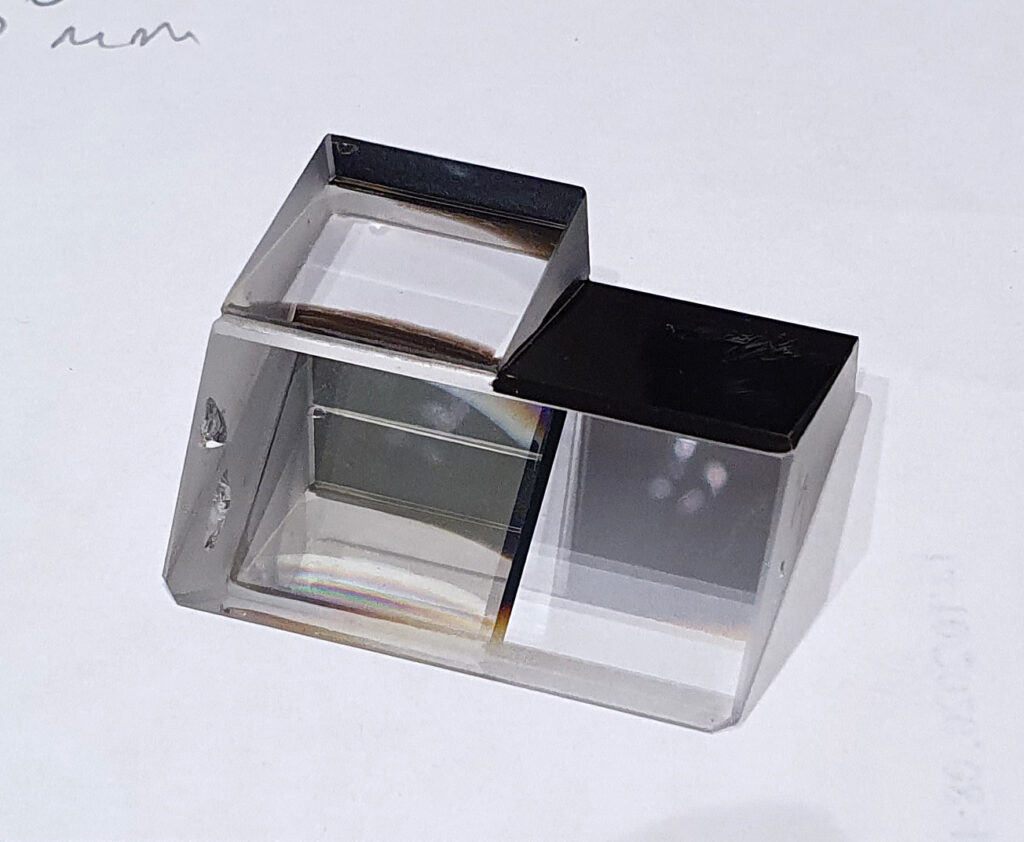
The prism is split into 2 halves – left and right in the image above. When the right hand side is slid into place, the light coming from underneath is bounced into the eyepieces, and none of it can pass directly upwards towards where the camera would be (when the vertical tube is added to the binocular head to make it a trinocular). When the prism is slid across so the left side of it is in the optical path, the light is split with some of it going to the eyepieces, and the remainder going vertically upwards to the camera. To replicate all of this in UV fused silica would be a stretch. It’s a big block of glass, and with some complex angles and shapes. Rather than trying to replicate the whole thing, I decided on a different approach – to cut the prism down the middle, and keep one half while replacing the other half with a simple block of UV fused silica. By keeping the right hand side of the prism, I can keep the side which directs light to the eyepieces and allows focusing. By replacing the left side with a block of UV fused silica, the light would go straight up to the camera. In this configuration, all the light would go to the camera, helping to improve optical efficiency and final focusing for the camera can be done using the live view function. The block of UV fused silica would simply be glued to the remaining part of the prism, and the whole thing mounted back into the the slider. Being a block with parallel sides that is smaller than the overall prism it is also much easier (and cheaper) to make.
Both the UV fused silica window and block have been ordered, and the prism will be sent off to be cut down and prepared. These should all be back with me in December, and are the last UV fused silica components required to convert the microscope.
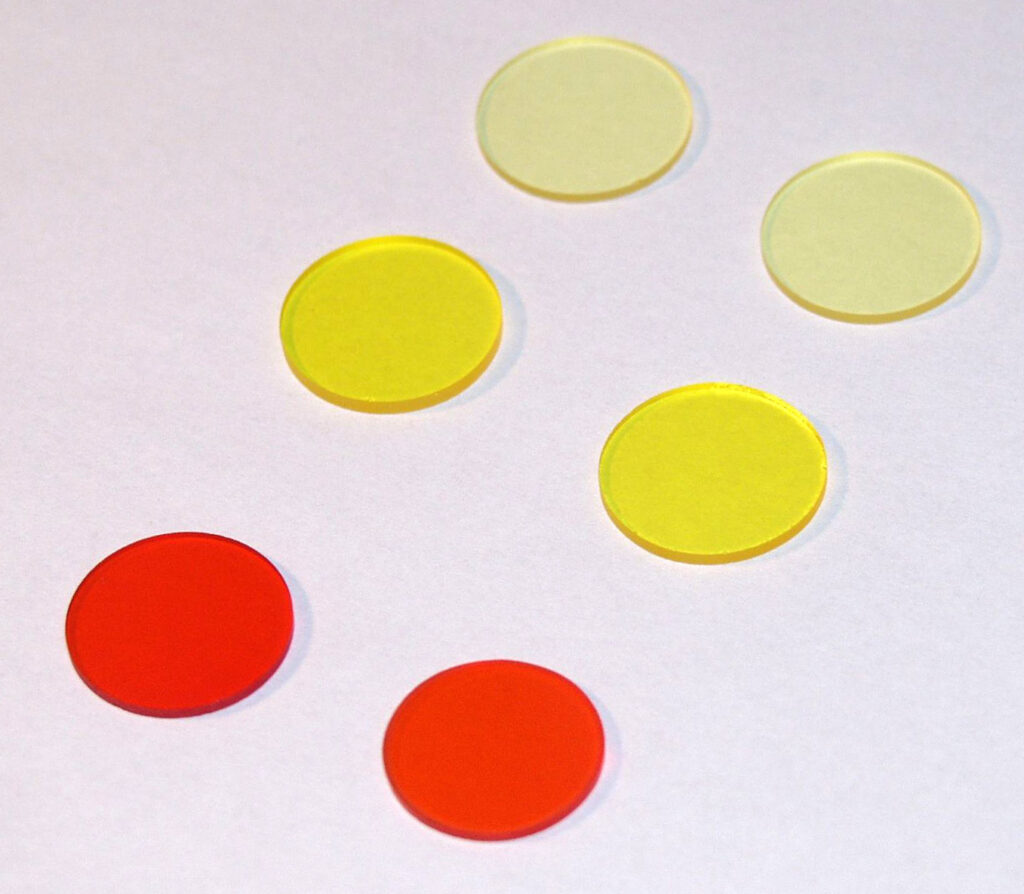
In all of this the safety of the user (i.e. me) needs to be considered. UV light sources for microscopy tend to be high power, and when focused to tiny pinpoints are extremely dangerous. Couple this with the light then being passed through eyepieces, and the risk of eye damage becomes a very real threat. Retaining parts of the original glass prism for the light going to the eyepiece is actually an advantage here, as the glass itself will block some of the UV, especially the UVB. However there would still be a lot of UVA passing through. How to address this? I wear glasses anyway which have UV blocking layers on them, and I would also wear UV safety glasses when using the device, but it would also be good to have some UV blocking filters in the eyepieces themselves to block anything below 400nm. The eyepieces are 23.2mm diameter so rather than having some long pass filters custom made, I wondered whether there were any 23mm yellow camera filters out there. A quick on eBay search led me to Vintage Cameras Ltd, who had some yellow and orange filters in 23mm diameter for substantially less than they would have been to have custom made. There were two light yellow, two dark yellow and two orange filters as shown below.
Measuring the transmission spectra of the filters using my Ocean FX spectrometer gave the following.
In the scan above, Yellow 1 and 2 are the light yellow filters, Yellow 3 and 4 the dark yellow ones and Orange 1 and 2 the orange ones (if that wasn’t obvious). Yellow 3 and 4 were almost identical, hence the lines overlap. All showed well defined long pass behaviour, although the light yellow and orange filters had a bump in the transmission below their cutoff. Zooming in to the short wavelength end gives the following.
The light yellow filters (Yellow 1 and 2) start letting some UV in at around 300nm and then transmission gradually rises from there. However the darker yellow and orange filters are effectively blocking all the UV light from 400nm to 250nm (less than 0.05% transmission). As the goal is to block the UV while still retaining usability the darker yellow filters are the best trade off between UV blocking and visible transmission, and these will be the ones I use in the binocular head for the UV microscope. It should be emphasised though, that these filters do not obviate the need for UV protective eyewear, they just reduce the risk of damage when using the device while enabling it still be to be used like a normal microscope. I shall still determine the light coming through the eyepieces spectroscopically in the final build.
This UV microscope build has been a really interesting scientific challenge, teaching me more about optics (and microscopes) than I thought there was to know. All the replacement UV fused silica components are now ordered so hopefully in early 2021 I’ll be able to give an update on how it is working. Thanks for reading, I hope you enjoyed it and if you want to know more about this or my other work, you can reach me here.