
In my early days of UV microscopy, I got to wondering what the resolution was with my setup. I ended up buying a Newport USAF resolution test slide designed for really high end microscopes, and doing some tests with that to see what the resolution was when using 313nm, 365nm and 546nm light from a mercury xenon lamp (you can see that test here). However since then I have done more work on the microscope, and I have also started doing my diatom imaging. For looking at ready made diatom slides, where the coverslip and slides are glass and standard thickness, this effectively eliminates the ability to use 313nm light, and I am limited to 365nm and above. My preferred condenser (Olympus Aplanat Achromat) stops me from using 365nm light as it blocks it, and until recently I have been using filtered 450nm light as my preferred approach. Recently though I got myself a 395nm LED torch, the thought being to combine that with a 390nm Thorlabs bandpass filter. I can then use this with my preferred condenser for imaging diatom slides.
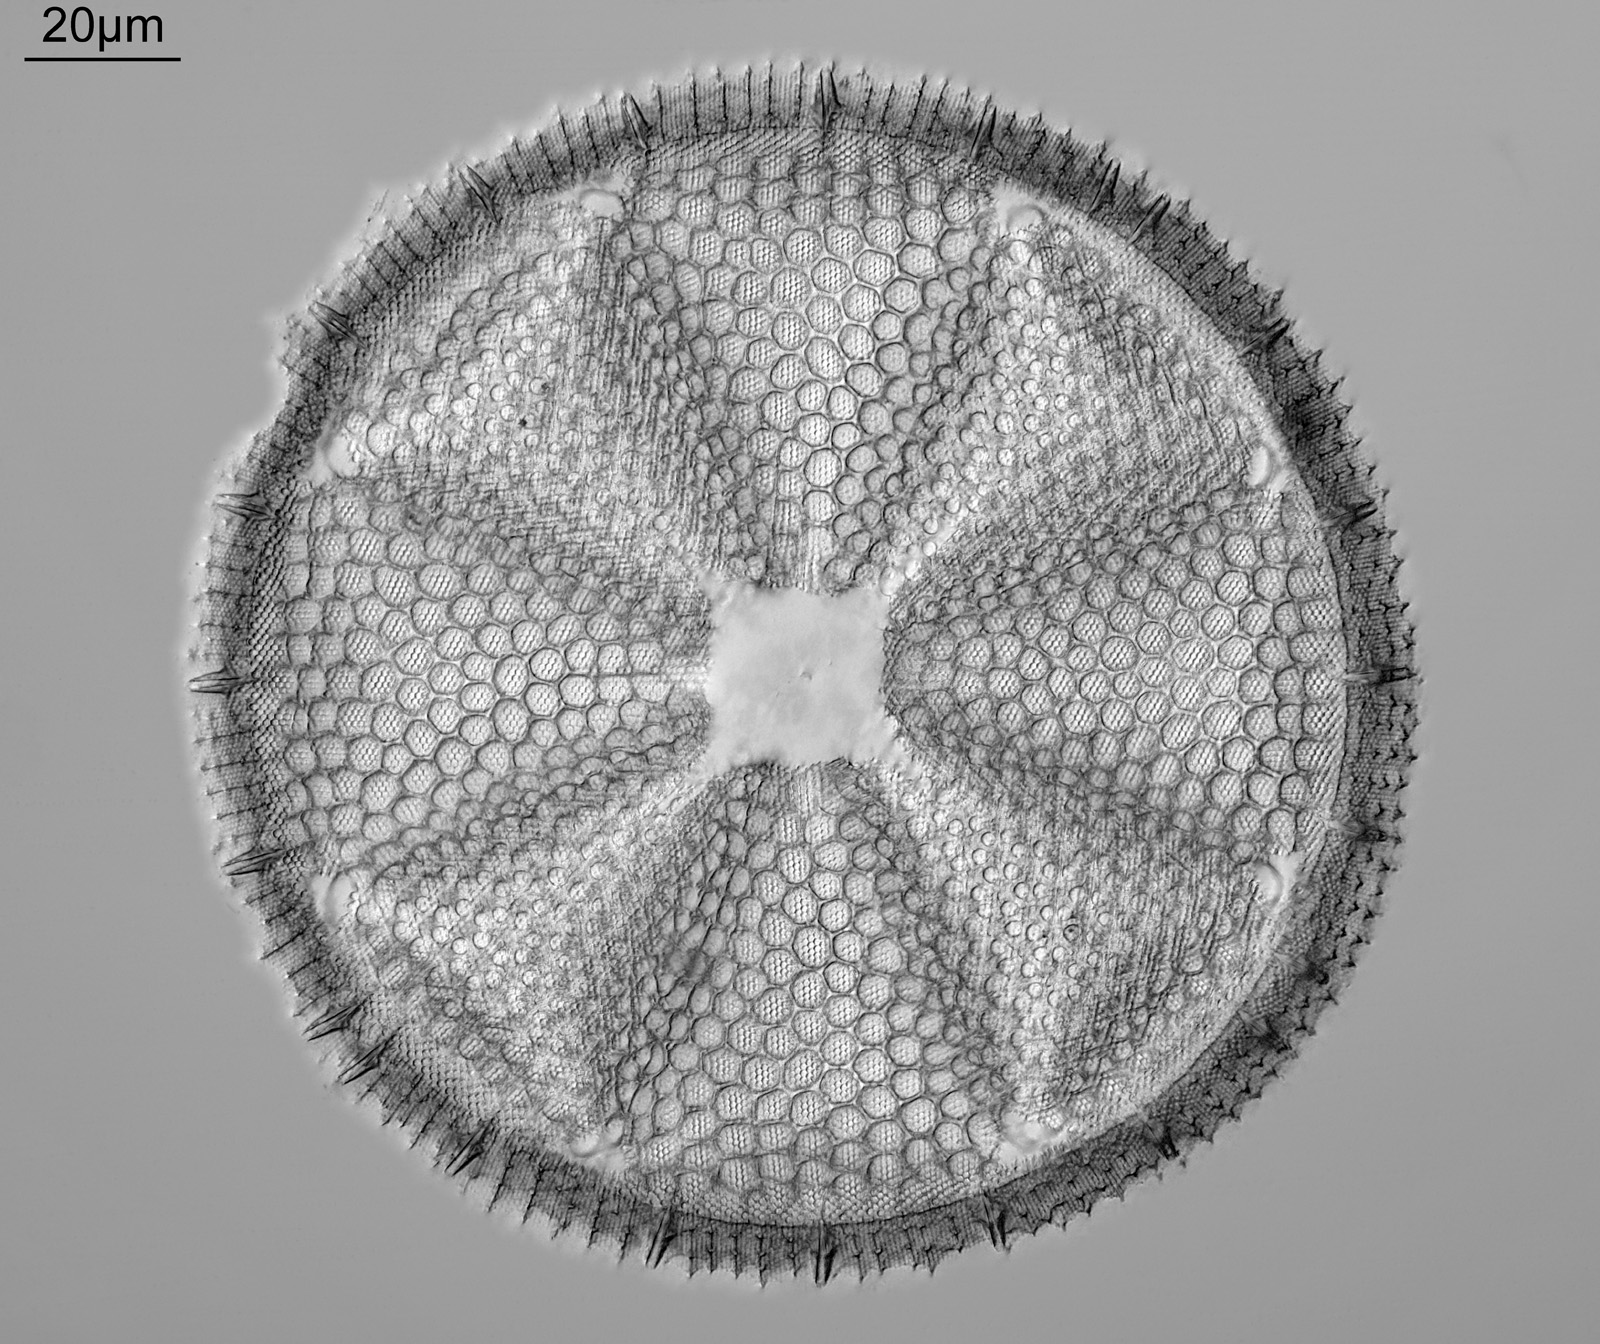
As an example of the types of images I can use this setup to create, the images below was taken on my Olympus BHB microscope using 390nm light with a 63x Leitz Pl Apo NA 1.40 objective with oil immersion, the Olympus Aplanat Achromat condenser, oil immersion, bright field (I’ve reduced the resolution sharing, but it gives an example of what can be done). The slide was by CN Walter.
This looked nice and sharp to me, but I wanted to get some more numbers to put behind this. I got my Newport test slide out again, and took three images where I changed the lighting – 390nm, 450nm, and unfiltered white LED light (400-700nm) – while keeping the rest of the setup the same. The objective was my 63x Leitz Pl Apo NA 1.40 with oil immersion, the condenser the Olympus Aplanat Achromat, oil immersion, bright field set to about NA 1.1. ISO100 for all images, although exposure time was varied so that overall image exposure was about the same for each one. Image was refocused for each one (although an Apo objective some minor correction of focus will pretty much always be needed with a NA 1.40 objective which has a tiny depth of field). Same small degree of sharpening I use for images from this objective, and finally an auto contrast. Shown below are crops from the centre of each image concentrating on the smallest sized features on the test slide.
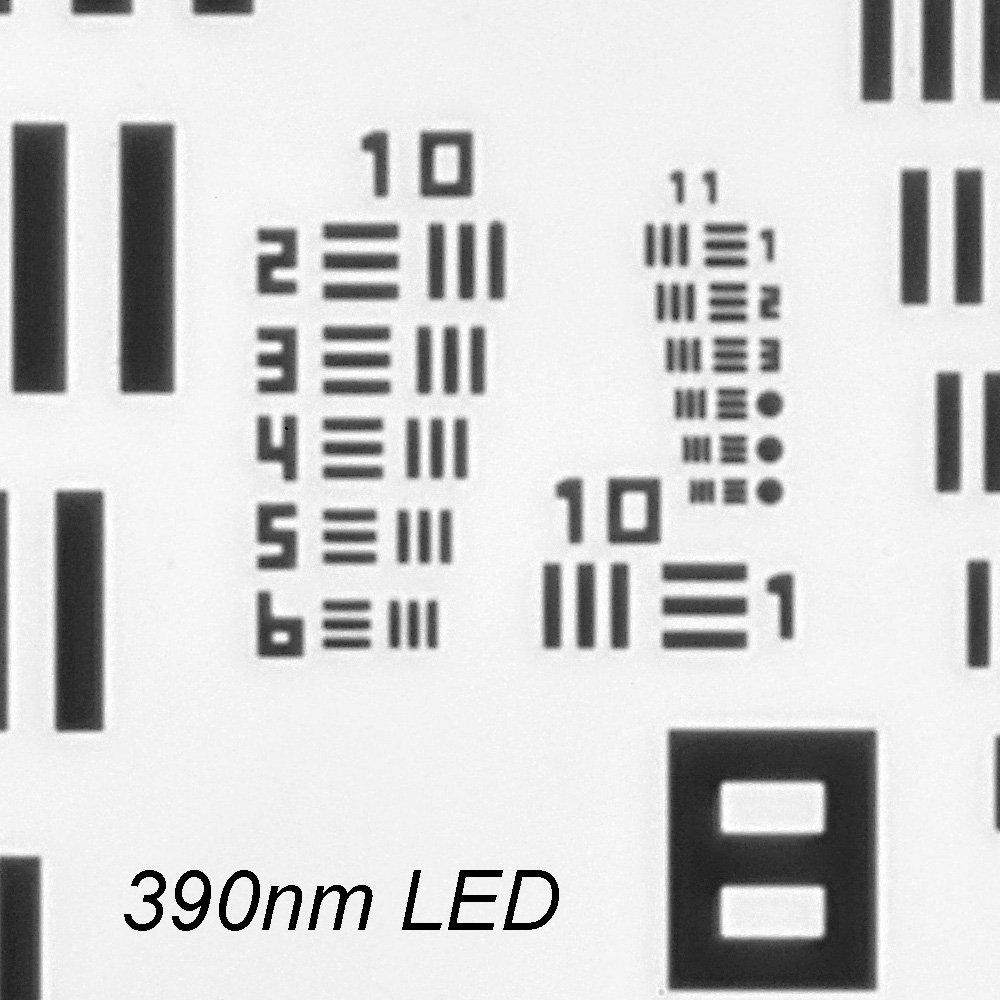
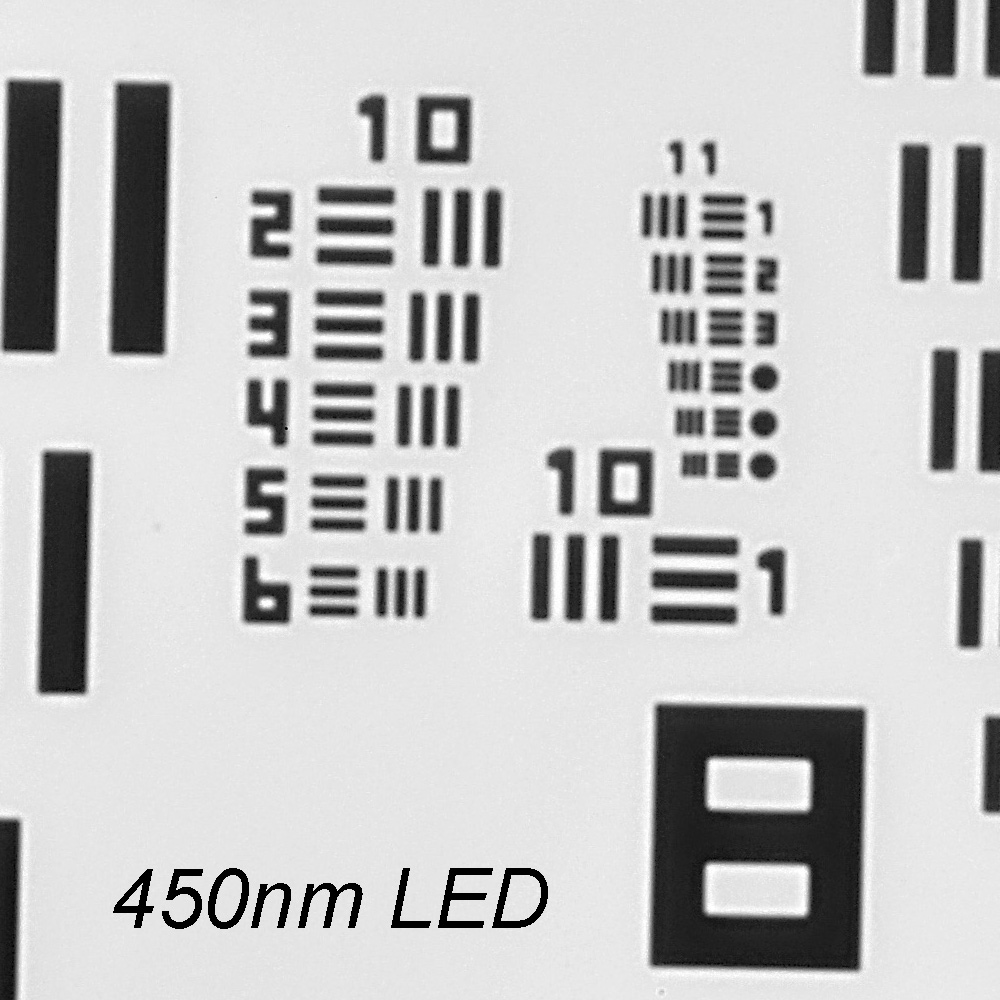
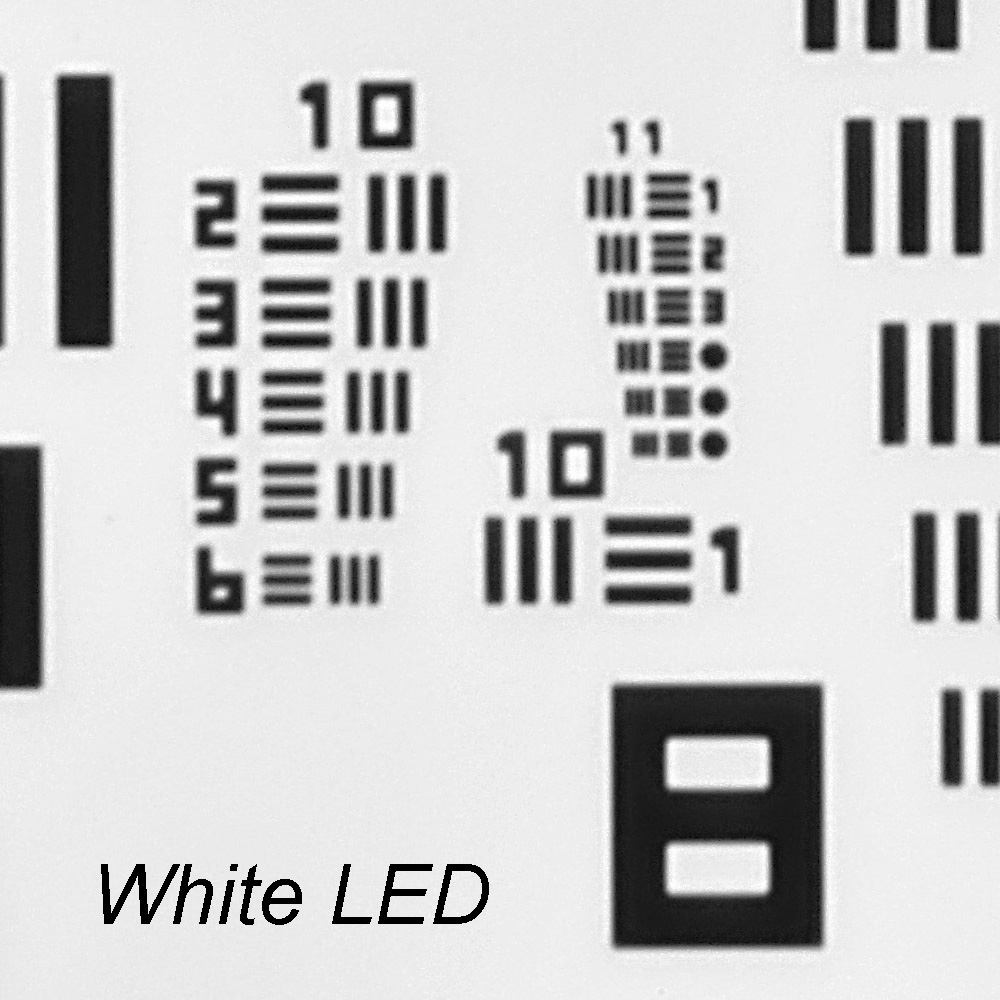
The part of the images above to concentrate on is the ’11’ with 6 sets of bars underneath it. These dark bars are chromium deposited on the quartz substrate of the slide. Group 11 has 6 Elements below it, which become smaller and smaller. Elements 1-3 are numbered, and then 4-6 just have dots next to them (you can see 1-6 for Group 10 to help with visualizing what is going on). The bar/space widths are as follows;
Group 11, Element 1 – 244nm
Group 11, Element 2 – 218nm
Group 11, Element 3 – 194nm
Group 11, Element 4 – 173nm
Group 11, Element 5 – 154nm
Group 11, Element 6 – 137nm
There’s more info on the Newport Test slide here – mine is a Highres 2 with dark lines on a clear background.
There is a difference between the different light sources, with a higher resolution being seen with the 390nm light vs 450nm vs white light – the shorter the wavelength the better the resolution. It’s perhaps easiest to see by looking at Group 11, Element 6 (the smallest of the sets of bars below the ’11’ in the images). With unfiltered white LED light the bars of Element 6 all blur together, while they are just about visible with the 450nm light and 390nm light. The difference between 390nm and 450nm light is more subtle, but just about visible on these images.
One thing to note – the 63x Leitz objective is designed to be used with a 0.17mm thick coverslip and immersion fluid. However no coverslip was used here. The reason for this is a practical one – with a coverslip on the slide, a small amount of oil is needed between the coverslip and slide, and with the extremely small working distance of the 63x Leitz objective, there is a risk of grinding the coverslip into an extremely expensive test slide, and this is something I do not want to do. This will hamper the maximum achievable resolution a bit but in theory not too much as the refractive index of the immersion fluid should be close to that of glass, however it should allow for comparative testing between the different wavelengths.
On the plus point, resolution looks to be down below 200nm for this setup especially for the 390nm light.
Looking back at my original resolution testing, these longer wavelengths stack up very well against the deeper UV images in terms of achievable resolution. This seems odd, as shorter wavelengths improve resolutions (thank you Abbe). However the setup is different here to the previous images – here the objective and condenser are higher NA vs for the deeper UV images. The higher NA’s here improve resolution for a given wavelength. As always, the whole system needs to be considered when looking at resolution. Yes shorter wavelengths can improve resolution, but the overall effect depends on everything in the optical path. Know your kit….
Where does this leave us? The use of 390nm light is a long enough wavelength to allow for the use of standard optical elements in the microscope and standard prepared slides for imaging diatoms, and enables improved resolution compared with white light and even 450nm light. Downsides – well you’ll need a UV sensitive camera with the internal UV/IR blocking filter removed. The LED source I have is plenty powerful enough and was cheap – about 25GBP – however with cheap often comes ‘nasty’ and one quarter of the LED has already burned out after a few uses. Brightness is also not very stable, making capturing images for stacking a bit more annoying. Caveat emptor….. A more expensive UV LED setup like the types that Thorlabs make should improve the issue with brightness variation, but at a much higher cost. I could also make one myself, and may do that if I have the time and/or the inclination. I will certainly persevere with 390nm light though, and a replacement torch is on its way. If this new one burns out I’ll get some better LEDs and modify them myself.
As always, thanks for reading and if you’d like to know more about my work, I can be reached here.