
Since starting some microscopy as a bit of project to keep me occupied during the Covid-19 lock down, I got to thinking about building a UV transmission microscope. This would ideally be something I could use down to and even below 300nm and be able to select the wavelengths I could image with. This has obvious application for sunscreen formulation imaging – looking at the distribution of UVA and UVB actives in the product for instance – and also in the imaging of skin as well as forensics, botany, and even archaeology. I even started to have a go at it, here, when I did some rudimentary UV microscopy of a thin film of sunscreen on a slide. The issue with that though was that other than the objective it wasn’t using a system designed for UV imaging. Why is that a problem, why not just use a standard microscope? The biggest issue is that things which are transparent in the visible region aren’t necessarily transparent in the UV, especially at the shorter wavelength end of the spectrum. As you can imagine, if the lenses you are using are not letting any light through, then it’s going to be pretty hard to use them for imaging.
This leads me to the key question – what would it take to build a UV transmission microscope, something suitable for multispectral imaging down to 300nm and even below? I’ll share my thoughts as I go about the process, as it turns out there are quite a few considerations. Of course I could go ahead and buy a ready made UV transmission microscope, and I’ve come across a few companies that seem to offer them. I have not however even bothered checking the prices. Even if they were willing to provide a quote for me, the systems would cost tens if not hundreds of thousands of GBP. This sends me down the DIY route, and either sourcing or adapting components to do the job.
As I have already seen with my sunscreen imaging, doing UV transmission microscopy in the 365-400nm region is certainly doable with my normal microscope, however as mentioned above it is certainly not optimised for it. Also going to shorter wavelengths isn’t possible with the standard microscope due to the current optics absorbing the light. This means rethinking what to use for the condenser, the photoeyepiece, the internal focusing optics of the microscope itself, the filtration, the light source, even the choice of slide and coverslip, to try and maximise light throughput to the camera. If even one of these blocks the UV, then it won’t reach the camera, so all have to be assessed and changed. As you can imagine, this is not going to be an overnight fix, and I wont be covering everything in todays post.
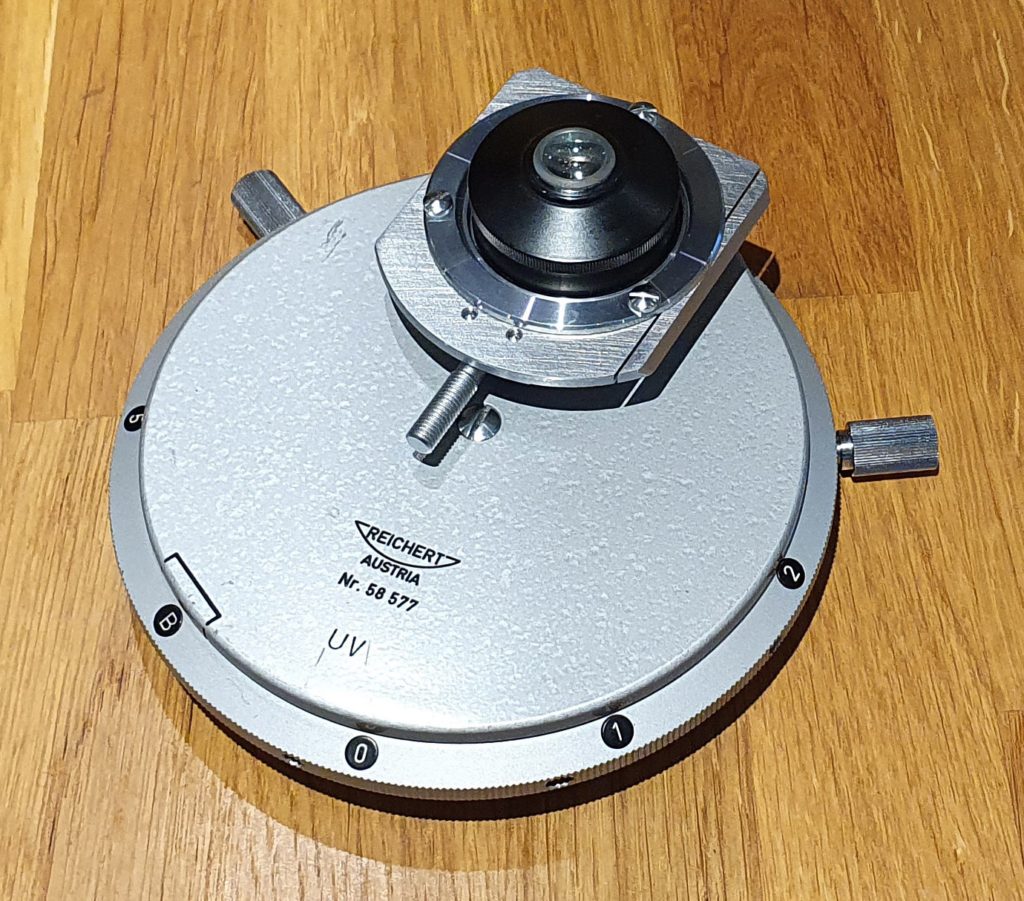
Let’s break this down into chunks, and start addressing the problem. The condenser does a vital job of focusing the light onto the subject. This, then obviously needs to be able to transmit the UV. In my sunscreen imaging work, I just used the standard Olympus Abbe condenser in the microscope. It’s a very basic design, but for UV transmission often simpler is better. I also have an Olympus BH-AAC Aplanat Achromat condenser which is much higher optical quality. While hunting around on eBay, I came across a Reichert UV condenser for sale in Russia. Reichert (based in Vienna) made some extremely high quality microscopes, and given this said ‘UV’ on it, and that the vendor didn’t want to much for it, made it an obvious candidate for testing. Here’s a picture of the Reichert UV condenser.
When it arrived I measured the transmission from 280nm to 420nm through all three condensers, and I got the following curves.
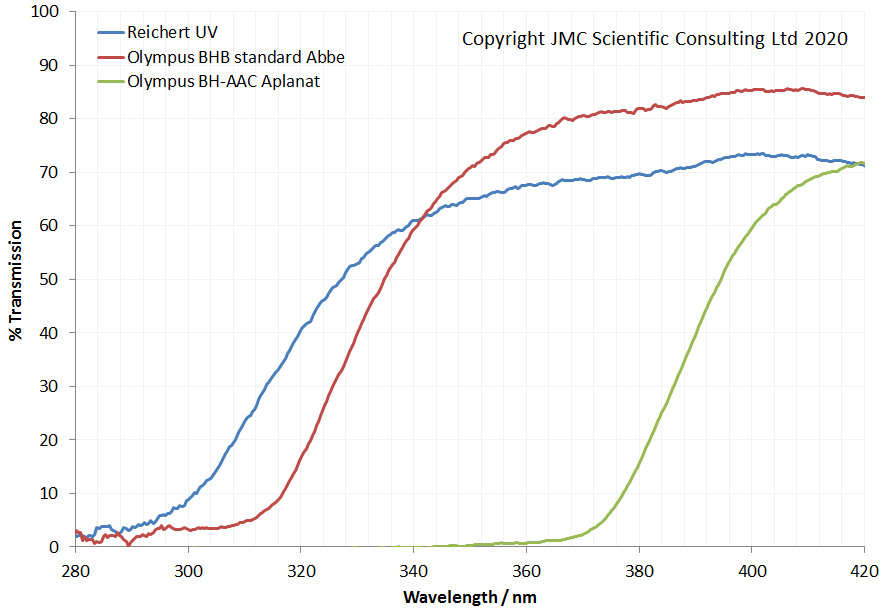
So what is going on here? The BH-AAC Aplanat is letting very little UV through, so is obviously no good for UV imaging. Not a huge surprise, as it has multiple elements, and is likely coated to optimise visible light transmission. The standard Abbe condenser is actually pretty good for UV transmission down to about 350nm. Below that it tails off, and is pretty much blocking the UV below 320nm. This then was a lucky choice for my initial UV transmission microscopy work, but would obviously be no good for looking below 320nm. The Reichert UV condenser does let shorter wavelength light through than the Olympus Abbe condenser, but even this is blocking almost everything below 300nm. It’s a shame, as I thought with the name ‘UV’ this might have been better. Yes, it could potentially be used at 320nm, but not really much lower. In hind sight I should have realised that this was still a glass condenser, and was not going to be any use below 300nm, but c’est la vie…..
None of the tested condensers are really useful for the ‘low 300’s nm’ region of UV. So where does this leave me? I could get a custom made UV condenser, which is an option but not a cheap one. Another option was to look for a quartz condenser from an old microscope. Quartz condensers should have good transmission down to around 200nm. But they are not common, in fact they are very rare.
I actually found an antique Zeiss quartz condenser for sale in the US, and after putting in an offer on it managed to buy it. It is currently in the US waiting for a time when flying gets back to normal and I can collect it. I shall update on that when I finally get hold of it for testing.
In the mean time while I am waiting for the quartz condenser, there are plenty of other aspects of the UV microscope design to test and optimise. As mentioned above, this will not be a quick project, and I’ll update the progress on it as and when I can. A lot of the information I put in here which cover things like transmission through lenses and objectives, is not available elsewhere, and I am sharing this in case it of of use to anyone else venturing down this road. Ideally I’d like to find another Olympus BHB which I can use a donor for the project, rather than risk damaging mine while I convert the internal optics. If you want to know more about this (and you have an Olympus BHB you’d like to donate, hint, hint), or any other aspect of my research, you can reach me here. Thanks for reading, and happy sciencing…..