
“It’s just the little things, the incidentals….”
While I was at University one of my favourite bands was Alisha’s Attic, and like many I still enjoy putting the old CDs on and listening to music from what feels like a lifetime ago. The line above is from one of their songs, called (not surprisingly) The Incidentals. It came to mind as I was thinking about writing this piece that the world of UV imaging is like this. Simple things which we don’t worry too much about in visible light imaging can have huge impact when working in the UV. So, without further ado, I present the case for the humble microscope slide and coverslip…..
When it comes to microscopy, there’s little which can be thought of as simpler than these items. Pieces of glass used to mount the sample, we take them out of the box, give them a little clean, and then that’s about it. But for UV imaging glass has a bit of a problem. Depending on the wavelengths you use, it isn’t always transparent, which if you’re trying to get light to go through it is a bit of a problem.
UV lighting can be done in number of ways, but one of the common routes for microscopy is to use mercury xenon lamps. These have high UV output, with some very very strong narrow bands superimposed on a broad background of emission. Using filters, you can get narrow UV bands which can be used for both transmission and fluorescence imaging. So what do glass slides look under UV, and how does wavelength impact how they behave?
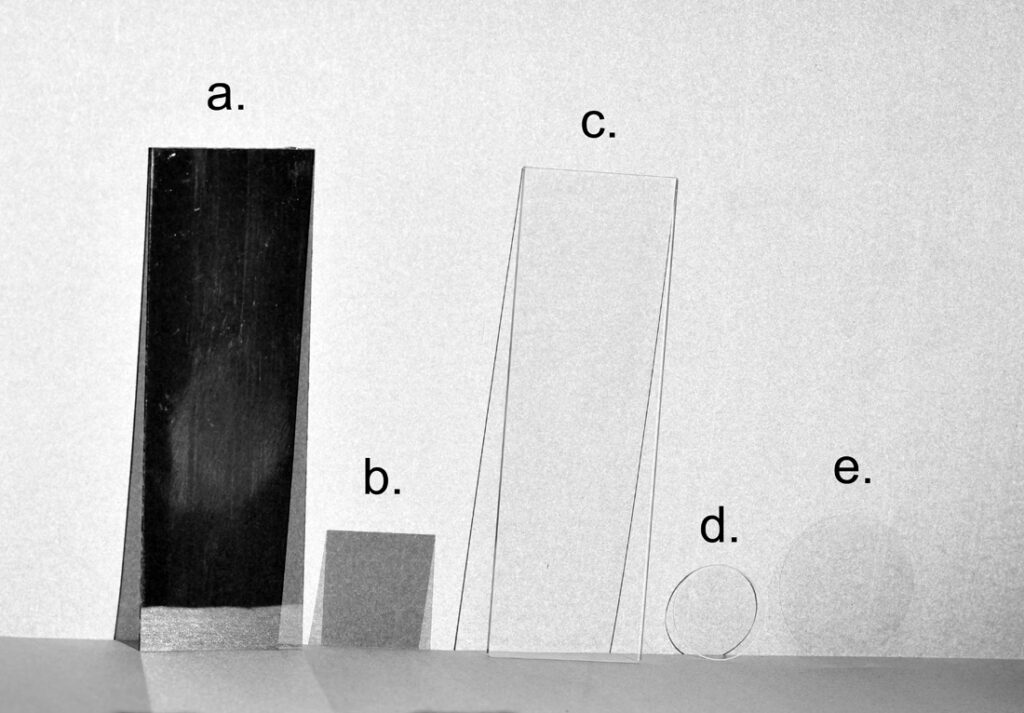
To compare with the glass slides and coverslips, I sourced some quartz and fused silica components from UQG Optics, who I get some of my optical filters from. For my testing I had 5 coverslips and slides; a. Standard 1.1mm thick glass slide, b. standard 0.17mm thick glass coverslip, c. Quartz microscope slide 1mm thick, d. UV fused silica 0.35mm thick coverslip, and e. Quartz 0.17mm thick coverslip.
The first set of images is how they behave with UV transmission. For imaging I used my monochrome converted Nikon d850 camera, a Rayfact 105mm UV lens, and Edmund Optic OD4 band pass filters (313nm or 365nm). Light source was a 200W Hamamatsu LC8 mercury xenon lamp. Slides were imaged against a white paper background.
Here’s how they look at 313nm (UVB region).
And, now the same slides/coverlips imaged at 365nm.
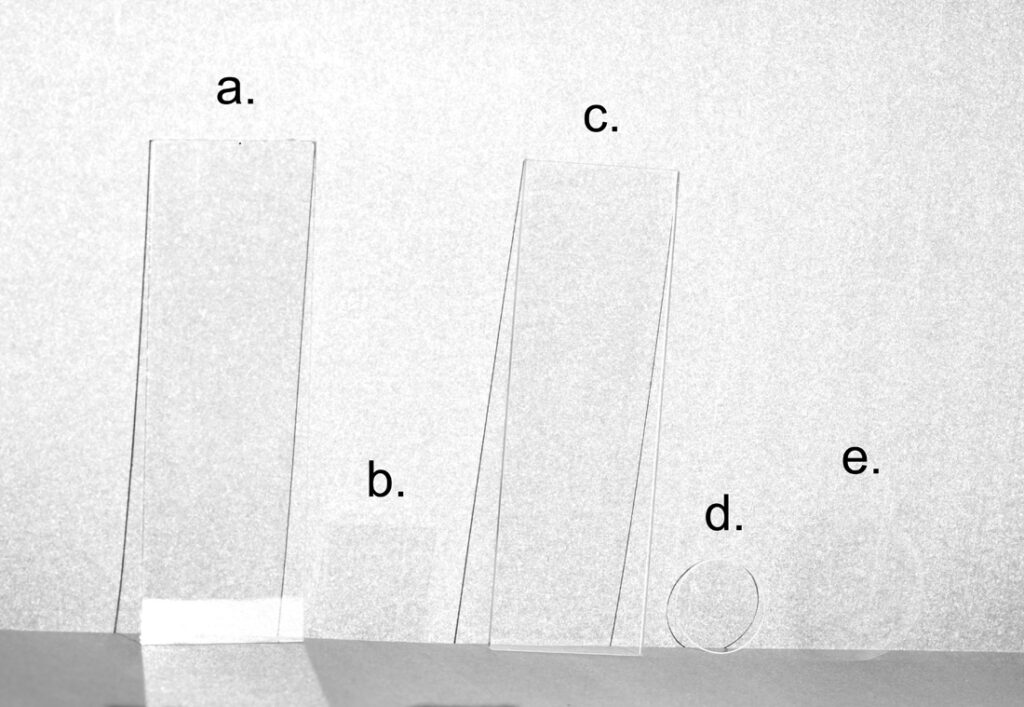
It’s pretty obvious that the glass slide is absorbing most if not all the 313nm light, and even the coverslip which is only 0.17mm thick is absorbing a lot of it. The quartz and UV fused silica components are on the other hand essentially transparent (other than a little bit of surface reflection reducing the effective transmission). At 365nm the story is different. Now the conventional glass slide and coverslip are transparent just like the quartz and UV fused silica ones. I also measured the transmission spectra through each of these using my Ocean Optics spectrometer and deuterium light source.
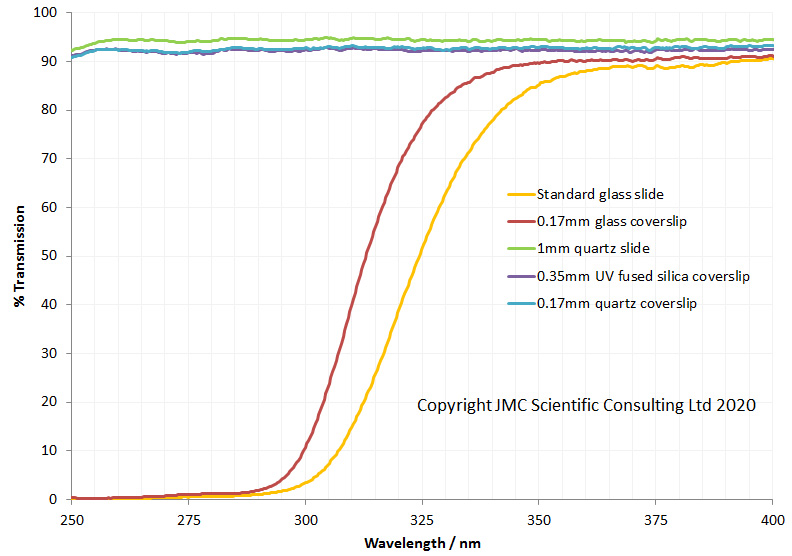
The transmission spectra back up what was seen in the UV images. I can measure down to 250nm with my system, but the quartz and UV fused silica will go on transmitting well below that.
Looking at the results above you may be thinking that the conventional glass slide and coverslip will be fine for UVA imaging at around 365nm. Well, yes and no, and it depends on how you set up your filters, lighting and camera in the system. In addition to how they transmit light you need to consider how they might fluoresce under UV light. To test this required a slightly different setup. The same light source was used, but now the 313nm or 365nm filter was put in front of the light source. The room was completely dark, so the only light came from fluorescence caused by the UV. The samples were placed inside a box painted with Semple Black 2.0 paint (which has high UV absorption and low fluorescence). Imaging was done with a conventional Canon EOS 5DSR camera and 105mm lens, and a 420nm long pass filter (to remove any light not caused by fluorescence).
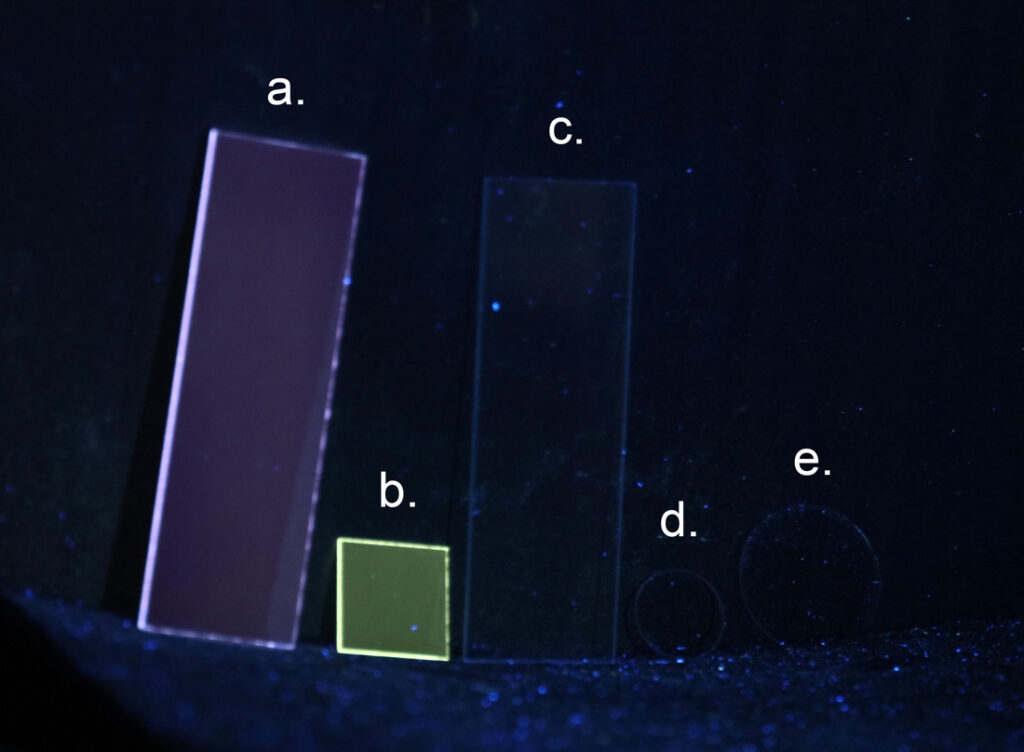
First, the fluorescence image when illuminated under 313nm light.
And now when illuminated using 365nm light.
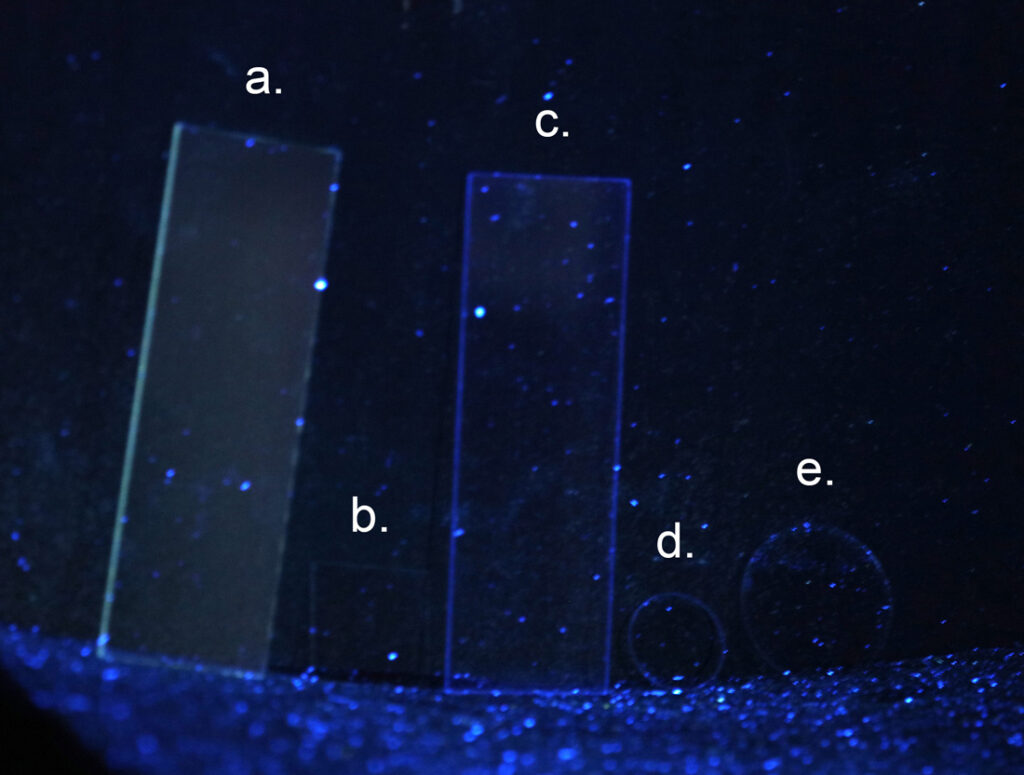
At 313nm, the glass slide and coverslip (a. and b.) both fluoresce and emit visible light. Interestingly they are emitting different wavelengths, and even though the coverslip is thin, its fluorescence is very bright. Under 365nm light the glass slide still fluoresces, but now the coverslip looks dark. Very interesting, not only do the normal glass components fluoresce but it is wavelength dependent. Also the specific glass slide and coverslip you have will impact how much it fluoresces, so it pays to shop around. Typically higher priced and higher quality glass will have fewer impurities and lower fluorescence, but that is not a hard and fast rule.
You can also see lots of blue dots in the image, especially with the 365nm irradiation. This is dust from clothes which contains optical brighteners from laundry detergents. It is the bane of UV fluorescence photographers. Rooms which looks clean under visible light, light up like a Christmas tree under UV light due to this dust. It give an overall blue ‘hue’ to the image at 365nm. The quartz and UV fused silica components are effectively non-fluorescent at either wavelength.
The quartz and UV fused silica components offer great transmission, and are non-fluorescent under UV. Why not just use these instead of glass slides whenever working with UV? Well, they have one major drawback, and that is cost. The glass slides and coverslips cost a few pence each. Depending on what they are being used for they can be thought of as disposable – use once and throw away. Anyone who’s ever tried cleaning coverslips will understand why this is the case. The quartz and UV fused silica components are certainly not disposable. The 1mm quartz microscope slides cost around 13GBP each, the 0.35mm thick coverslips also about 13GBP each, and the 0.17mm thick coverslips around 36GBP each!!! Overall, you’re looking at the order of 100x to 1000x the cost of glass equivalents. With that in mind these are not disposable items. The thought of trying to clean a 24mm diameter 0.17mm thick coverslip after use fills me with dread……
UV microscopy presents some unique challenges that visible light imaging does not. Even the choice of things such as the slide or coverslip you use, which may seem inconsequential or incidental under visible light, become vital to consider, especially when looking at short wavelength UV imaging. In fact every component of the optical train needs to be optimised, modified and tested when doing UV imaging and microscopy. If you want to know more about this or any other aspect of my work, you can reach me here.